SpringMVC-拦截器
SpringMVC-拦截器
学习核心
拦截器概念核心
拦截器执行流程
使用拦截器实现用户登录权限验证
拦截器与过滤器的区别
学习资料
拦截器概述
- 对于任何优秀的MVC框架,都会提供一些通用的操作,如请求数据的封装、类型转换、数据校验、解析上传的文件、防止表单的多次提交等。早期的MVC框架将这些操作都写死在核心控制器中,而这些常用的操作又不是所有的请求都需要实现的,这就导致了框架的灵活性不足,可扩展性降低
- SpringMVC提供了Interceptor拦截器机制,类似于Servlet中的Filter过滤器,用于拦截用户的请求并做出相应的处理。比如通过拦截器来进行用户权限验证,或者用来判断用户是否已经登录。Spring MVC拦截器是可插拔式的设计,需要某一功能拦截器,只需在配置文件中应用该拦截器即可;如果不需要这个功能拦截器,只需在配置文件中取消应用该拦截器。
- 在Spring MVC中定义一个拦截器有两种方法:实现HandlerInterceptor接口,实现WebRequestInterceptor接口
拦截器的实现
1.拦截器实现思路
SpringMVC实现拦截器:
SpringMVC中的拦截器类似于Servlet的过滤器,用于在请求服务器前后进行拦截和处理,其开发步骤说明如下:
- 定义拦截器(实现HandlerInterceptor接口、或者实现WebRequestInterceptor接口)
- 在核心配置文件(如springmvc.xml)中配置拦截器
- 在controller编写接口执行拦截测试
HandlerInterceptor
public interface HandlerInterceptor {
    default boolean preHandle(HttpServletRequest request, HttpServletResponse response, Object handler) throws Exception {
        return true;
    }

    default void postHandle(HttpServletRequest request, HttpServletResponse response, Object handler, @Nullable ModelAndView modelAndView) throws Exception {
    }

    default void afterCompletion(HttpServletRequest request, HttpServletResponse response, Object handler, @Nullable Exception ex) throws Exception {
    }
}
- preHandle:进入Handler前执行,即在controller内容调用前执行。返回true表示向下执行,返回false表示终止往下执行(可用于身份鉴权拦截等场景)
- postHandle:进入controller方法但还没返回视图之前执行(可用于将公共的模型数据(例如导航菜单)传递到视图)
- afterCompletion:controller方法执行完成之后执行(可用于统一的影响处理、日志信息处理、资源清理等场景)
自定义拦截器实现HandlerInterceptor,HandlerInterceptor提供了默认方法,接口实现可直接调用父接口的默认方法或者自定义
public class MyHandlerInterceptor implements HandlerInterceptor {
    @Override
    public boolean preHandle(HttpServletRequest request, HttpServletResponse response, Object handler) throws Exception {
        return HandlerInterceptor.super.preHandle(request, response, handler);
    }

    @Override
    public void postHandle(HttpServletRequest request, HttpServletResponse response, Object handler, ModelAndView modelAndView) throws Exception {
        HandlerInterceptor.super.postHandle(request, response, handler, modelAndView);
    }

    @Override
    public void afterCompletion(HttpServletRequest request, HttpServletResponse response, Object handler, Exception ex) throws Exception {
        HandlerInterceptor.super.afterCompletion(request, response, handler, ex);
    }
}
WebRequestInterceptor
public interface WebRequestInterceptor {
    void preHandle(WebRequest var1) throws Exception;

    void postHandle(WebRequest var1, @Nullable ModelMap var2) throws Exception;

    void afterCompletion(WebRequest var1, @Nullable Exception var2) throws Exception;
}
WebRequestInterceptor中也定义了三个方法,也是通过这三个方法来实现拦截的。这三个方法都传递了同一个参数WebRequest, WebRequest 是Spring 定义的一个接口,它里面的方法定义都基本跟HttpServletRequest 一样,在WebRequestInterceptor 中对WebRequest 进行的所有操作都将同步到HttpServletRequest 中,然后在当前请求中一直传递
- preHandle:controller执行前执行,该方法返回值为void(无法用于请求阻断,一般用于资源准备)
- postHandle:preHandle 中准备的数据都可以通过参数WebRequest访问。ModelMap 是Controller 处理之后返回的Model 对象,可以通过改变它的属性来改变Model 对象模型,达到改变视图渲染效果的目的
- afterCompletion:Exception 参数表示的是当前请求的异常对象,如果Controller 抛出的异常已经被处理过,则Exception对象为null
自定义拦截器实现WebRequetInterceptor
public class MyWebRequestInterceptor implements WebRequestInterceptor {
    @Override
    public void preHandle(WebRequest webRequest) throws Exception {

    }

    @Override
    public void postHandle(WebRequest webRequest, ModelMap modelMap) throws Exception {

    }

    @Override
    public void afterCompletion(WebRequest webRequest, Exception e) throws Exception {

    }
}
2.拦截器实现参考
此处案例基于此前的springmvc样例工程springmvc-demo进行测试
定义拦截器(实现HandlerInterceptor接口、或者实现WebRequestInterceptor接口)
public class MyHandlerInterceptor implements HandlerInterceptor {
    @Override
    public boolean preHandle(HttpServletRequest request, HttpServletResponse response, Object handler) throws Exception {
        System.out.println("MyHandlerInterceptor 进入controller前执行");
        // 返回true,继续向下执行
        return true;
    }

    @Override
    public void postHandle(HttpServletRequest request, HttpServletResponse response, Object handler, ModelAndView modelAndView) throws Exception {
        System.out.println("MyHandlerInterceptor 进入controller返回ModelAndView前执行");
    }

    @Override
    public void afterCompletion(HttpServletRequest request, HttpServletResponse response, Object handler, Exception ex) throws Exception {
        System.out.println("MyHandlerInterceptor 执行完controller后执行");
    }
}
public class MyWebRequestInterceptor implements WebRequestInterceptor {
    @Override
    public void preHandle(WebRequest webRequest) throws Exception {
        System.out.println("MyWebRequestInterceptor preHandle");
    }

    @Override
    public void postHandle(WebRequest webRequest, ModelMap modelMap) throws Exception {
        System.out.println("MyWebRequestInterceptor postHandle");
    }

    @Override
    public void afterCompletion(WebRequest webRequest, Exception e) throws Exception {
        System.out.println("MyWebRequestInterceptor afterCompletion");
    }
}
拦截器配置
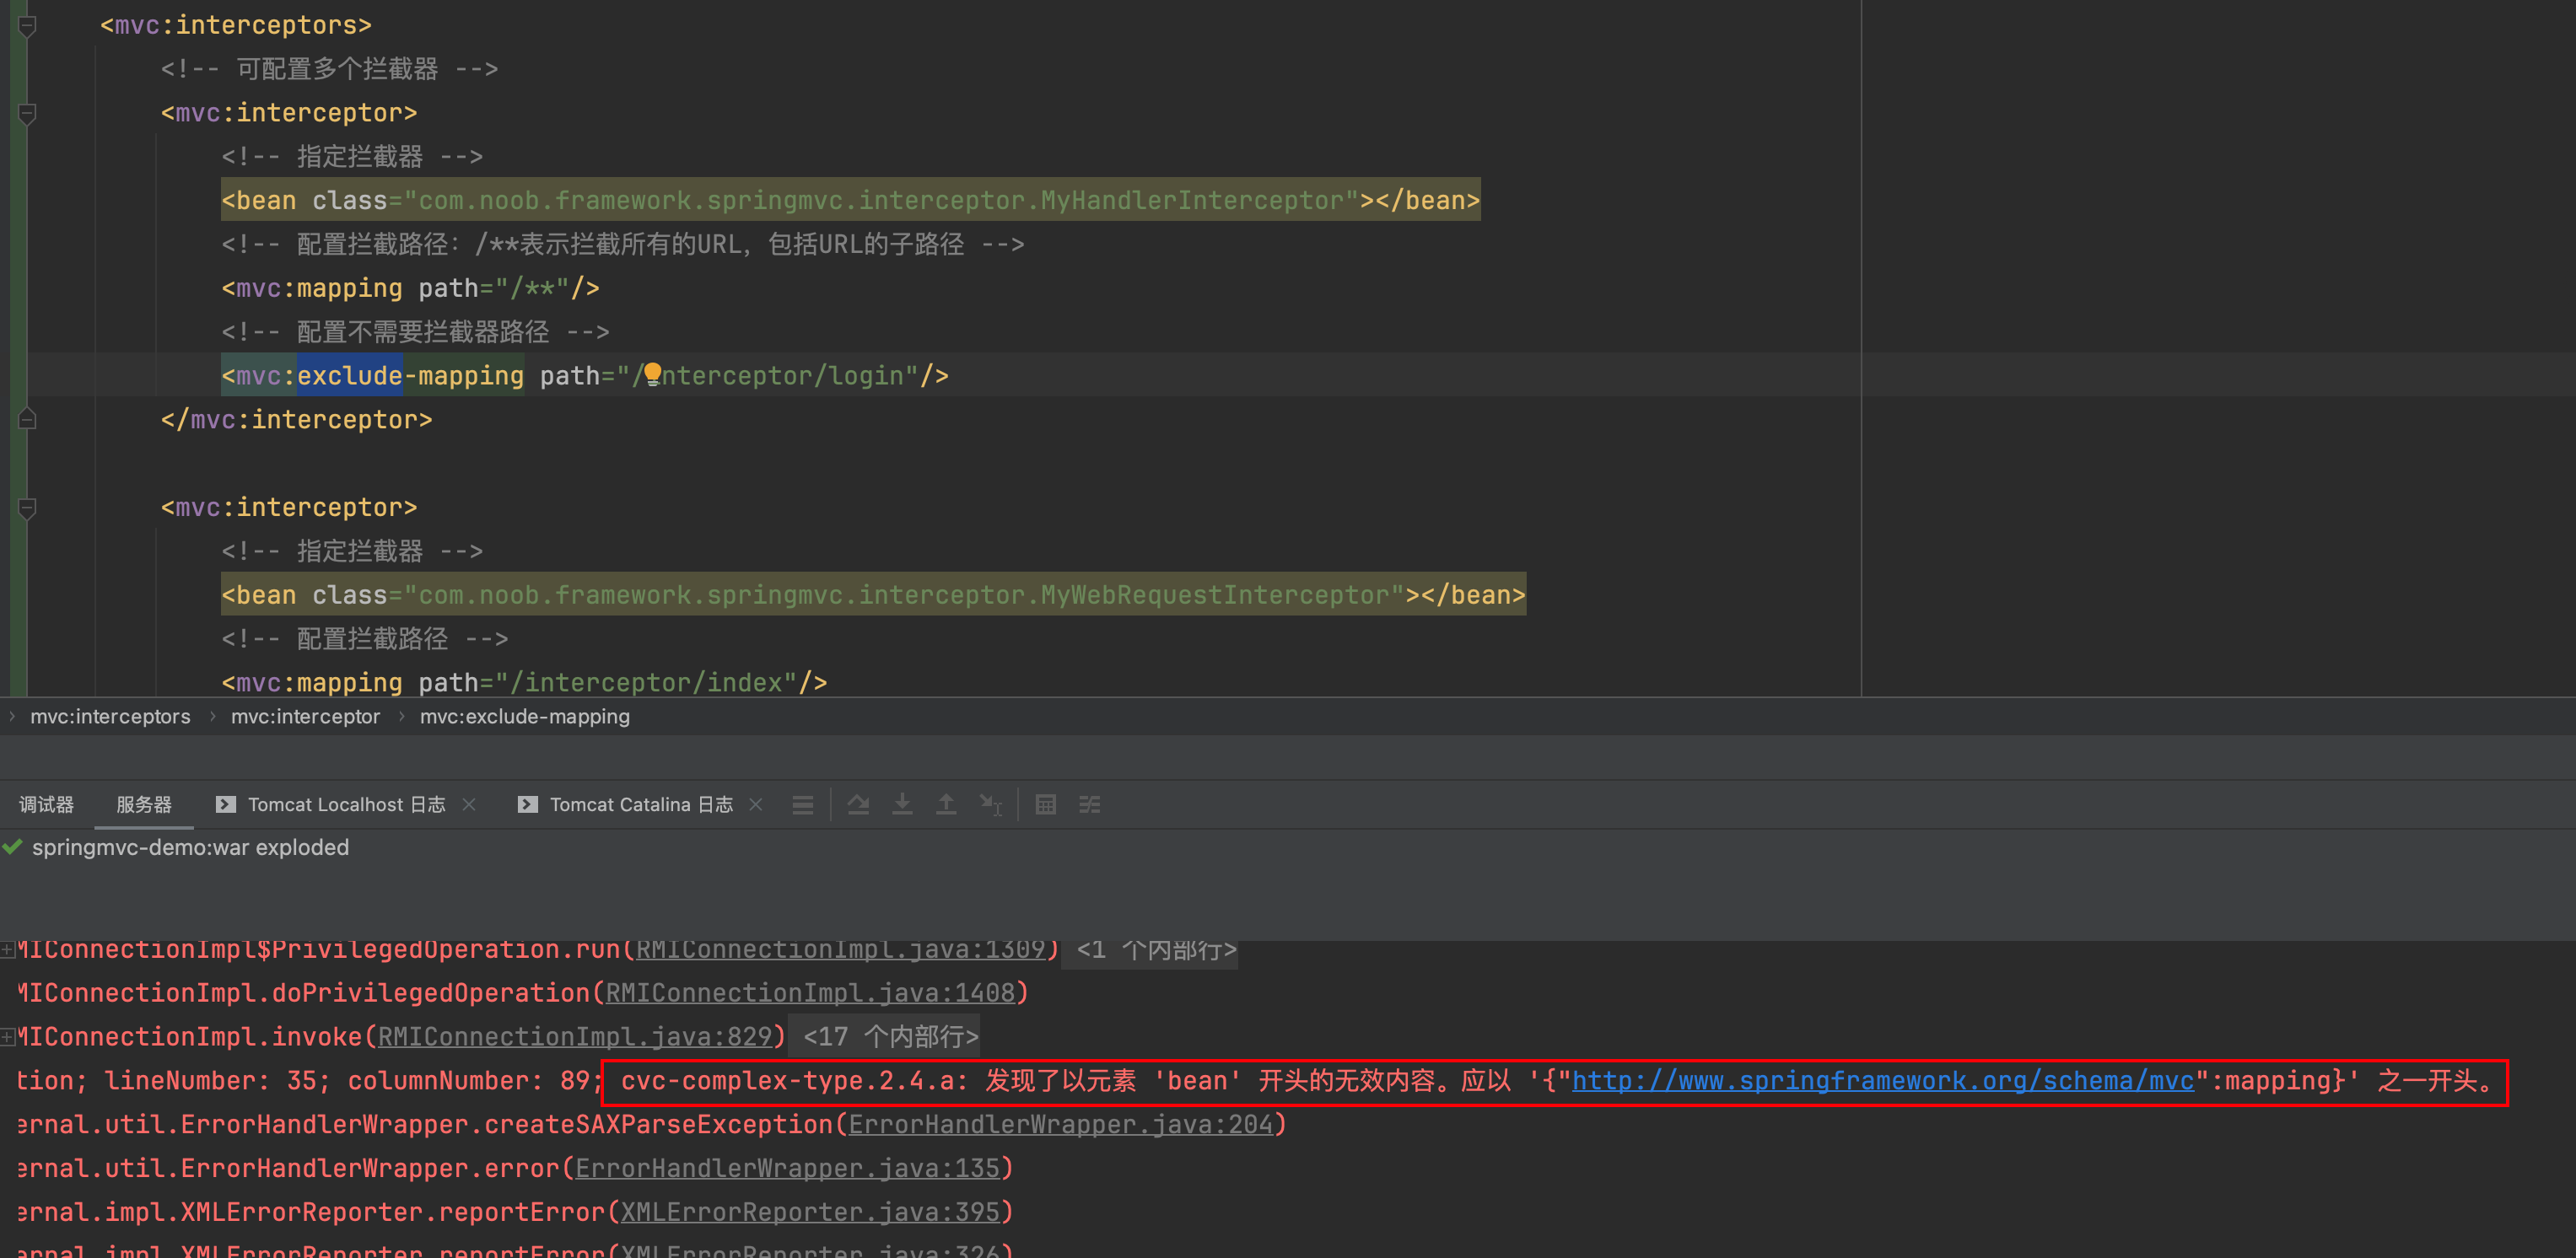
单个拦截器mvc:interceptor配置必须按照:mvc:mapping、mvc:exclude-mapping、bean顺序进行配置,否则程序解析错误

<!-- 拦截器配置 -->
<mvc:interceptors>
  <!-- 可配置多个拦截器 -->
  <mvc:interceptor>
    <!-- 配置拦截路径:/**表示拦截所有的URL,包括URL的子路径 -->
    <mvc:mapping path="/**"/>
    <!-- 配置不需要拦截器路径 -->
    <mvc:exclude-mapping path="/interceptor/login"/>
    <!-- 指定拦截器 -->
    <bean class="com.noob.framework.springmvc.interceptor.MyHandlerInterceptor"></bean>
  </mvc:interceptor>

  <mvc:interceptor>
    <!-- 配置拦截路径 -->
    <mvc:mapping path="/interceptor/index"/>
    <!-- 指定拦截器 -->
    <bean class="com.noob.framework.springmvc.interceptor.MyWebRequestInterceptor"></bean>
  </mvc:interceptor>
</mvc:interceptors>
controller层定义
// 控制器定义
@RestController
@RequestMapping("/interceptor")
public class InterceptorController {

    @RequestMapping(value = "index", method = RequestMethod.GET)
    public String index() {
        System.out.println("------controller index方法执行------");
        return "success";
    }

    @RequestMapping(value = "login", method = RequestMethod.GET)
    public String login() {
        System.out.println("------controller login方法执行------");
        return "login success";
    }
}
接口访问测试
# http://localhost:8080/springmvc/interceptor/index
MyHandlerInterceptor 进入controller前执行
MyWebRequestInterceptor preHandle
------controller index方法执行------
MyWebRequestInterceptor postHandle
MyHandlerInterceptor 进入controller返回ModelAndView前执行
MyWebRequestInterceptor afterCompletion
MyHandlerInterceptor 执行完controller后执行

# http://localhost:8080/springmvc/interceptor/login
# 没有被拦截,因为MyHandlerInterceptor过滤掉了该路径,且MyWebRequestInterceptor配置了只拦截index
------controller login方法执行------

# 测试其他接口:http://localhost:8080/springmvc/hello/index
MyHandlerInterceptor 进入controller前执行
MyHandlerInterceptor 进入controller返回ModelAndView前执行
MyHandlerInterceptor 执行完controller后执行
拦截器执行流程
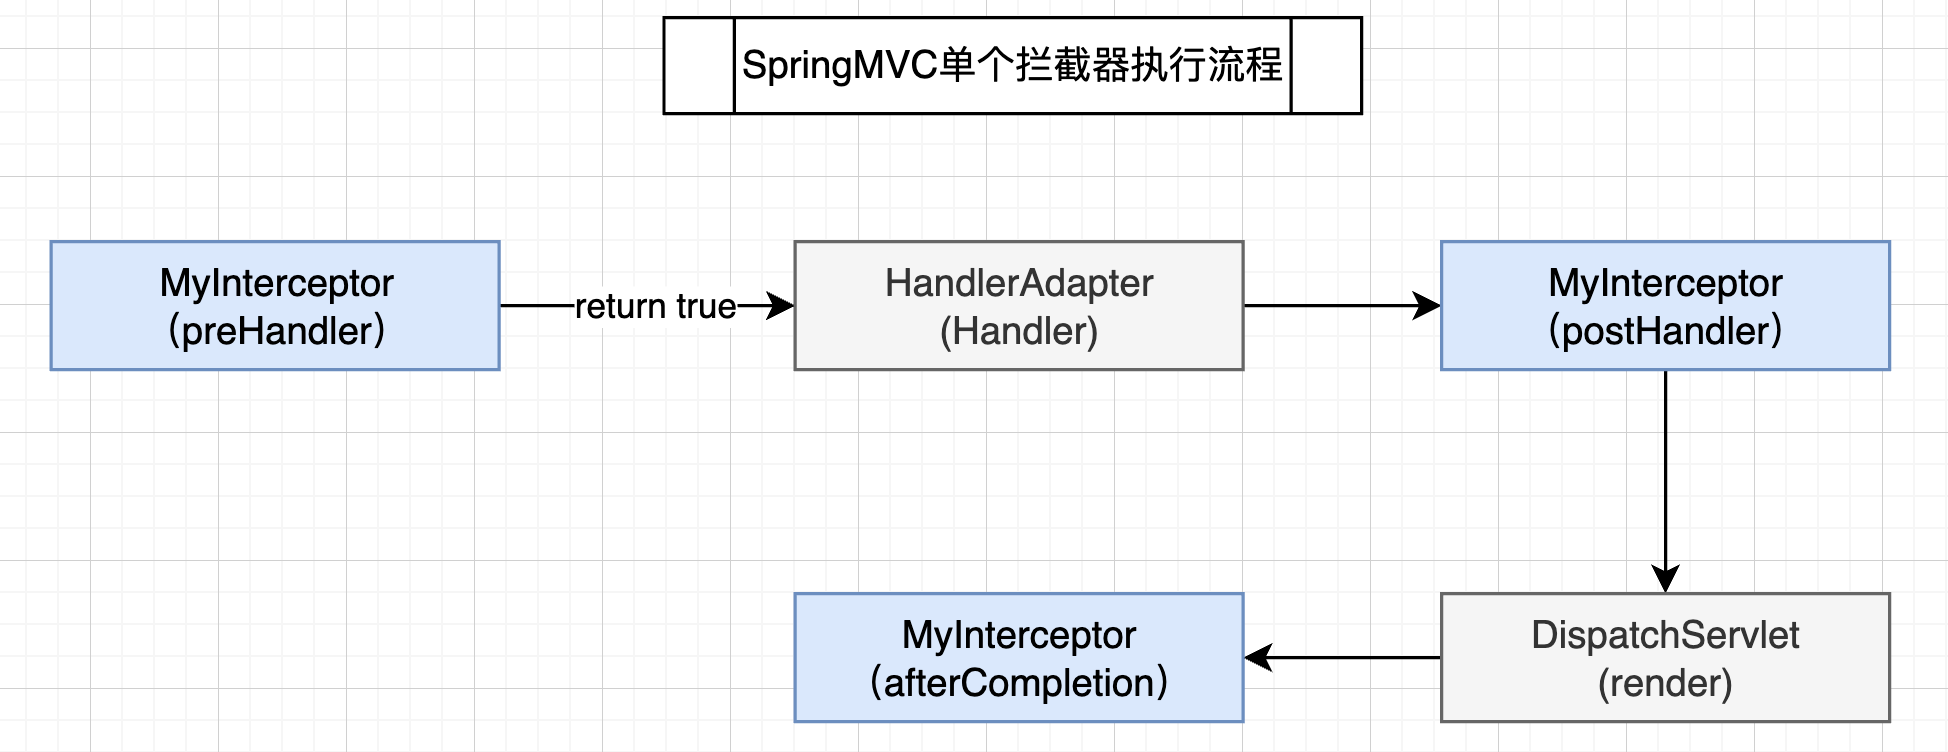
单个拦截器的执行流程
运行程序时,拦截器的执行时有一定顺序的,该顺序与配置文件中所定义的拦截的顺序相关。如果程序中只定义了一个拦截器,则该单个拦截器在程序中的执行流程如图所示

多个拦截器的执行流程
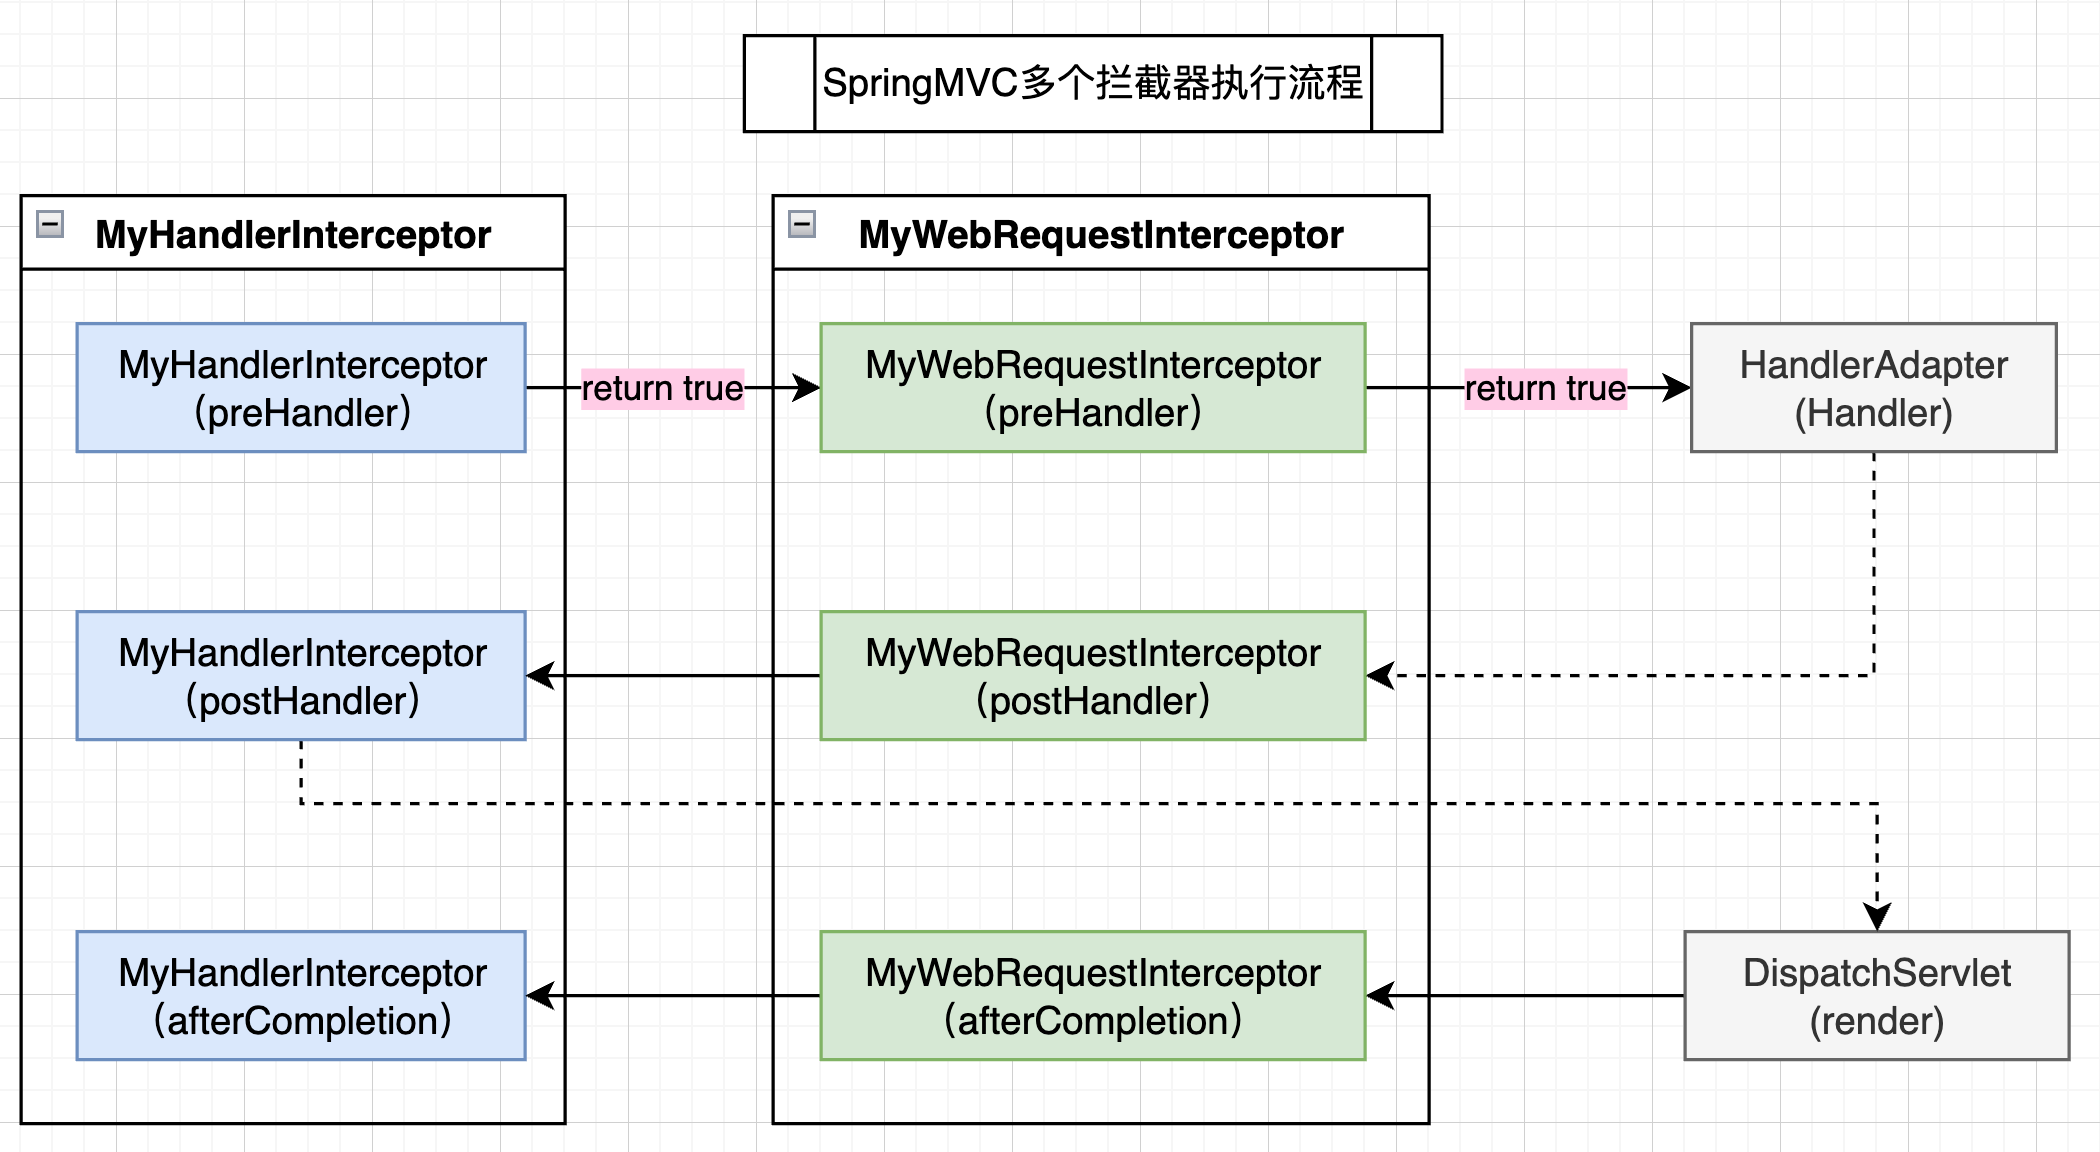
在一个Web工程中,甚至在一个HandlerMapping处理器适配器中都可以配置多个拦截器,每个拦截器都按照提前配置好的顺序执行。它们内部的执行规律并不像多个普通Java类一样,它们的设计模式是**基于“责任链”**的模式。
下面通过图例来描述多个拦截器的执行流程,以案例中的两个拦截器MyHandlerInterceptor和MyWebRequestInterceptor,将MyHandlerInterceptor配置在前,则其执行流程如图所示(可以结合上述案例中的输出进行理解分析)
MyHandlerInterceptor 进入controller前执行
MyWebRequestInterceptor preHandle
------controller index方法执行------
MyWebRequestInterceptor postHandle
MyHandlerInterceptor 进入controller返回ModelAndView前执行
MyWebRequestInterceptor afterCompletion
MyHandlerInterceptor 执行完controller后执行

当多个拦截器同时工作的时候,preHandler()方法会按照配置文件中拦截器的配置顺序执行,而postHandler()和afterCompletion()方法则会按照配置顺序的反序执行
拦截器应用场景
1.用户登录权限验证
构建思路
- 创建LoginInterceptor登录拦截器
- 创建登录页面login.jsp、主界面index.jsp
- 创建登录接口、主页接口
接口定义
@Data
public class LoginUser {
    private String username;
    private String password;
}
// 控制器定义
@Controller
@RequestMapping("/index")
public class IndexController {

    @RequestMapping(value = "toIndex")
    public String index() {
        // 跳转到index页面
        return "index";
    }

    @RequestMapping(value = "toLogin")
    public String toLogin() {
        // 跳转到登录页面
        return "login";
    }

    @RequestMapping(value = "login")
    public String login(LoginUser loginUser, HttpSession session, HttpServletRequest request) {
        // 执行登录操作,模拟默认账号验证
        String defaultUsername = "noob";
        String defaultPassword = "123456";
        if(defaultUsername.equals(loginUser.getUsername()) && defaultPassword.equals(loginUser.getPassword())) {
            // 保存session记录(此处只是简单保存信息,正常保存登录信息为用户实体)
            session.setAttribute("current_user", loginUser);
            // 登录成功后跳转主页
            return "redirect:/index/toIndex";
        }else{
            request.setAttribute("message", "用户名或密码错误");
            // 登录失败后跳转登录页面
            return "redirect:/index/login";
        }
    }

    @RequestMapping(value = "logout")
    public String logout(HttpSession session) {
        // 注销操作
        session.invalidate();
        // 注销成功跳转登录页面
        return "redirect:/index/login";
    }
}
页面定义
- index.jsp
<%@ page contentType="text/html;charset=UTF-8" language="java" %>
<%@ taglib prefix="c" uri="http://java.sun.com/jsp/jstl/core" %>
<!DOCTYPE html>
<html lang="zh-CN">
<head>
    <meta charset="utf-8">
    <meta http-equiv="X-UA-Compatible" content="IE=edge">
    <meta name="viewport" content="width=device-width, initial-scale=1">

    <title>Index</title>

    <c:if test="${requestScope.username!=null}">${requestScope.username} <a href="${pageContext.request.contextPath }/index/logout">退出登录</a> </c:if>

</head>
<body>
<div class="container">
   hello SpringMVC
</div>
</body>
</html>
- login.jsp
<%@ page language="java" contentType="text/html; charset=UTF-8"
         pageEncoding="UTF-8"%>
<!DOCTYPE html>
<html>
<head>
    <meta charset="UTF-8">
    <title>登录页面</title>
</head>
<body>
<font color="red">${requestScope.message }</font><br/><br/>
<h3>登录页面</h3>
<form action="${pageContext.request.contextPath }/index/login" method="post">
    账号:<input type="text" name="username"/><br/><br/>
    密码:<input type="password" name="password"/><br/><br/>
    <input type="submit" value="登录"/>
</form>
</body>
</html>
LoginInterceptor:登录拦截器
package com.noob.framework.springmvc.interceptor;

import org.springframework.web.servlet.HandlerInterceptor;
import org.springframework.web.servlet.ModelAndView;

import javax.servlet.http.HttpServletRequest;
import javax.servlet.http.HttpServletResponse;

public class LoginHandlerInterceptor implements HandlerInterceptor {
    @Override
    public boolean preHandle(HttpServletRequest request, HttpServletResponse response, Object handler) throws Exception {
        // 登录校验,获取请求的URI
        String url=request.getRequestURI();
        if(!url.toLowerCase().contains("login")) {
            //非登录请求,获取session,判断是否有用户数据
            if(request.getSession().getAttribute("current_user")!=null) {
                // 传输登录用户信息
                request.setAttribute("username", request.getSession().getAttribute("current_user"));
                //已经登录,放行
                return true;
            }else {
                //没有登录则跳转到登录页面
                request.setAttribute("message", "您还没有登录,请先登录");
                request.getRequestDispatcher("/index/toLogin").forward(request, response);
            }
        }else {
            return true;//登录请求,放行
        }
        return false;//默认拦截
    }

    @Override
    public void postHandle(HttpServletRequest request, HttpServletResponse response, Object handler, ModelAndView modelAndView) throws Exception {
    }

    @Override
    public void afterCompletion(HttpServletRequest request, HttpServletResponse response, Object handler, Exception ex) throws Exception {
    }
}
拦截器配置:springmvc.xml
<!-- 配置登录拦截器 -->
<mvc:interceptor>
  <!-- 配置拦截路径 -->
  <mvc:mapping path="/index/toIndex"/>
  <!-- 指定拦截器 -->
  <bean class="com.noob.framework.springmvc.interceptor.LoginHandlerInterceptor"></bean>
</mvc:interceptor>
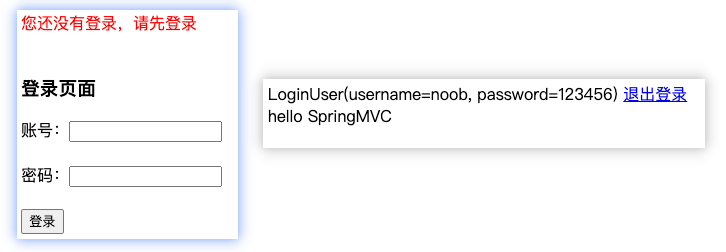
访问测试
http://localhost:8080/springmvc/index/toIndex
首次访问用户未登录,会自动跳转到登录页面,随后输入登录信息进行验证。验证成功后会自动跳转到主页。再次访问该链接,此时用户登录信息已经保存到session域,则被认定为已登录状态

