Spring-DI
Spring-DI
学习核心
核心:三级缓存和循环依赖问题
掌握什么是Spring循环依赖?如何解决?
为什么要三级缓存?两级缓存可以解决循环依赖吗?
三级缓存能解决所有的循环依赖吗?
学习资料
依赖注入
1.依赖注入基础概念
依赖注入核心
依赖注入(DI:Dependency Injection)
当某个 Java 实例需要另一个 Java 实例时,使用 Spring 之前都是由调用者创建(使用 new 关键字获得被调用者实例)被调用者的实例,而使用 Spring 框架后,被调用者的实例不再由调用者创建,而是由 Spring IoC 容器创建,这称为控制反转(即 IOC)
Spring IOC 容器在创建被调用者的实例时,会自动将调用者需要的对象实例注入给调用者(调用者通过 Spring IoC 容器获得被调用者实例),这称为依赖注入(即 DI)
2.依赖注入的方式(Bean的装配方式)
依赖注入的方式(Bean的装配方式)
- 基于XML方式
- 基于注解(Annotation)方式
- 基于自动装配的依赖注入
- 静态工厂注入
- 实例工厂注入
案例说明
创建一个原生mavne项目,随后引入spring相关依赖
<properties>
  <maven.compiler.source>8</maven.compiler.source>
  <maven.compiler.target>8</maven.compiler.target>
  <project.build.sourceEncoding>UTF-8</project.build.sourceEncoding>
  <spring.version>5.3.20</spring.version>
</properties>

<dependencies>
  <!-- Spring Core -->
  <dependency>
    <groupId>org.springframework</groupId>
    <artifactId>spring-core</artifactId>
    <version>${spring.version}</version>
  </dependency>

  <!-- Spring Context -->
  <dependency>
    <groupId>org.springframework</groupId>
    <artifactId>spring-context</artifactId>
    <version>${spring.version}</version>
  </dependency>

  <!-- Spring Web -->
  <dependency>
    <groupId>org.springframework</groupId>
    <artifactId>spring-web</artifactId>
    <version>${spring.version}</version>
  </dependency>

  <!-- 其他需要的模块... -->
</dependencies>
基于XML方式
(1)设置方法注入(setter injection)
基于设置方法注入,也可以叫做setter方法注入(最简单的注入方式)
指 IOC 容器使用 setter 方法注入被依赖的实例。通过调用无参构造器或无参 static 工厂方法实例化 bean 后,调用该 bean 的 setter 方法,即可实现基于 setter 的 DI。
目的:在UserService接口的实现类UserServiceImpl中用setter方法初始化UserDao的对象
构建参考:UserDao、UserDaoImpl、UserService、UserServiceImpl
DI说明:在xml配置文件中装配UserDao属性,在UserServiceImpl实现类中通过setter方法初始化UserDao
类定义
// UserDao
public interface UserDao {
    public boolean save(String userName);
}

// UserDaoImmpl
public class UserDaoImpl implements UserDao{
    public boolean save(String userName){
        System.out.println("mod save:" + userName);
        return true;
    }
}

// UserService
public interface UserService {
    public void addUser(String userName);
}

// UserServiceImpl
public class UserServiceImpl implements UserService{

    // 1.接口声明
    private UserDao userDao;

    // 2.提供setter方法(DI)
    public void setUserDao(UserDao userDao) {
        this.userDao = userDao;
    }

    @Override
    public void addUser(String userName) {
        // 调用UserDao的保存方法
        userDao.save(userName);
    }
}
xml配置文件
<?xml version="1.0" encoding="UTF-8"?>
<beans xmlns="http://www.springframework.org/schema/beans"
       xmlns:xsi="http://www.w3.org/2001/XMLSchema-instance"
       xsi:schemaLocation="http://www.springframework.org/schema/beans http://www.springframework.org/schema/beans/spring-beans.xsd">

    <!-- 实例化UserDaoImpl -->
    <bean id="userDao" name="userDao" class="com.noob.framework.di.UserDaoImpl" >
        <!-- id:文件的唯一标识符(不能重复,驼峰命名法) name:别名 class:要实例化的Bean的全限定类名-->
    </bean>

    <!-- 还可设定别名标签:可通过IOC容器获取:applicationContext.getBean("user"); -->
    <alias name="userDao" alias="user"></alias>

    <!-- 实例化UserServiceImpl -->
    <bean id="userService" name="userService" class="com.noob.framework.di.UserServiceImpl">
        <!-- 将UserDao的实例对象(userDao)注入到UserService中 -->
        <property name="userDao" ref="userDao">
            <!-- name:对应UserServiceImpl类中声明的属性(对应变量名,或者注解指定的name属性) ref:对应bean的id或name -->
        </property>
    </bean>
</beans>
测试
public class SpringDITest {
    public static void main(String[] args) {
        // 读取xml配置
        ApplicationContext applicationContext = new ClassPathXmlApplicationContext("applicationContext.xml");
        // 通过IOC容器获得对象
        UserService userService = (UserService) applicationContext.getBean("userService"); // applicationContext.getBean("userService",UserService.class);
        // 调用方法测试
        userService.addUser("noob");
    }
}

// output
mod save:noob
过程说明:读取配置文件,创建IOC容器,使用SpirngIOC容器获取到userService实例,调用实例方法addUser,在该方法中调用了UserDaoImpl实现类的save方法(UserDao对象为IOC容器自动调用setter方法(对应setUserDao方法)注入)
(2)构造器注入(Constructor Injection)
指 IOC 容器使用构造方法注入被依赖的实例。基于构造器的 DI 通过调用带参数的构造方法实现,每个参数代表一个依赖,Spring 容器会根据 bean 中指定的构造方法参数来决定调用哪个构造函数
在上述案例基础上调整,将原有的setter注入方式调整为构造器注入
修改UserServiceImpl(将setter方式改为构造器方式)
public class UserServiceImpl implements UserService{

    // 1.接口声明
    private UserDao userDao;

    // 2.构造器注入(DI)
    public UserServiceImpl(UserDao userDao) {
        this.userDao = userDao;
    }

    @Override
    public void addUser(String userName) {
        // 调用UserDao的保存方法
        userDao.save(userName);
    }
}
修改applicationContext.xml:将property属性定义改为constructor-arg
<?xml version="1.0" encoding="UTF-8"?>
<beans xmlns="http://www.springframework.org/schema/beans"
       xmlns:xsi="http://www.w3.org/2001/XMLSchema-instance"
       xsi:schemaLocation="http://www.springframework.org/schema/beans http://www.springframework.org/schema/beans/spring-beans.xsd">

    <!-- 实例化UserDaoImpl -->
    <bean id="userDao" name="userDao" class="com.noob.framework.di.UserDaoImpl" >
        <!-- id:文件的唯一标识符(不能重复,驼峰命名法) name:别名 class:要实例化的Bean的全限定类名-->
    </bean>

    <!-- 还可设定别名标签:可通过IOC容器获取:applicationContext.getBean("user"); -->
    <alias name="userDao" alias="user"></alias>

    <!-- 实例化UserServiceImpl -->
    <bean id="userService" name="userService" class="com.noob.framework.di.UserServiceImpl">
        <!-- 将UserDao的实例对象(userDao)注入到UserService中 -->
        <constructor-arg name="userDao" ref="userDao"></constructor-arg>
    </bean>
</beans>
如果担心属性概念混淆,idea中可以点击属性查看其关联绑定到哪个内容,例如constructor-arg的name关联的是userService实例中定义的属性;ref绑定的是bean的id或者name,此处即userDao对应的bean定义
测试
测试逻辑不变,重新启动进行测试会得到和案例1中一样的接口,方法正常执行
基于注解(Annotation)方式
为什么要引入注解?如果程序中要使用的Bean数量较多,通过xml配置方式引入则会导致配置文件过于臃肿,从而使得维护和代码可读性变得很差,因此引入注解简化配置
常用注解说明
| 注解 | 说明 |
|---|---|
| bean注册 | |
| @Component | 泛化概念:通用注解(如果不明确类属于哪一层,可以使用通用注解) |
| @Repository | 分层概念:一般用于数据访问层 |
| @Service | 分层概念:一般用于Service层(业务层) |
| @Controller | 分层概念:一般用于Controller层(控制层) |
| @Bean | 区分其和@Component的应用场景,@Bean作用于方法,其功能性更加灵活 |
| 自动装配(注入) | |
| @Autowired | 优先byType匹配,如果有多个实现选择则转为byName |
| @Qualifier | 一般结合@Autowired使用,将默认的byType匹配机制转为指定的byName匹配(根据@Qualifier指定的name进行匹配) |
| @Resource | 优先byName匹配,如果无法匹配则转为byName。该注解有两个核心属性name、type 如果指定单个属性(只指定name、或只指定type)则按照指定的方式查找 如果两个属性都指定则按照byName+byType方式查找 |
案例说明:dao、service、controller层狗阿金
# PersonDao
public interface PersonDao {
     public void save(String userName);
}

# PersonDaoImpl
// Bean注册(将数据访问层的PersonDaoImpl实现类标识为spring的bean)
@Repository("personDao")
public class PersonDaoImpl implements PersonDao{
    @Override
    public void save(String userName) {
        System.out.println("PersonDaoImpl save方法执行");
        System.out.println("mod save:" + userName);
    }
}

# PersonService
public interface PersonService {
    public void addUser(String userName);
}

# PersonServiceImpl
// bean注册:将service层(业务层)的PersonServiceImpl标记为spring的bean
@Service("personService")
public class PersonServiceImpl implements PersonService{

    @Resource(name = "personDao")
    private PersonDao personDao;

    @Override
    public void addUser(String userName) {
        System.out.println("PersonServiceImpl addUser方法执行");
        personDao.save(userName);
    }
}

# PerosnController
// Bean注册(将Controller控制层的PersonController标识为spring的bean)
@Controller("personController")
public class PersonController {
    @Resource(name = "personService")
    private PersonService personService;

    public void add(){
        System.out.println("PersonController add方法执行");
        personService.addUser("noob");
    }
}
applicationContext-anno.xml
<?xml version="1.0" encoding="UTF-8"?>
<beans xmlns="http://www.springframework.org/schema/beans"
       xmlns:xsi="http://www.w3.org/2001/XMLSchema-instance"
       xmlns:context="http://www.springframework.org/schema/context"
       xsi:schemaLocation="http://www.springframework.org/schema/beans http://www.springframework.org/schema/beans/spring-beans.xsd http://www.springframework.org/schema/context https://www.springframework.org/schema/context/spring-context.xsd">
    <!-- 使用context命名空间,通知spring扫描指定目录,解析注解配置(如果拆分了多个包则扫描多个包或限定表达式) -->
    <context:component-scan base-package="com.noob.framework.di.annotation"></context:component-scan>
</beans>
构建测试
public class SpringDIAnnoTest {
    public static void main(String[] args) {
        // 读取配置文件并创建IOC容器
        ApplicationContext applicationContext = new ClassPathXmlApplicationContext("classpath:applicationContext-anno.xml");
        // 通过IOC容器创建实例对象
         PersonController personController = (PersonController) applicationContext.getBean("personController");
         // 方法调用
        personController.add();
    }
}

// output
PersonController add方法执行
PersonServiceImpl addUser方法执行
PersonDaoImpl save方法执行
mod save:noob
基于自动装配的依赖注入
Spring 提供了一个自动装配的机制。操作概述如下所示:
在类中提供依赖对象的setter方法,依赖项为setter方法参数。constructor模式不需要,因为依赖项是构造器参数。 在 Spring 的配置文件中定义 Bean 时,<bean> 标签有一个autowire属性,autowire属性值有 6 种,可以通过这个属性来让 Spring 容器为接受管理的 Bean 自动注入依赖对象
例如:<bean id="标识名" class="全限定类名" autowire="autowire属性值"/>
基于上述配置完成自动装配,就不用在配置文件中使用<property>标签或<constructor-arg>标签来描述 Bean 之间的依赖关系了,Spring 容器会自动建立 Bean 之间的依赖关系
(1)byName模式
案例:MVC层构建参考(可以看到此处的设定其实和xml案例打通小异,核心区别在于applicationContext.xml的配置)
# Student
@Data
public class Student {

    private String stuName;

    private String stuId;

    public Student(String stuName, String stuId) {
        this.stuName = stuName;
        this.stuId = stuId;
    }
}

# StudentDao
public interface StudentDao {
    public void save(Student student);
}

# StudentDaoImpl
public class StudentDaoImpl implements StudentDao{

    @Override
    public void save(Student student) {
        System.out.println("mod save:" + student.getStuName());
    }
}

# StudentService
public interface StudentService {
    public void addUser(Student student);
}

# StudentServiceImpl
public class StudentServiceImpl implements StudentService{

    private StudentDao studentDao;

    // setter方式注入
    public void setStudentDao(StudentDao studentDao) {
        this.studentDao = studentDao;
    }

    @Override
    public void addUser(Student student) {
        studentDao.save(student);
    }
}
xml配置(设定autowire自动装配:此处为byName模式)
<?xml version="1.0" encoding="UTF-8"?>
<beans xmlns="http://www.springframework.org/schema/beans"
       xmlns:xsi="http://www.w3.org/2001/XMLSchema-instance"
       xsi:schemaLocation="http://www.springframework.org/schema/beans http://www.springframework.org/schema/beans/spring-beans.xsd">


    <!-- 注册StudentDao -->
    <bean id="studentDao" class="com.noob.framework.di.autowire.StudentDaoImpl"></bean>

    <!-- 注册userService -->
    <bean id="studentService" class="com.noob.framework.di.autowire.StudentServiceImpl" autowire="byName"></bean>

</beans>
复盘byName模式:一般是根据命名、首字母小写、驼峰命名法去定位,此处对象为StudentDao,则其会根据studentDao去找是否存在这么一个注册对象。(例如此处将studentDao改为其他则此时调用失败报空指针异常,实际上是要使用的StudentDao对象失败)
测试
public class SpringDIAutowireTest {
    public static void main(String[] args) {
        ApplicationContext applicationContext = new ClassPathXmlApplicationContext("applicationContext-autowire.xml");
        StudentService studentService = applicationContext.getBean("studentService", StudentService.class);
        studentService.addUser(new Student("noob","0001"));
    }
}

// output
mod save:noob
(2)byType模式
类似的byType模式则是根据接口定义去找实现类,此处修改xml配置(此处只粘贴核心部分内容),然后再次启动测试是正常访问的
<!-- 注册StudentDao -->
<bean id="studentDao" class="com.noob.framework.di.autowire.StudentDaoImpl"></bean>

<!-- 注册userService -->
<bean id="studentService" class="com.noob.framework.di.autowire.StudentServiceImpl" autowire="byType"></bean>
此处的byType模式,是根据接口定义去找其相应的实现类,如果找到多个满足条件的bean对象则会抛出异常,常见的byType配置错误问题参考如下:(结合注解中的byType、byName概念去理解)
接口只有一个实现类,但是定义了同一个实现类的多个bean
接口有多个实现类,定义了多个不同的bean指向不同实现类
例如新增一个StudentDaoExtendImpl实现StudentDao接口,然后修改xml配置,重新启动测试
public class StudentDaoExtendImpl implements StudentDao{
    @Override
    public void save(Student student) {
        System.out.println("extend");
    }
}
<!-- 注册StudentDao -->
<bean id="studentDao" class="com.noob.framework.di.autowire.StudentDaoImpl"></bean>
<bean id="studentDao1" class="com.noob.framework.di.autowire.StudentDaoImpl"></bean>
<bean id="studentDao3" class="com.noob.framework.di.autowire.StudentDaoExtendImpl"></bean>

<!-- 注册userService -->
<bean id="studentService" class="com.noob.framework.di.autowire.StudentServiceImpl" autowire="byType"></bean>
启动测试可以看到报错提示(idea中一些新版本会自动检测spring的一些配置缺陷,辅助并提示开发常见错误问题)

警告: Exception encountered during context initialization - cancelling refresh attempt: org.springframework.beans.factory.UnsatisfiedDependencyException: Error creating bean with name 'studentService' defined in class path resource [applicationContext-autowire.xml]: Unsatisfied dependency expressed through bean property 'studentDao'; nested exception is org.springframework.beans.factory.NoUniqueBeanDefinitionException: No qualifying bean of type 'com.noob.framework.di.autowire.StudentDao' available: expected single matching bean but found 3: studentDao,studentDao1,studentDao3
Exception in thread "main" org.springframework.beans.factory.UnsatisfiedDependencyException: Error creating bean with name 'studentService' defined in class path resource [applicationContext-autowire.xml]: Unsatisfied dependency expressed through bean property 'studentDao'; nested exception is org.springframework.beans.factory.NoUniqueBeanDefinitionException: No qualifying bean of type 'com.noob.framework.di.autowire.StudentDao' available: expected single matching bean but found 3: studentDao,studentDao1,studentDao3
	at org.springframework.beans.factory.support.AbstractAutowireCapableBeanFactory.autowireByType(AbstractAutowireCapableBeanFactory.java:1534)
	at org.springframework.beans.factory.support.AbstractAutowireCapableBeanFactory.populateBean(AbstractAutowireCapableBeanFactory.java:1417)
	at org.springframework.beans.factory.support.AbstractAutowireCapableBeanFactory.doCreateBean(AbstractAutowireCapableBeanFactory.java:619)
	at org.springframework.beans.factory.support.AbstractAutowireCapableBeanFactory.createBean(AbstractAutowireCapableBeanFactory.java:542)
	at org.springframework.beans.factory.support.AbstractBeanFactory.lambda$doGetBean$0(AbstractBeanFactory.java:335)
	at org.springframework.beans.factory.support.DefaultSingletonBeanRegistry.getSingleton(DefaultSingletonBeanRegistry.java:234)
	at org.springframework.beans.factory.support.AbstractBeanFactory.doGetBean(AbstractBeanFactory.java:333)
	at org.springframework.beans.factory.support.AbstractBeanFactory.getBean(AbstractBeanFactory.java:208)
	at org.springframework.beans.factory.support.DefaultListableBeanFactory.preInstantiateSingletons(DefaultListableBeanFactory.java:953)
	at org.springframework.context.support.AbstractApplicationContext.finishBeanFactoryInitialization(AbstractApplicationContext.java:918)
	at org.springframework.context.support.AbstractApplicationContext.refresh(AbstractApplicationContext.java:583)
	at org.springframework.context.support.ClassPathXmlApplicationContext.<init>(ClassPathXmlApplicationContext.java:144)
	at org.springframework.context.support.ClassPathXmlApplicationContext.<init>(ClassPathXmlApplicationContext.java:85)
	at com.noob.framework.di.autowire.SoringDIAutowireTest.main(SoringDIAutowireTest.java:8)
Caused by: org.springframework.beans.factory.NoUniqueBeanDefinitionException: No qualifying bean of type 'com.noob.framework.di.autowire.StudentDao' available: expected single matching bean but found 3: studentDao,studentDao1,studentDao3
	at org.springframework.beans.factory.config.DependencyDescriptor.resolveNotUnique(DependencyDescriptor.java:220)
	at org.springframework.beans.factory.support.DefaultListableBeanFactory.doResolveDependency(DefaultListableBeanFactory.java:1367)
	at org.springframework.beans.factory.support.DefaultListableBeanFactory.resolveDependency(DefaultListableBeanFactory.java:1309)
	at org.springframework.beans.factory.support.AbstractAutowireCapableBeanFactory.autowireByType(AbstractAutowireCapableBeanFactory.java:1519)
	... 13 more
静态工厂注入(*)
注入步骤
【1】定义实体
【2】定义工厂类:提供静态方法创建并返回指定实体对象
【3】xml配置:装配工厂类,并指定factory-method(告诉Spring容器通过指定的方法创建对象)
【4】测试类:加载配置,并通过工厂类对象获取到实体对象并执行方法
# 定义Staff类
public class Staff {
    public void say(){
        System.out.println("say sth...");
    }
}

# 构建工厂类,提供静态方法创建并返回指定的对象
public class MyBeanFactory {
    // 创建静态工厂方法实例化Bean对象
     public static Staff createBean(){
         return new Staff();
     }
}

# xml配置
<!-- factory-method:告诉Spring容器调用工厂类中的指定方法获取Bean的实例 -->
<bean id="myBeanFactory" class="com.noob.framework.di.staticFactory.MyBeanFactory" factory-method="createBean"></bean>

# 测试
public class SpringDIStaticFactoryTest {
    public static void main(String[] args) {
        ApplicationContext applicationContext = new ClassPathXmlApplicationContext("applicationContext-staticFactory.xml");
        // 通过执行静态工厂方法获取到Bean对象
        Staff staff = (Staff) applicationContext.getBean("myBeanFactory");
        staff.say();
    }
}

// output
say sth...
实例工厂注入(*)
注入步骤
【1】定义实体
【2】定义实例工厂类:定义构造函数,提供成员方法创建并返回指定实体对象
【3】xml配置:装配工厂类并指定factory-bean、factory-method(告诉Spring容器使用哪个实例的哪个方法创建对象)
【4】测试类:加载配置,并通过实例工厂获取到实体对象并执行方法
# 定义实体
public class Boss {
    public void say(){
        System.out.println("say sth...");
    }
}

# 定义实例工厂类:定义构造函数,提供成员方法创建并返回指定实体对象
public class InstanceBeanFactory {

    // 构造函数初始化
    public InstanceBeanFactory(){
        System.out.println("instance factory init");
    }

    // 创建普通方法实例化Bean对象
     public Boss createBean(){
         return new Boss();
     }
}

# xml配置
<!-- 步骤1:配置实例工厂 -->
<bean id="instanceBeanFactory" class="com.noob.framework.di.instanceFactory.InstanceBeanFactory"></bean>

<!-- factory-bean:指定一个实例工厂; factory-method 指定实例工厂的指定方法 -->
<bean id="boss" factory-bean="instanceBeanFactory" factory-method="createBean"></bean>

# 测试
public class SpringDIInstanceFactoryTest {
    public static void main(String[] args) {
        ApplicationContext applicationContext = new ClassPathXmlApplicationContext("applicationContext-instanceFactory.xml");
        // 通过执行静态工厂方法获取到Bean对象
        Boss boss = (Boss) applicationContext.getBean("boss");
        boss.say();
    }
}

// output
instance factory init
say sth...
如何理解记忆区分静态工厂注入模式和实例工厂注入模式:从类的静态和实例去理解区分
- 静态:静态工厂提供一个静态方法用于创建对象并返回,配置上只需要配置静态工厂和factory-method(告诉Spring使用哪个方法创建对象)(可以理解为静态方法是归属于类的,因此只需指定class、factory-method就能定位到对应的Bean对象创建方法)
- 实例:实例工厂使用成员方法用于创建对象并返回,配置上需要先注入一个实例工厂,然后再通过这个工厂注入对象 (可以理解为要调用实例工厂的方法,得先有一个实例,通过这个实例去调用创建Bean对象的实例方法)
三级缓存
1.什么是循环依赖?
最简单的理解:类A中注入了类B、类B中注入了类A。
即存在两个Bean互相依赖,都想要将对方注入自己之中,这种情况称之为循环依赖
@Service
public class A {
    @Autowired
    private B b;
}

@Service
public class B {
    @Autowired
    private A a;
}
依赖注入原理:如果说A发现它需要注入一个BeanB,则它会到一级缓存中去寻找BeanB,找到了就注入,找不到则进入BeanB的创建流程,将创建好的BeanB放入到一级缓存(单例池)中,然后A就可以将B给注入进来
一级缓存(单例池):可以存放创建好的Bean,可被其他对象注入
单单使用一级缓存还是会存在循环依赖问题,会陷入先有鸡还是先有蛋的问题。
循环依赖案例
对象构建
@Service
public class AuthorService {
    @Resource
    public BookService bookService;
}

@Service
public class BookService {
    @Resource
    public AuthorService authorService;
}
xml配置或者类文件方式配置
方式1:applicationContext-circleDependence.xml
<context:component-scan base-package="com.noob.framework.di.circle"></context:component-scan>

方式2:Java类方式配置
@Configuration
@ComponentScan
public class AppConfig {
	// 自定义配置
}
测试
/**
 * 循环依赖测试
 */
public class CircleDependenceTest {
    public static void main(String[] args) {
//        ApplicationContext context = new AnnotationConfigApplicationContext(AppConfig.class);
        ApplicationContext context = new ClassPathXmlApplicationContext("applicationContext-circleDependence.xml");
        AuthorService authorService = (AuthorService) context.getBean("authorService");
        BookService bookService = (BookService) context.getBean("bookService");
        System.out.println(authorService.bookService);
        System.out.println(bookService.authorService);
    }
}

// output
com.noob.framework.di.circle.BookService@60704c
com.noob.framework.di.circle.AuthorService@6b19b79
基于测试结果发现,单例Bean的循环依赖问题得到解决(此处Spring引入了三级缓存装配内容),Spring的三级缓存可以解决单例对象循环依赖问题,但是无法解决构造器方式以及多例Bean对象的循环依赖问题,可以通过场景案例测试分析:
【1】构造器模式的循环依赖
@Service
public class AuthorService {
    public BookService bookService;
    public AuthorService(BookService bookService) {
        this.bookService = bookService;
    }
}

@Service
public class BookService {
    public AuthorService authorService;
    public BookService(AuthorService authorService) {
        this.authorService = authorService;
    }
}
【2】多例Bean的循环依赖
在AuthorService、BookService配置@Scope(BeanDefinition.SCOPE_PROTOTYPE)将其设置为多例,启动测试显示如下结果
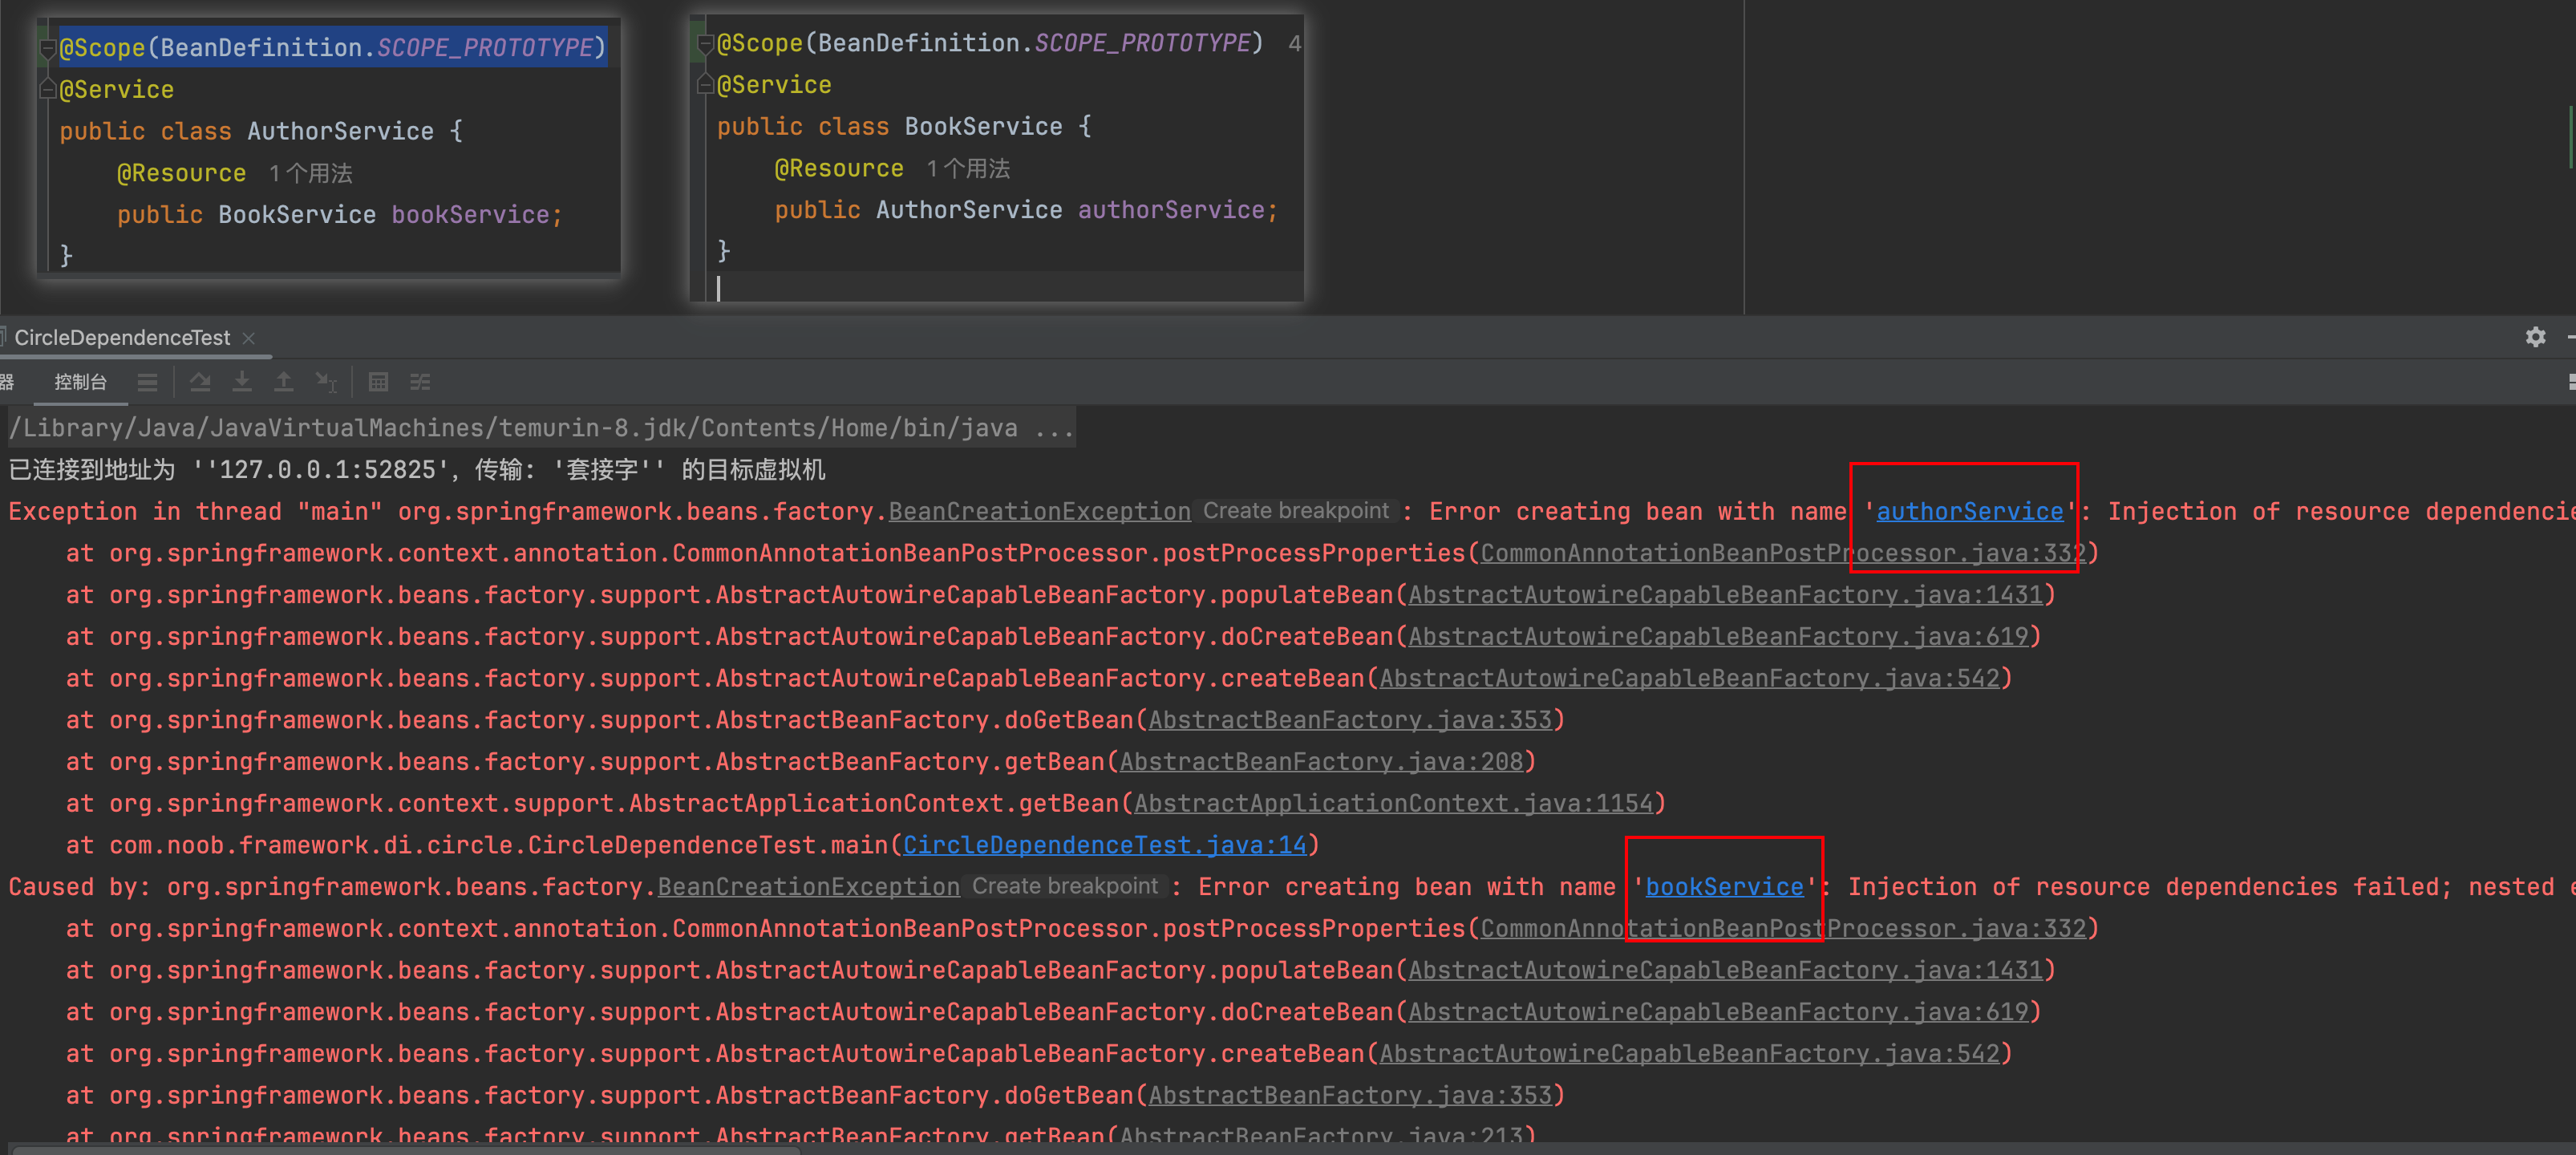
2.引入三级缓存可以解决什么问题?
首先要理解三级缓存引入的核心作用:
【1】引入三级缓存用于解决循环依赖问题
【2】解决的仅仅只是单例模式下Bean属性的循环依赖问题,对于多例Bean、prototype作用域的Bean的循环依赖问题,无法使用三级缓存解决
三级缓存:使用3个Map作为缓存,分别存放不同成长阶段的Bean (一级缓存存放最成熟的Bean;三级缓存存放最幼稚的Bean)
| 三级缓存相关 | 说明 |
|---|---|
| 三级缓存:SingletonFactories | 单例工厂的缓存,存放获取对象的Lambda表达式,会根据是否被切AOP返回代理对象与否 |
| 二级缓存:EarlySingletonObject | 存放中间状态的Bean(存放已实例化,但还没进行属性赋值、没执行init方法的半成品),即未依赖注入的代理对象/普通对象 |
| 一级缓存:SingletonObject | 存放创建完成的Bean(存放已实例化、属性赋值、初始化完成的成品),可被其他对象注入 |
| 创建中集合:creating set | 用来标志谁正在创建的过程 |
当需要依赖注入的Bean出现在creating set的时候,说明出现了循环依赖问题,需要做一些特殊的处理
三级缓存机制:以上述案例为参考分析A、B的依赖注入过程
【1】创建A:实例化A对象,先将A放入creating set中标记正在创建,然后将A放在第三级缓存-工厂(让其他对象能够找到它),随后发现A需要注入B,则进入B的创建流程
【2】创建B:和A的流程类似,实例化B对象,先将B放入creating set中标记正在创建,然后将B放在第三级缓存-工厂。随后发现B需要注入A,此时发现A对象也在creating set中,则此时B只能从第三级缓存中去获取A(从第三级缓存中获取Lambda表达式并执行,获取到A的对象(具体看A是否被AOP返回代理对象与否))并将其进行注入。随后将A对象(普通/代理)放入到二级缓存中,此时A处于中间状态
此时继续B的创建流程,创建完成则将B对象放入一级缓存,进而结束掉B的创建周期(将B从creating set移除)
【3】B对象创建完成,则可将B注入到A中,随后A继续进行创建流程,创建完成则将A放入一级缓存,并从其他缓存区中残余的一些记录,随后将其creating set中移除
代码分析:getSingleton方法中三级缓存的使用
protected Object getSingleton(String beanName, boolean allowEarlyReference) {
  // Spring首先从singletonObjects(一级缓存)中尝试获取
  Object singletonObject = this.singletonObjects.get(beanName);
  // 若是获取不到而且对象在建立中,则尝试从earlySingletonObjects(二级缓存)中获取
  if (singletonObject == null && isSingletonCurrentlyInCreation(beanName)) {
    synchronized (this.singletonObjects) {
        singletonObject = this.earlySingletonObjects.get(beanName);
        if (singletonObject == null && allowEarlyReference) {
          ObjectFactory<?> singletonFactory = this.singletonFactories.get(beanName);
          if (singletonFactory != null) {
            //若是仍是获取不到而且允许从singletonFactories经过getObject获取,则经过singletonFactory.getObject()(三级缓存)获取
              singletonObject = singletonFactory.getObject();
              //若是获取到了则将singletonObject放入到earlySingletonObjects,也就是将三级缓存提高到二级缓存中
              this.earlySingletonObjects.put(beanName, singletonObject);
              this.singletonFactories.remove(beanName);
          }
        }
    }
  }
  return (singletonObject != NULL_OBJECT ? singletonObject : null);
}
上述代码的流程分析:
Spring 会先从一级缓存
singletonObjects中尝试获取 Bean若是获取不到,而且对象正在建立中,就会尝试从二级缓存
earlySingletonObjects中获取 Bean若还是获取不到,且允许从三级缓存
singletonFactories中经过singletonFactory的getObject()方法获取 Bean 对象,就会尝试从三级缓存singletonFactories中获取 Bean若是在三级缓存中获取到了 Bean,会将该 Bean 存放到二级缓存中
循环依赖解决的核心(为什么三级缓存可以解决循环依赖)
可以结合依赖注入流程和三级缓存进行理解。循环依赖解决的核心在于SingletonFactories这个第三级缓存,其源码分析如下
public interface ObjectFactory<T> {
    T getObject() throws BeansException;
}
// 在Bean的创建过程中有两处比较重要的匿名内部类实现了ObjectFactory接口(1.Spring利用其建立Bean的时候;2.addSingletonFactory的时候)
addSingletonFactory(beanName, new ObjectFactory<Object>() {
   @Override
   public Object getObject() throws BeansException {
       return getEarlyBeanReference(beanName, mbd, bean);
   }
});
此处addSingletonFactory方法是解决循环依赖的关键,这段代码是发生在**createBeanInstance**之后:
- 此时单例Bean对象已经实例化(可以通过对象引用定位到堆中的对象),但尚未属性赋值和初始化
- Spring会将该状态下的Bean放入到三级缓存中,提早曝光给IOC容器(提早概念:指不必等到对象完成属性赋值和初始化再交给IOC容器,即可以在第三级缓存singletonFactories中找到该状态的对象)
三级缓存的不足(Spring为什么不能解决非单例Bean的循环依赖)
首先要理解这个问题核心得先明确Bean创建的生命周期,然后拆分几个小方面理解上面的问题?
(1)Spring 为什么不能解决构造器的循环依赖?
对象的构造函数是在实例化阶段调用的:而上述场景是在对象实例化后才会将对象放入三级缓存,因此在调用对象的构造函数时,对象还未完成实例化,所以也就无法将对象存放到三级缓存中
在构造函数中注入,对象A需要在对象B的构造函数中完成初始化,对象B需要在对象A的构造函数中完成初始化,但此时两个对象都还没实例化完成,也就不会将其放入到第三级缓存中,因此最终结果就是两个Bean都无法完成初始化,进而无法解决这个场景下的循环依赖问题
(2)Spring 为什么不能解决 prototype 作用域的Bean对象或者多例对象的循环依赖?
Spring 中循环依赖的解决是通过缓存来实现的
Spring IOC 容器只会管理单例 Bean 的生命周期,并将单例 Bean 存放到缓存池中(三级缓存)。Spring 并不会管理 prototype 作用域的 Bean,也不会缓存该作用域的 Bean
多实例 Bean 是每次调用 getBean 都会创建一个新的 Bean 对象,该 Bean 对象并不能缓存
如何解决非单例Bean的循环依赖?
- 对于构造器注入产生的循环依赖,可以使用
@Lazy注解,延迟加载 - 对于多例 Bean 和
prototype作用域产生的循环依赖,可以尝试改为单例 Bean
三级缓存的意义
第三级缓存的目的是为了延迟代理对象的创建,因为如果没有依赖循环的话,那么就不需要为其提前创建代理,可以将它延迟到初始化完成之后再创建。
既然目的只是延迟的话,那么是不是可以不延迟创建,而是在实例化完成之后,就为其创建代理对象,这样就不需要第三级缓存了。因此,可以将 addSingletonFactory() 方法进行改造。
java

复制代码protected void addSingletonFactory(String beanName, ObjectFactory<?> singletonFactory) {
    Assert.notNull(singletonFactory, "Singleton factory must not be null");

    synchronized (this.singletonObjects) {
        // 判断一级缓存中不存在此对象
        if (!this.singletonObjects.containsKey(beanName)) {
            // 直接从工厂中获取 Bean
            Object o = singletonFactory.getObject();

            // 添加至二级缓存中
            this.earlySingletonObjects.put(beanName, o);
            this.registeredSingletons.add(beanName);
        }
    }
}
基于这种概念每次实例化完 Bean 之后就直接去创建代理对象,并添加到二级缓存中。测试结果是完全正常的,Spring 的初始化时间应该也是不会有太大的影响,因为如果 Bean 本身不需要代理的话,是直接返回原始 Bean 的,并不需要走复杂的创建代理 Bean 的流程。
测试证明,二级缓存也是可以解决循环依赖的。为什么 Spring 不选择二级缓存,而要额外多添加一层缓存,使用三级缓存呢?
如果 Spring 选择二级缓存来解决循环依赖的话,那么就意味着所有 Bean 都需要在实例化完成之后就立马为其创建代理,而 Spring 的设计原则是在 Bean 初始化完成之后才为其创建代理。
使用三级缓存而非二级缓存并不是因为只有三级缓存才能解决循环引用问题,其实二级缓存同样也能很好解决循环引用问题。使用三级而非二级缓存并非出于 IOC 的考虑,而是出于 AOP 的考虑,即若使用二级缓存,在 AOP 情形注入到其他 Bean的,不是最终的代理对象,而是原始对象。
懒加载
基于上述Spring三级缓存机制概念分析,一些场景下无法通过三级缓存去解决,此处引入懒加载概念解决上述三级缓存不能解决的问题
当两个或多个Bean之间存在循环依赖时,可以使用@Lazy注解延迟初始化其中一个Bean,从而打破循环依赖
Spring 懒加载(Lazy Loading)是一种性能优化策略,用于延迟加载或懒加载对象,直到实际需要使用它们时才进行加载。在Spring框架中,可以通过注解或XML配置来启用懒加载
懒加载使用
# 方式1:Java配置
import org.springframework.context.annotation.Lazy;
import org.springframework.stereotype.Component;

@Component
@Lazy
public class LazyBean {
    // Bean的实现...
}
# 方式2:XML配置
<bean id="lazyBean" class="com.example.LazyBean" lazy-init="true"/>
懒加载的实现机制:当容器启动的时候LazyBean不会被立即实例化,而是在第一次请求该Bean的时候才会进行创建
懒加载可以帮助提高系统的启动速度,特别是在加载大量资源或执行耗时的初始化时。但请注意,懒加载可能会引入运行时的初始化时延,因此在设计时需要权衡这种性能优化对系统整体行为的潜在影响
【1】懒加载解决构造器方式的循环依赖(只要一方中配置了@Lazy即可)
@Service
public class BookService {
    public AuthorService authorService;

    public BookService(@Lazy AuthorService authorService) {
        this.authorService = authorService;
    }
}

@Service
public class AuthorService {
    public BookService bookService;
    public AuthorService( BookService bookService) {
        this.bookService = bookService;
    }
}
【2】懒加载解决多例的循环依赖(只要一方配置了@Lazy即可)
@Scope(BeanDefinition.SCOPE_PROTOTYPE)
@Service
public class BookService {
    @Resource
    public AuthorService authorService;
}


@Scope(BeanDefinition.SCOPE_PROTOTYPE)
@Service
public class AuthorService {
    @Resource
    public BookService bookService;
}