【OJ】⑦基于Docker构建代码沙箱
【OJ】⑦基于Docker构建代码沙箱
先配置好虚拟机环境,Docker在虚拟机环境上操作(也可使用远程服务器,如果是构建项目测试的话建议使用虚拟机,以免玩崩)
Docker核心
1.Docker基本概念
为什么要使用Docker技术?
为了提升系统的安全性,把不同的程序和宿主机进行隔离,是的某个程序(应用)的执行不会影响到系统本身
Docker 技术可以实现程序和宿主机的隔离
什么是容器?(可以把一个容器理解为一个新的电脑(定制化的操作系统))
理解为对一系列应用程序、服务和环境的封装,从而把程序运行在一个隔离的、密闭的、隐私的空间内,对外整体提供服务。
Docker基本概念
| 术语 | 说明 |
|---|---|
| 镜像 | 用来创建容器的安装包,可以理解为给电脑安装操作系统的系统镜像 |
| 容器 | 通过镜像来创建的一套运行环境,一个容器里可以运行多个程序,可以理解为一个电脑实例 |
| Dockerfile | 制作镜像的文件,可以理解为制作镜像的一个清单 |
| 镜像仓库 | 存放镜像的仓库,用户可以从仓库下载现成的镜像,也可以把做好的镜像放到仓库里 |
【Dockerfile】 == build ==》【Docker Image】 == run ==》【Docker Container】
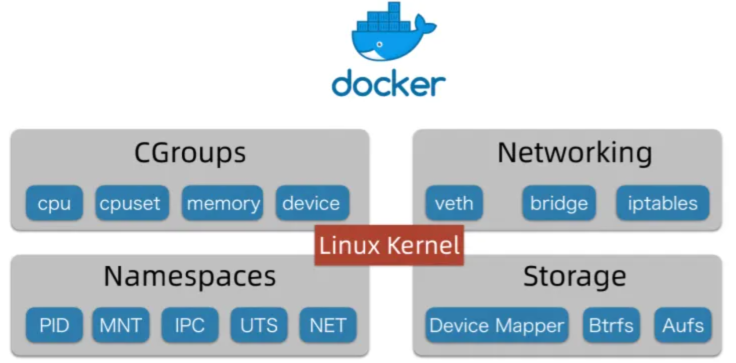
Docker实现原理:❓Docker能实现哪些资源的隔离
1)Docker 运行在 Linux 内核上
2)CGroups:实现了容器的资源隔离,底层是 Linux CGroup 命令,能够控制进程使用的资源
3)Network 网络:实现容器的网络隔离,docker 容器内部的网络互不影响
4)Namespaces 命名空间:可以把进程隔离在不同的命名空间下,每个容器他都可以有自己的命名空间,不同的命名空间下的进程互不影响
5)Storage 存储空间:容器内的文件是相互隔离的,也可以去使用宿主机的文件
Docker compose:是一种同时启动多个容器的集群操作工具(容器管理工具),一般情况下,开发者仅做了解即可,实际使用 docker compose 时去百度配置文件
镜像仓库:类似Maven仓库、前端NPM仓库,是一个存放镜像的仓库,用户可以从仓库下载现成的镜像,也可以把做好的镜像放到仓库中
官方镜像仓库:docker hub:一个官方的docker镜像仓库
2.Docker安装(基于Ubuntu)
一般情况下,不建议在 Windows 系统上安装。Windows 本身就自带了一个虚拟机叫 WSL,不推荐;推荐使用虚拟机安装Docker
使用免费的VMWare Workstation Player软件,安装虚拟机、Docker环境和远程开发环境
此处选用Ubuntu,提供了一个Ubuntu Desktop,对新手比较友好dovkerd
Docker常用操作
1)查看Docker版本信息
# 查看Docker版本
Docker -v
Docker version 24.0.5, build 24.0.5-0ubuntu1~22.04.1
2)查看命令用法
# 查看命令用法
docker --help

# 查看具体子命令的用法
docker run --help
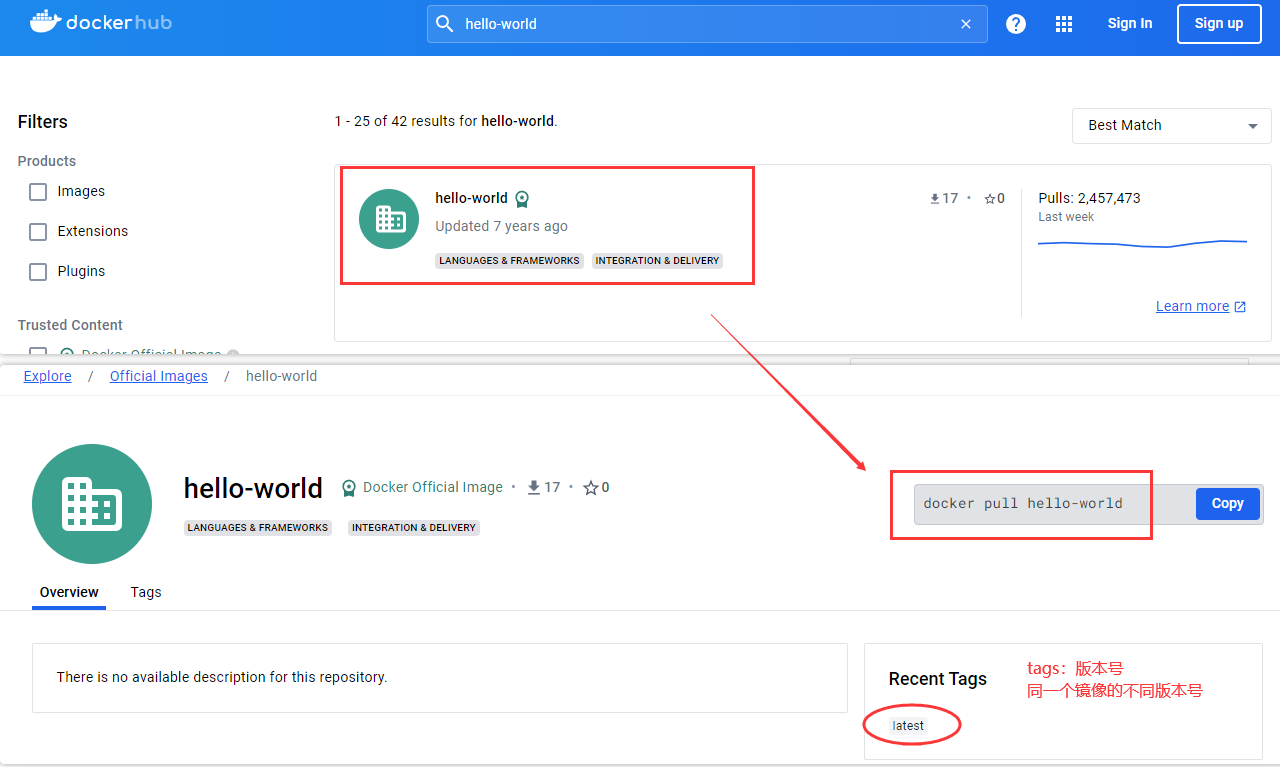
3)从远程仓库拉取现成的镜像
从官方仓库docker hub搜索现成的镜像(例如hello-world),拉取镜像
# 从远程仓库拉取现成的镜像
docker pull [options] name[:tag|@digest]

# 参考示例
docker pull hello-world

sudo docker pull hello-world
执行指令如果提示没有权限:说明linux当前登录用户没有使用该系统的一些权限(需要修改权限),或者通过sudo执行
permission denied while trying to connect to the Docker daemon socket at unix:///var/run/docker.sock: Post "http://%2Fvar%2Frun%2Fdocker.sock/v1.24/images/create?fromImage=hello-world&tag=latest": dial unix /var/run/docker.sock: connect: permission denied
4)根据镜像创建容器实例
# 根据镜像创建容器实例
docker create [options] image [command] [arg...]

# 参考示例(启动实例,得到容器实例containerId)
sudo docker create hello-world
// 执行指令会得到一个容器实例Id
2d72aa8448a8cb02f2e5938f7fd9833741816642c90c17bdbd824a3a3aab68ca
5)查看容器状态
# 查看容器状态
sudo docker ps
# 运行结果:会显示当前启动的容器信息(如果没有启动则无)
CONTAINER ID IMAGE COMMAND CREATED STATUS PORTS NAMES
# 查看所有容器状态
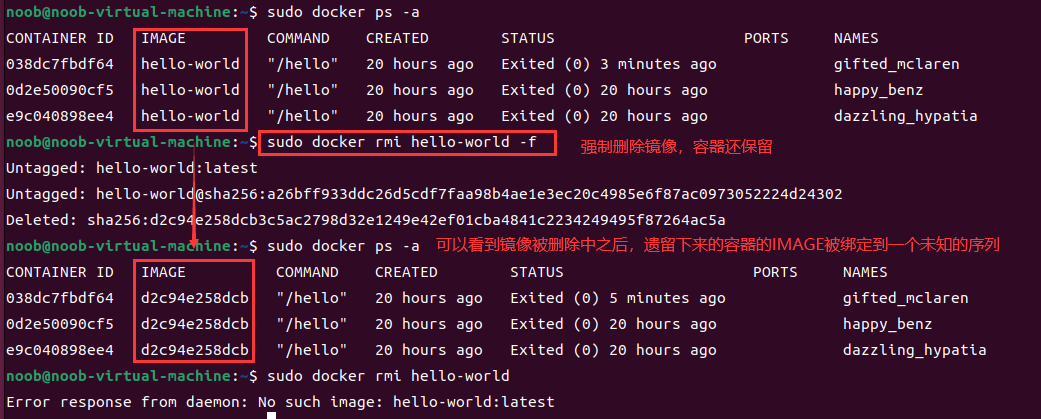
sudo docker ps -a(添加-a参数指定查看所有的容器状态)
# 运行结果(会展示所有容器信息,CONTSINERID会展示前缀信息)
容器ID、创建容器使用的镜像、创建容器指定的命令、创建时间、创建状态、容器名称(如果没有指定,则系统默认随机分配)
CONTAINER ID IMAGE COMMAND CREATED STATUS PORTS NAMES
2d72aa8448a8 hello-world "/hello" About a minute ago Created amazing_khorana
038dc7fbdf64 hello-world "/hello" 20 hours ago Exited (0) 20 hours ago gifted_mclaren
0d2e50090cf5 hello-world "/hello" 20 hours ago Exited (0) 20 hours ago happy_benz
e9c040898ee4 hello-world "/hello" 20 hours ago Exited (0) 20 hours ago dazzling_hypatia
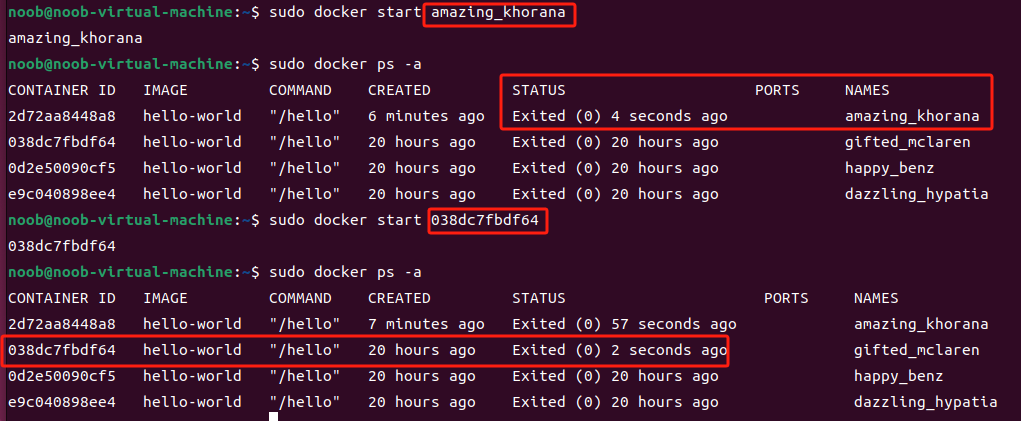
6)启动容器
# 启动容器
docker start [options] container [container...]
sudo docker start [容器名称]
sudo docker start [容器ID]

# 参考示例
sudo docker start amazing_khorana   // 以容器名称启动

sudo docker start 038dc7fbdf64      // 以容器ID启动
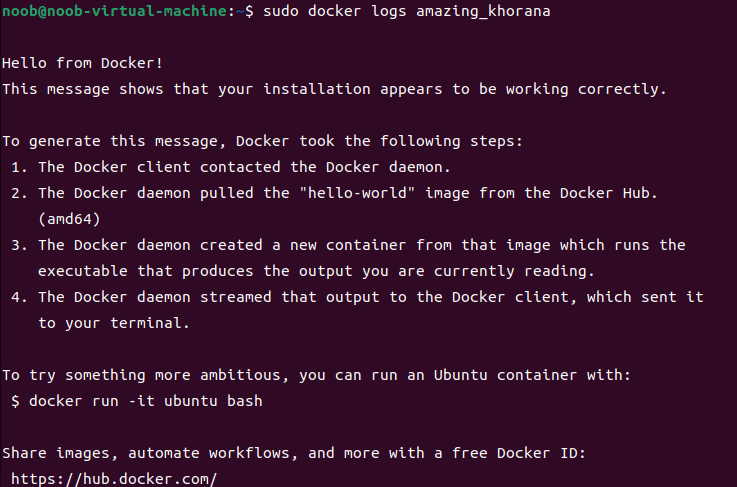
7)查看日志
# 查看日志
docker logs [options] container

sudo docker logs [容器名称]
sudo docker logs [容器ID]

# 参考示例
sudo docker logs amazing_khorana
8)删除容器实例
# 删除容器实例
docker rm [options] container [container...]

# 参考示例
sudo docker rm amazing_khorana

9)删除镜像
# 删除镜像
docker rmi [optiions] image [image...]

sudo docker rmi hello-world       // 如果镜像还绑定了容器则不允许删除
sudo docker rmi hello-world -f    // 强制删除,如果镜像绑定了容器则删除镜像,保留容器

# 参考示例
sudo docker rmi hello-world -f
一般不建议直接删除容器、镜像
10)推送镜像
# 推送镜像
docker push image
Java操作Docker
使用 Docker-Java (Java操作Docker的API):https://github.com/docker-java/docker-java
官方快速入门:https://github.com/docker-java/docker-java/blob/main/docs/getting_started.md,根据官方入门文档完成测试
先引入依赖:
		<!-- 引入Docker操作相关依赖 -->
		<!-- https://mvnrepository.com/artifact/com.github.docker-java/docker-java -->
        <dependency>
            <groupId>com.github.docker-java</groupId>
            <artifactId>docker-java</artifactId>
            <version>3.3.0</version>
        </dependency>

        <!-- https://mvnrepository.com/artifact/com.github.docker-java/docker-java-transport-httpclient5 -->
        <dependency>
            <groupId>com.github.docker-java</groupId>
            <artifactId>docker-java-transport-httpclient5</artifactId>
            <version>3.3.0</version>
        </dependency>
DockerClientConfig:用于定义一些初始化的 DockerClient 的配置(类比 MySQL 的连接配置、线程数的配置等)
DockerHttpClient:用于向 Docker 守护进程(操作 Docker 的接口)发送请求的客户端,低层封装(不推荐使用),你要自己构建请求参数(简单地理解成JDBC)
DockerClient(推荐):这个才是真正的和 Docker 守护进程交互的、最方便的 SDK,高层封装,对DockerHttpClient 在进行了一层封装(理解成MyBatis),提供了线程的增删改查
Linux Docker远程开发(oj-code-sandbox)
1)方式1:远程部署(本地开发,同步代码到远程服务器)
方式1:远程部署(本地代码开发同步到linux远程服务器路径:其核心是本地开发,然后同步文件)
使用IDEA Development 将代码上传到Linux,然后使用JetBrains远程开发完全连接linux实时开发,构建思路:
- 添加远程开发配置
- 将本地文件夹和linux远程服务器的文件夹进行映射
- 同步文件(手动同步、自动同步)
- 确认linux中是否已经同步
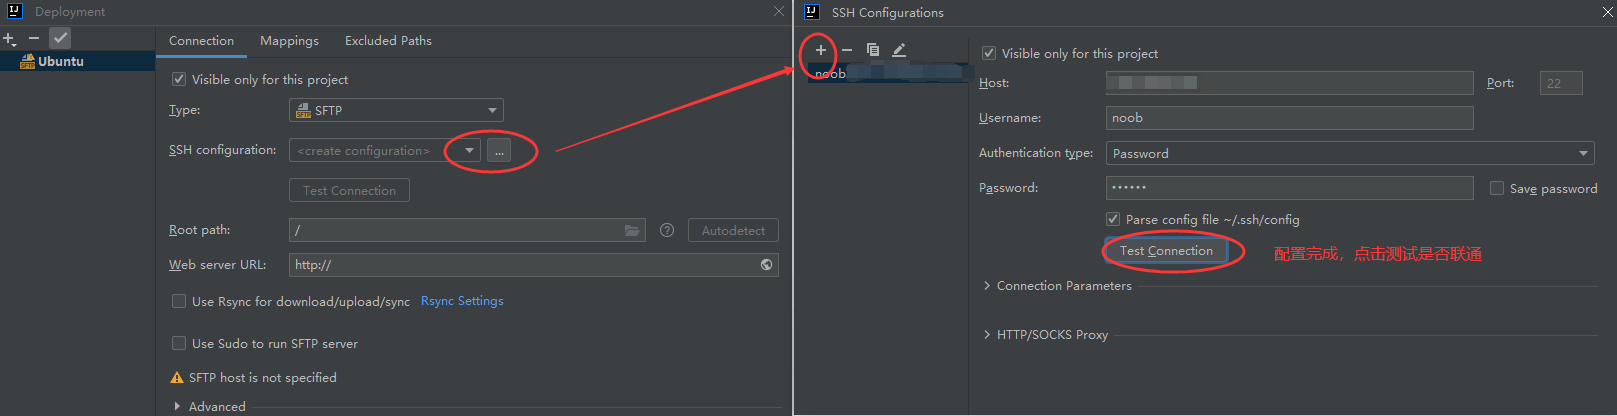
远程开发配置
配置同步:Tools=》Development=》Configuration (创建一个远程配置)=》添加选择sftp协议=》输入服务器名称(Ubuntu)
然后在相应配置中添加一个SSH连接配置,让软件知道应该去访问哪个linux服务器。点击设置添加一个SSH配置,输入虚拟机的IP、用户名、密码
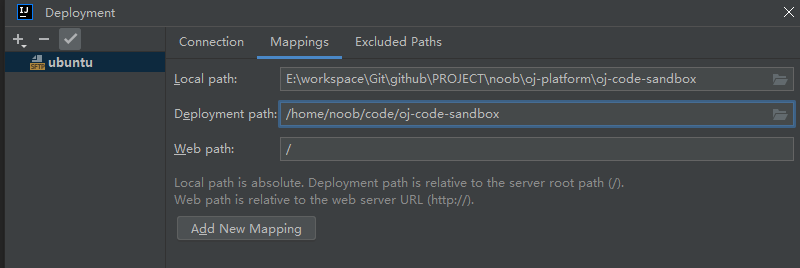
配置Mapping映射,同步本地文件和远程服务器文件
Tools=》Development=》Configuration :选择刚创建好的服务配置,然后点击Mappings选项卡进行配置,需要先理解每个参数的含义
- Local path:本机项目代码存放位置
- Deployment path:希望将代码同步到linux服务器的目录位置
- Web path:/
进入到linux 虚拟机目录(如果虚拟机创建了用户,例如创建了用户noob,则可在/home下有一个noob目录专门用于存放这个用户相关的所有文件),在里面创建一个文件夹专门用于存储项目代码(即同步部署的目标路径)
🚀手动同步:配置完成,右键选择项目RemoteDemo,选择Deployment=》Sync with Deployed to Ubuntu (一键同步),然后就会自动列举出当前没有同步的文件内容。点击一键同步即可完成同步操作,随后去linux服务器上查看代码是否同步完成(基于手动同步操作)
🚀自动同步:Tools=》Development=》Automatic Upload(自动上传配置),点击该配置则开启自动上传,随后在项目中任意位置创建一个文件,测试是否自动同步即可
🤡:基于这种方式可能每次都要手动或者自动同步一下然后再启动、部署,应择优选择适合自己的方案,也可以选择基于idea的远程开发模式(直接操作服务器代码)
如果要把远程服务器的代码同步到本地,则可通过Remote Host =》 打开对应目录,右键选择Download Here(会提示是否覆盖当前目录)
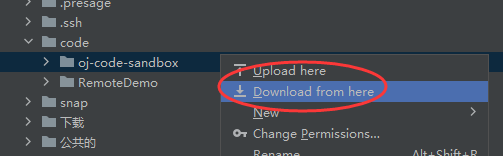
或者选择本地项目,右键选择download from 选择配置好的远程服务器,然后下载同步到本地即可
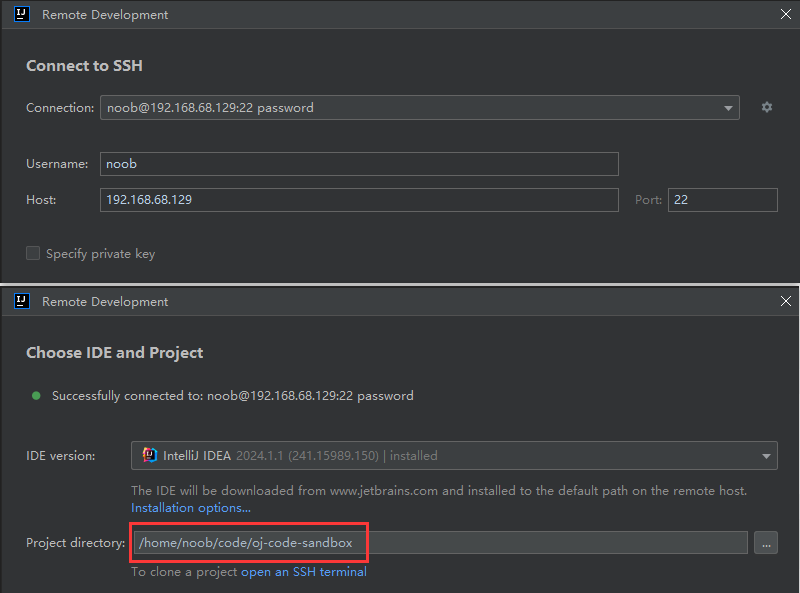
2)方式2:远程开发(直接通过本地操作远程服务器代码)
方式2:远程开发模式,通过idea的remote development模式进行开发,本地相当于操作远程服务器一样完成远程服务器上的代码开发,其所有的操作都是基于远程服务器的代码。可以理解为玩网页游戏,本地不会存储客户端软件,直接通过网页端操作
操作步骤
File =》Remote Development =》新建一个SSH连接,然后配置远程服务器信息,选择远程服务器依赖的环境和项目目录(IDEA版本、代码目录)
例如此处,项目代码目录可以选择前面方式1中已经同步过去的文件夹(需要注意不要两边都开启同步,即不要两种方式混着用,如果是以服务器那边的为参考则后续不要用方式1误操作把本地的内容给同步过去导致直接冲掉了服务器的代码内容,因为服务器的代码版本是没有做版本跟踪的,一旦被冲掉就无法挽回)
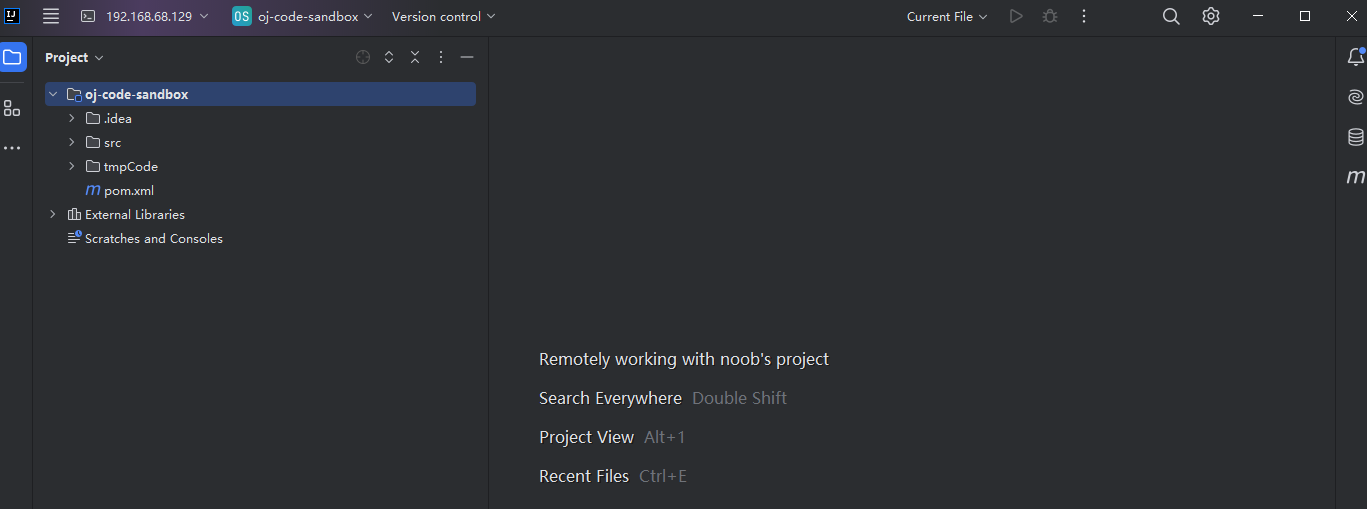
等待项目加载完成,会开启一个新的远程服务开发的窗口,可以通过这个窗口直接操作远程代码(此处可以考虑在远程服务器上对这个项目进行代码版本管理)
如果无法启动程序,则需要修改settings=》Build,Exception,Development:Compile=》进程VM选项:-Djdk.lang.Process.launchMechanism=vfork
可能是使用了比较新的IDEA版本导致,需要配置一下,此外还需注意要配置一下远程开发项目环境(例如Maven依赖等),然后启动一下项目,尝试是否可以正常访问
完成上述步骤,就可以直接操作远程服务器代码完成开发
远程开发:编写案例操作Docker
如果启动失败(连接Docker失败):
- 增加权限
- 重启虚拟机、重启开发环境、重启程序
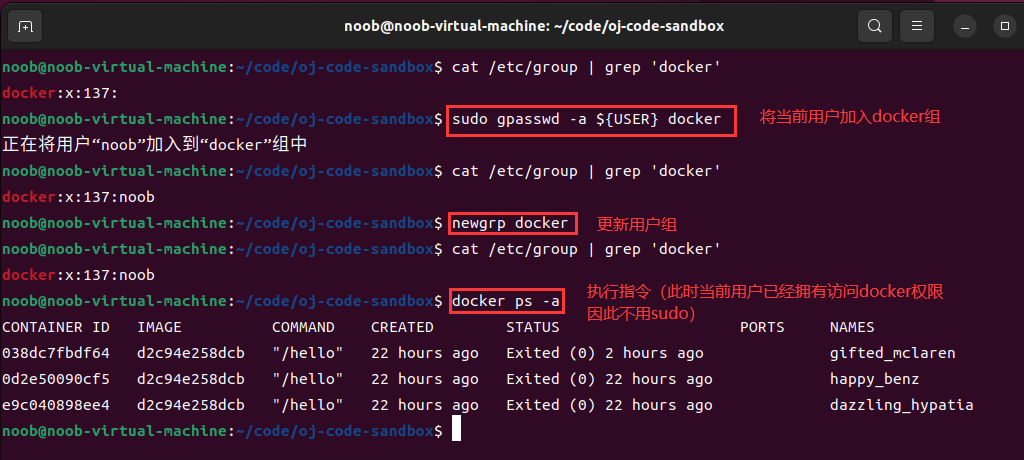
权限设定:查看用户组
# 查看用户组
cat /etc/group

# 查看用户组(过滤选择docker,查看docker所属用户组)
cat /etc/group | grep 'docker'

# 如果当前用户没有访问docker的权限,则加入用户组(使用gpasswd命令添加)
sudo gpasswd -a ${USER} docker      // 此处${USER}表示获取当前登录用户名,也可直接用常量代替例如:sudo gpasswd -a noob docker
Docker连接失败:重启一下远程开发环境
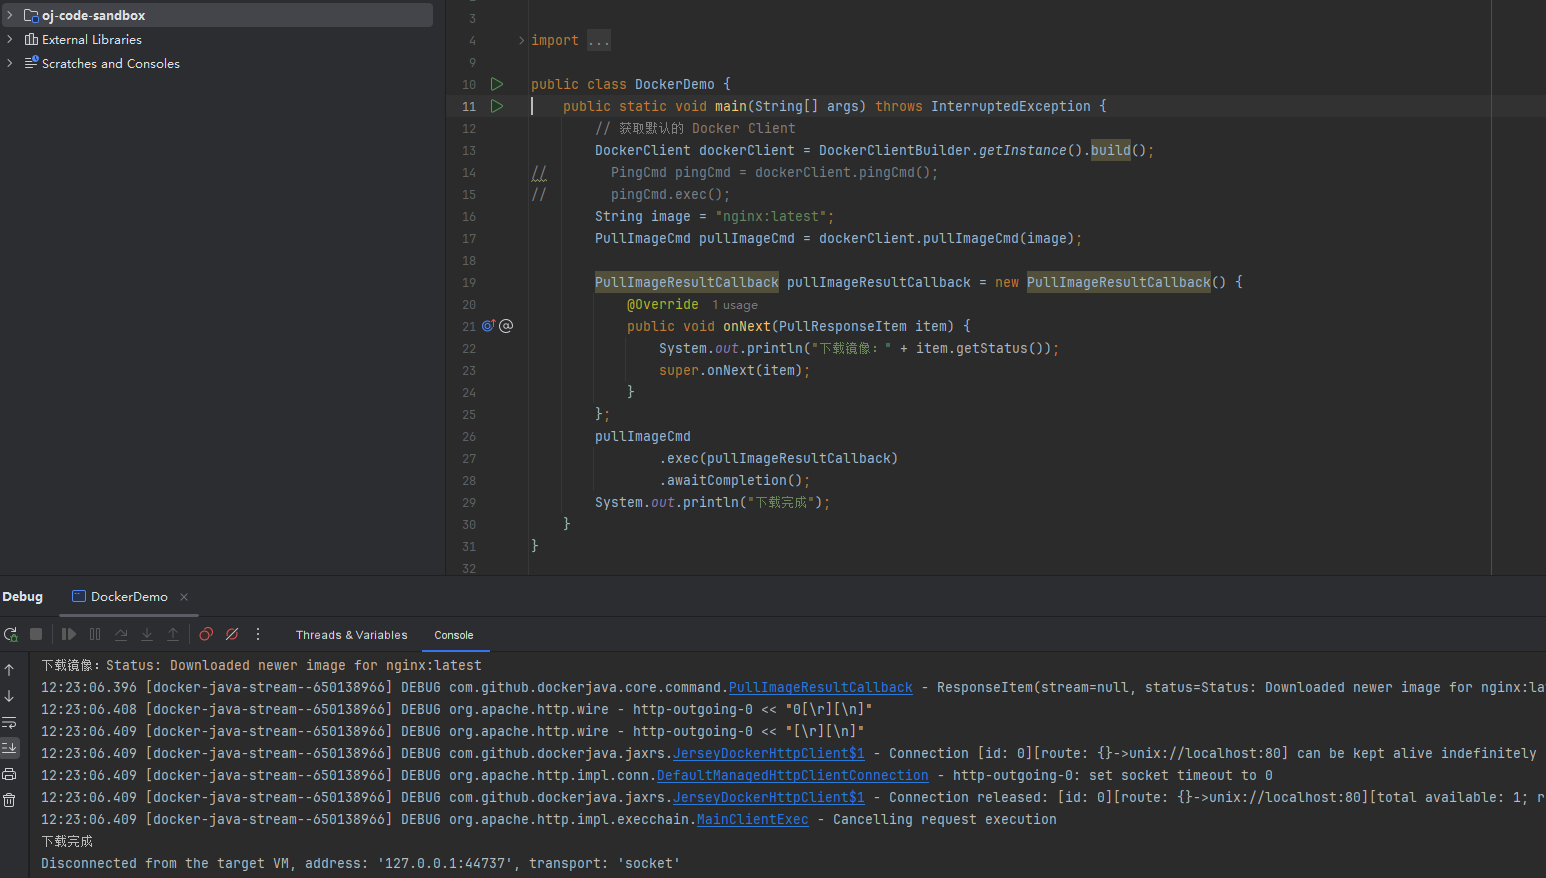
1)拉取镜像
import com.github.dockerjava.api.DockerClient;
import com.github.dockerjava.api.command.PullImageCmd;
import com.github.dockerjava.api.model.PullResponseItem;
import com.github.dockerjava.core.DockerClientBuilder;
import com.github.dockerjava.core.command.PullImageResultCallback;

public class DockerDemo {
    public static void main(String[] args) throws InterruptedException {
        // 获取默认的 Docker Client
        DockerClient dockerClient = DockerClientBuilder.getInstance().build();
//        PingCmd pingCmd = dockerClient.pingCmd();
//        pingCmd.exec();
        String image = "nginx:latest";
        PullImageCmd pullImageCmd = dockerClient.pullImageCmd(image);

        PullImageResultCallback pullImageResultCallback = new PullImageResultCallback() {
            @Override
            public void onNext(PullResponseItem item) {
                System.out.println("下载镜像:" + item.getStatus());
                super.onNext(item);
            }
        };
        pullImageCmd
                .exec(pullImageResultCallback)
                .awaitCompletion();
        System.out.println("下载完成");
    }
}
回到linux,查看拉取的镜像信息
# 查看镜像
docker images

2)创建容器
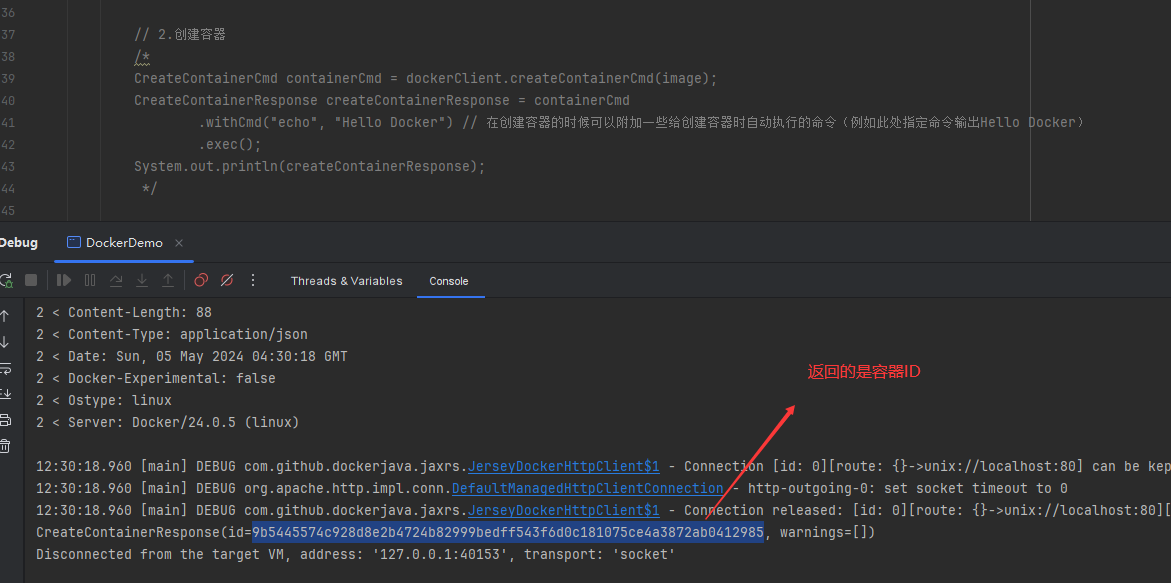
CreateContainerCmd containerCmd = dockerClient.createContainerCmd(image);
        CreateContainerResponse createContainerResponse = containerCmd
                .withCmd("echo", "Hello Docker") // 在创建容器的时候可以附加一些给创建容器时自动执行的命令(例如此处指定命令输出Hello Docker)
                .exec();
        System.out.println(createContainerResponse);
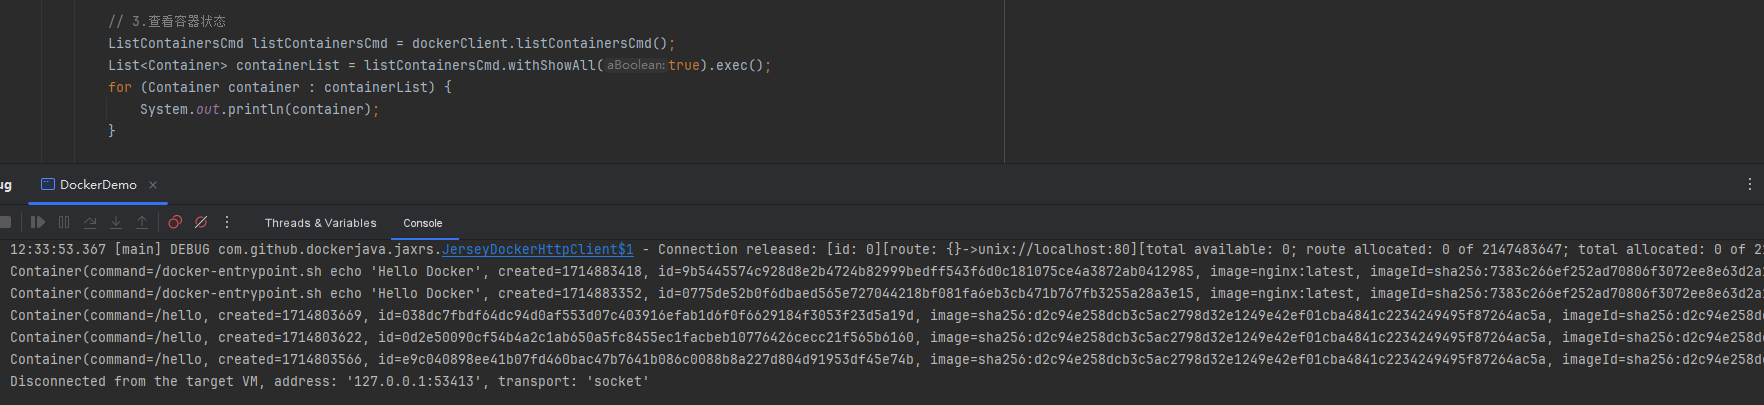
3)查看容器状态
ListContainersCmd listContainersCmd = dockerClient.listContainersCmd();
        List<Container> containerList = listContainersCmd.withShowAll(true).exec();
        for (Container container : containerList) {
            System.out.println(container);
        }
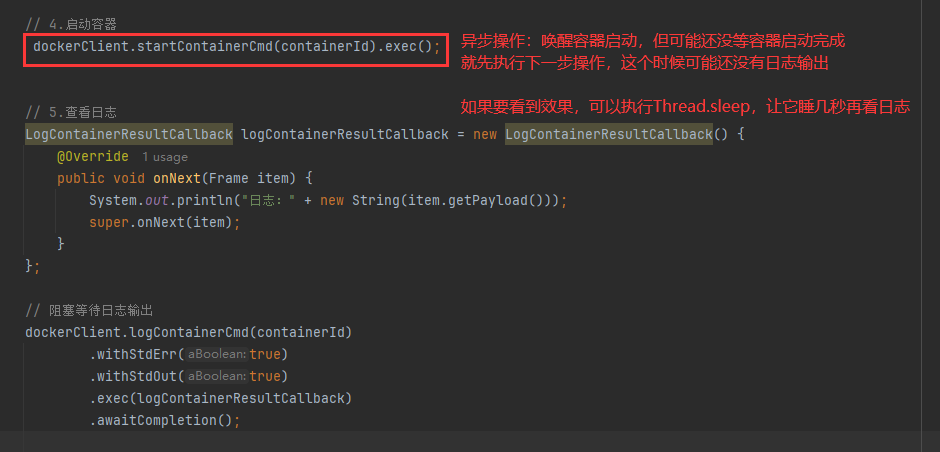
4)启动容器
// qizhong containerId,为容器创建成功生成的ID
dockerClient.startContainerCmd(containerId).exec();

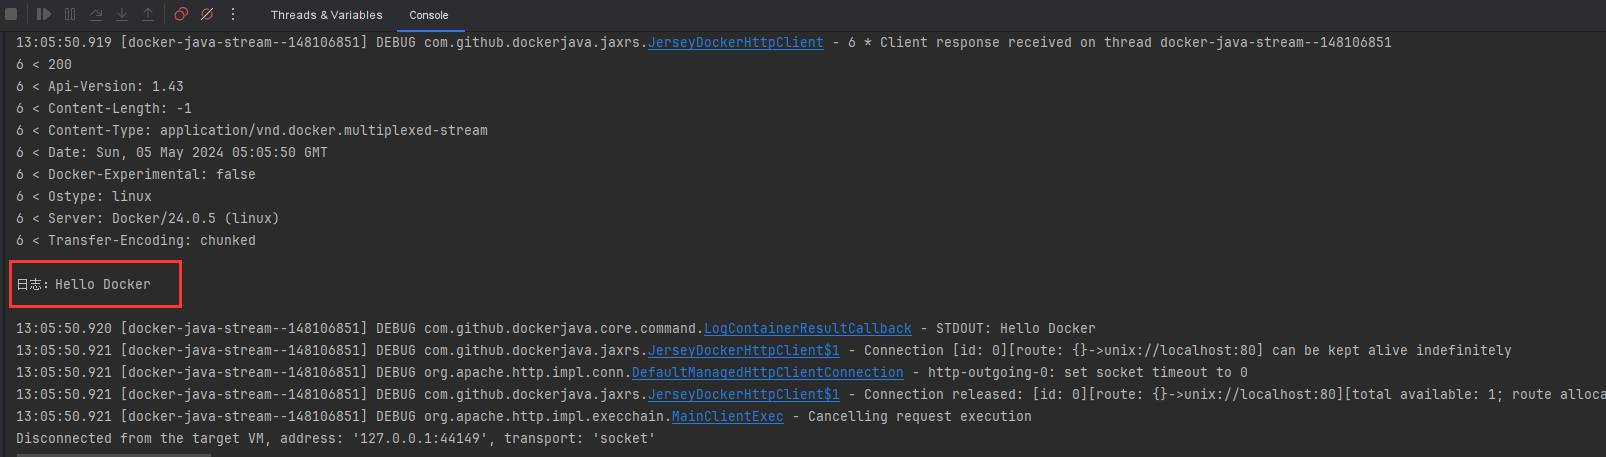
5)查看日志
// 5.查看日志
        LogContainerResultCallback logContainerResultCallback = new LogContainerResultCallback() {
            @Override
            public void onNext(Frame item) {
                System.out.println("日志:" + new String(item.getPayload()));
                super.onNext(item);
            }
        };

        // 阻塞等待日志输出
        dockerClient.logContainerCmd(containerId)
                .withStdErr(true)
                .withStdOut(true)
                .exec(logContainerResultCallback)
                .awaitCompletion(); // 阻塞等待日志输出
此处需注意,如果日志没有输出,则考虑下述情况(记得阻塞等待日志输出awaitCompletion)
6)删除容器
// 删除容器
dockerClient.removeContainerCmd(containerId).exec();
7)删除镜像
// 删除镜像
dockerClient.removeImageCmd(image).exec();
镜像删除时候如果存在容器(有些容器还在使用这个镜像),则无法直接删除,如果要强制删除,则可加入.withForce()

Docker实现代码沙箱
实现流程:docker 负责运行 Java 程序,并且得到结果
1)把用户的代码保存为文件
2)编译代码,得到 class 文件
3)把编译好的文件上传到容器环境内
4)在容器中执行代码,得到输出结果
5)收集整理输出结果
6)文件清理
7)错误处理,提升程序健壮性
todo:扩展:模版方法设计模式,定义同一套实现流程,让不同的子类去负责不同流程中的具体实现。执行步骤一样,每个步骤的实现方式不一样。
准备工作
复制一份JavaNativeCodeSandbox.java,构建新的JavaDockerCodeSandbox,保留前两步(保存代码文件、编译代码,尽量保证编程可以跨平台运行,可以在linux也可以在windows项目运行),清理掉一些冗余的内容(例如黑白名单等),参考:
public class JavaDockerCodeSandbox implements CodeSandbox {

    // 全局文件存储文件夹定义
    private static final String GLOBAL_CODE_DIR_NAME = "tmpCode";

    // 存储的文件名定义
    private static final String GLOBAL_JAVA_CLASS_NAME = "Main.java";

    // 设置超时控制时长
    private static final long TIME_OUT = 5000L;

    // 自定义安全管理器存储路径
    private static final String SECURITY_MANAGER_PATH = "E:\\workspace\\Git\\github\\PROJECT\\noob\\oj-platform\\oj-code-sandbox\\src\\main\\resources\\security";

    // 自定义安全管理器类名
    private static final String SECURITY_MANAGER_CLASS_NAME = "MySecurityManager";

    @Override
    public ExecuteCodeResponse executeCode(ExecuteCodeRequest executeCodeRequest) {

        List<String> inputList = executeCodeRequest.getInputList();
        String code = executeCodeRequest.getCode();
        String language = executeCodeRequest.getLanguage();

        // 1)把用户的代码保存为文件
        String userDir = System.getProperty("user.dir");
        String globalCodePathName = userDir + File.separator + GLOBAL_CODE_DIR_NAME;
        // 判断全局代码目录是否存在,没有则新建
        if (!FileUtil.exist(globalCodePathName)) {
            FileUtil.mkdir(globalCodePathName);
        }

        // 把用户的代码隔离存放
        String userCodeParentPath = globalCodePathName + File.separator + UUID.randomUUID();
        String userCodePath = userCodeParentPath + File.separator + GLOBAL_JAVA_CLASS_NAME;
        File userCodeFile = FileUtil.writeString(code, userCodePath, StandardCharsets.UTF_8);


        // 2)编译代码,得到 class 文件
        String compileCmd = String.format("javac -encoding utf-8 %s", userCodeFile.getAbsolutePath());
        try {
            Process compileProcess = Runtime.getRuntime().exec(compileCmd);
            // 自定义ProcessUtils获取控制台输出(通过 exitValue 判断程序是否正常返回,通过 inputStream 和 errorStream 获取控制台输出)
            // 方式1:通过args方式输入参数(项目核心)
            ExecuteMessage executeMessage = ProcessUtils.runProcessAndGetMessage(compileProcess, "编译");
            System.out.println(executeMessage);
        } catch (Exception e) {
            return getErrorResponse(e);
        }


        // todo 封装响应结果
        ExecuteCodeResponse executeCodeResponse = new ExecuteCodeResponse();
        // 6)错误处理,提升程序健壮性(通过自定义封装getErrorResponse错误处理方法,当程序抛出异常时,直接返回错误响应)参考getErrorResponse方法

        // 返回执行代码结果响应
        return executeCodeResponse;
    }


    /**
     * 获取错误响应
     *
     * @param e
     * @return
     */
    private ExecuteCodeResponse getErrorResponse(Throwable e) {
        ExecuteCodeResponse executeCodeResponse = new ExecuteCodeResponse();
        executeCodeResponse.setOutputList(new ArrayList<>());
        executeCodeResponse.setMessage(e.getMessage());
        // 表示代码沙箱错误
        executeCodeResponse.setStatus(2);
        executeCodeResponse.setJudgeInfo(new JudgeInfo());
        return executeCodeResponse;
    }
}
1.创建容器,上传编译文件
自定义容器的两种方式:
- 在已有镜像的基础上再扩充:比如拉取线程的 Java 环境(包含 jdk),再把编译后的文件复制到容器里。适合新项目,跑通流程
- 完全自定义容器:适合比较成熟的项目,比如封装多个语言的环境和实现
思考:每个测试用例都单独创建一个容器,每个容器只执行一次 Java 命令吗?浪费性能,所以需要创建一个 可交互 的容器,能接受多次输入并且输出
// 创建容器的时候,可以指定文件路径(Volumn)映射,作用是把本地的文件同步到容器中,可以让容器访问。也可以叫容器挂载目录
HostConfig hostConfig = new HostConfig();
hostConfig.setBinds(new Bind(userCodeParentPath, new Volume("/app")));// 容器映射,一般不要放在根目录

// 此处userCodeParentPath为用户代码存放位置,对应映射到linux服务器的/app下,因此实际Docker执行的是/app/xxx/Main.java文件内容
编写完创建容器的逻辑,然后执行main方法测试一下镜像能否正常拉取,linux通过docker images指令查看
noob@noob-virtual-machine:~$ docker images
REPOSITORY   TAG        IMAGE ID       CREATED       SIZE
nginx        latest     7383c266ef25   11 days ago   188MB
openjdk      8-alpine   a3562aa0b991   4 years ago   105MB
public class JavaDockerCodeSandbox implements CodeSandbox {

    // 全局文件存储文件夹定义
    private static final String GLOBAL_CODE_DIR_NAME = "tmpCode";

    // 存储的文件名定义
    private static final String GLOBAL_JAVA_CLASS_NAME = "Main.java";

    // 设置超时控制时长
    private static final long TIME_OUT = 5000L;

    // 自定义安全管理器存储路径
    private static final String SECURITY_MANAGER_PATH = "E:\\workspace\\Git\\github\\PROJECT\\noob\\oj-platform\\oj-code-sandbox\\src\\main\\resources\\security";

    // 自定义安全管理器类名
    private static final String SECURITY_MANAGER_CLASS_NAME = "MySecurityManager";

    // 定义初始化
    private static final Boolean FIRST_INIT = true;

    public static void main(String[] args) {

        JavaDockerCodeSandbox javaNativeCodeSandbox = new JavaDockerCodeSandbox();
        ExecuteCodeRequest executeCodeRequest = new ExecuteCodeRequest();
        executeCodeRequest.setInputList(Arrays.asList("1 2", "1 3"));
        String code = ResourceUtil.readStr("testCode/simpleComputeArgs/Main.java", StandardCharsets.UTF_8);
        executeCodeRequest.setCode(code);
        executeCodeRequest.setLanguage("java");
        ExecuteCodeResponse executeCodeResponse = javaNativeCodeSandbox.executeCode(executeCodeRequest);
        System.out.println(executeCodeResponse);

    }


    @Override
    public ExecuteCodeResponse executeCode(ExecuteCodeRequest executeCodeRequest) {

        List<String> inputList = executeCodeRequest.getInputList();
        String code = executeCodeRequest.getCode();
        String language = executeCodeRequest.getLanguage();

        // 1)把用户的代码保存为文件
        String userDir = System.getProperty("user.dir");
        String globalCodePathName = userDir + File.separator + GLOBAL_CODE_DIR_NAME;
        // 判断全局代码目录是否存在,没有则新建
        if (!FileUtil.exist(globalCodePathName)) {
            FileUtil.mkdir(globalCodePathName);
        }

        // 把用户的代码隔离存放
        String userCodeParentPath = globalCodePathName + File.separator + UUID.randomUUID();
        String userCodePath = userCodeParentPath + File.separator + GLOBAL_JAVA_CLASS_NAME;
        File userCodeFile = FileUtil.writeString(code, userCodePath, StandardCharsets.UTF_8);


        // 2)编译代码,得到 class 文件
        String compileCmd = String.format("javac -encoding utf-8 %s", userCodeFile.getAbsolutePath());
        try {
            Process compileProcess = Runtime.getRuntime().exec(compileCmd);
            // 自定义ProcessUtils获取控制台输出(通过 exitValue 判断程序是否正常返回,通过 inputStream 和 errorStream 获取控制台输出)
            // 方式1:通过args方式输入参数(项目核心)
            ExecuteMessage executeMessage = ProcessUtils.runProcessAndGetMessage(compileProcess, "编译");
            System.out.println(executeMessage);
        } catch (Exception e) {
            return getErrorResponse(e);
        }

        // 3)创建容器,把编译好的文件上传到容器环境内
        // 获取默认的 Docker Client
        DockerClient dockerClient = DockerClientBuilder.getInstance().build();
        String image = "openjdk:8-alpine";
        if(FIRST_INIT){
            // 初始化镜像(不用每次都去拉取镜像,只需要初始化一次)
            PullImageCmd pullImageCmd = dockerClient.pullImageCmd(image);
            PullImageResultCallback pullImageResultCallback = new PullImageResultCallback() {
                @Override
                public void onNext(PullResponseItem item) {
                    System.out.println("下载镜像:" + item.getStatus());
                    super.onNext(item);
                }
            };
            try {
                pullImageCmd
                        .exec(pullImageResultCallback)
                        .awaitCompletion();
            } catch (InterruptedException e) {
                System.out.println("拉取镜像异常");
                throw new RuntimeException(e);
            }
            System.out.println("下载完成");
        }

        // 创建容器
        CreateContainerCmd containerCmd = dockerClient.createContainerCmd(image);
        HostConfig hostConfig = new HostConfig();
        hostConfig.withMemory(100 * 1000 * 1000L); // 限制内存
        hostConfig.withMemorySwap(0L);
        hostConfig.withCpuCount(1L); // 限制CPU
        hostConfig.setBinds(new Bind(userCodeParentPath, new Volume("/app"))); // 容器映射,一般不要放在根目录
        CreateContainerResponse createContainerResponse = containerCmd
                .withHostConfig(hostConfig)
                .withNetworkDisabled(true)
                .withReadonlyRootfs(true)
                .withAttachStdin(true)
                .withAttachStderr(true)
                .withAttachStdout(true)
                .withTty(true)
                .exec();
        System.out.println(createContainerResponse);
        String containerId = createContainerResponse.getId();

        // todo 封装响应结果
        ExecuteCodeResponse executeCodeResponse = new ExecuteCodeResponse();
        // 6)错误处理,提升程序健壮性(通过自定义封装getErrorResponse错误处理方法,当程序抛出异常时,直接返回错误响应)参考getErrorResponse方法

        // 返回执行代码结果响应
        return executeCodeResponse;
    }


    /**
     * 获取错误响应
     *
     * @param e
     * @return
     */
    private ExecuteCodeResponse getErrorResponse(Throwable e) {
        ExecuteCodeResponse executeCodeResponse = new ExecuteCodeResponse();
        executeCodeResponse.setOutputList(new ArrayList<>());
        executeCodeResponse.setMessage(e.getMessage());
        // 表示代码沙箱错误
        executeCodeResponse.setStatus(2);
        executeCodeResponse.setJudgeInfo(new JudgeInfo());
        return executeCodeResponse;
    }
}
查看容器状态:此时会发现容器状态为Created(创建),控制台
noob@noob-virtual-machine:~$ docker ps -a
CONTAINER ID   IMAGE              COMMAND                   CREATED             STATUS                         PORTS     NAMES
cfc50fee1d0b   openjdk:8-alpine   "/bin/sh"                 8 minutes ago       Created                                  recursing_torvalds
6d71f09b603f   openjdk:8-alpine   "/bin/sh"                 11 minutes ago      Created                                  unruffled_bohr
8e10b5f4d26d   nginx:latest       "/docker-entrypoint.…"   13 minutes ago      Created                                  recursing_boyd
fe2b3f4c98f7   nginx:latest       "/docker-entrypoint.…"   51 minutes ago      Exited (0) 51 minutes ago                competent_mclean
测试容器启动,发现容器无法正常启动,报错提示:Exception in thread "main" com.github.dockerjava.api.exception.InternalServerErrorException: Status 500: Decoding seccomp profile failed: invalid character 'å' looking for beginning of value
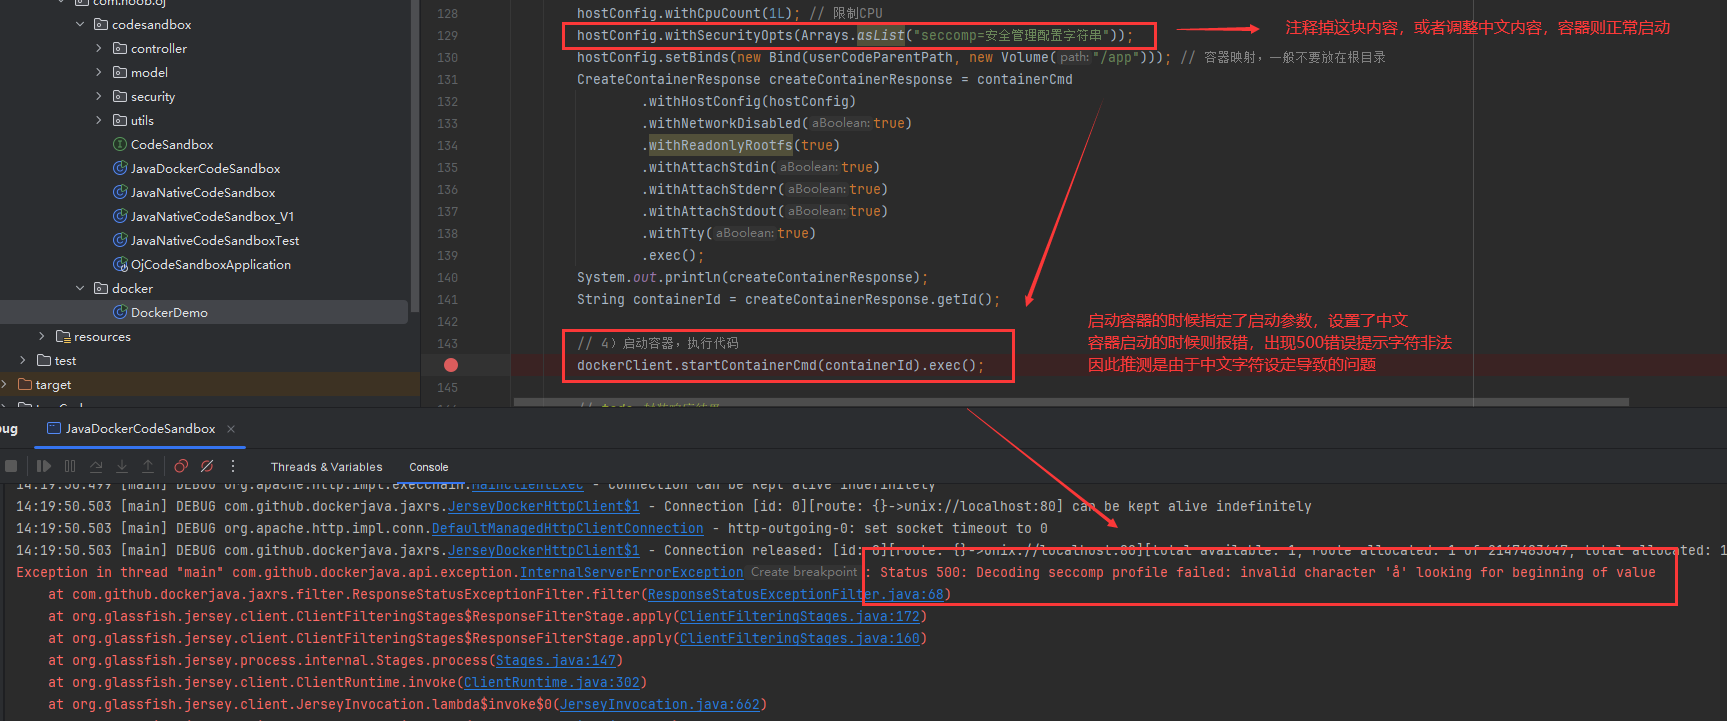
如果遇到容器启动报错500(服务器内部错误),按照提示信息去跟踪错误:参考上图错误提示,这个错误表明Docker在尝试启动一个容器时遇到了问题。Status 500是一个通用的HTTP状态码,表示服务器内部错误。具体到Docker,这通常意味着Docker守护进程(daemon)遇到了一个预料之外的错误。在这个错误消息中,"Decoding seccomp profile failed: invalid character"暗示Docker在解码Seccomp(安全计算模式)配置文件时遇到了格式错误或无效字符。
Seccomp是一种用来限制容器进程可调用的系统调用的机制。Docker使用Seccomp来提供容器的隔离性和安全性。
解决方法:
1)检查Docker版本:确保你的Docker版本是最新的,或者至少是一个支持你当前操作的版本
2)检查容器配置:如果你在启动容器时指定了特定的Seccomp配置文件,请检查该文件的格式是否正确,没有无效字符
3)重启Docker服务:有时候,简单的重启Docker服务可以解决临时的问题
4)查看Docker日志:检查Docker守护进程的日志文件,通常位于/var/log/docker.log或通过journalctl -u docker.service命令查看,以获取更多错误信息
5)如果问题依然存在,考虑在Docker社区或者GitHub仓库提交issue,提供错误报告和相关日志文件,以便开发者们可以查看并修复问题
在进行任何修改前,请确保备份重要数据和配置,以防需要恢复到原始状态
调整完上述错误,再次查看容器状态:此时会发现通过openjdk:8-alpine镜像创建的状态不是退出EXit...,这是因为通过Java代码控制创建的是一个tty(对应containerCmd.withTty(true))可交互的命令行程序(对应COMMAND:/bin/sh),它相当于会在后台启动一个命令行工具
CONTAINER ID   IMAGE              COMMAND                   CREATED              STATUS                         PORTS     NAMES
d08b5c400e7f   openjdk:8-alpine   "/bin/sh"                 About a minute ago   Up About a minute                        loving_payne
3f637103930a   openjdk:8-alpine   "/bin/sh"                 7 minutes ago        Up 7 minutes                             nostalgic_clarke
40b76c3266f9   openjdk:8-alpine   "/bin/sh"                 11 minutes ago       Created                                  elated_williamson
fe2b3f4c98f7   nginx:latest       "/docker-entrypoint.…"   About an hour ago    Exited (0) About an hour ago             competent_mclean
2.启动容器,执行代码
Docker执行命令(操作已启动容器)
docker exec [OPTIONS] CONTAINER COMMAND [ARG...]

Options:
  -d, --detach               Detached mode: run command in the background
      --detach-keys string   Override the key sequence for detaching a container
  -e, --env list             Set environment variables
      --env-file list        Read in a file of environment variables
  -i, --interactive          Keep STDIN open even if not attached
      --privileged           Give extended privileges to the command
  -t, --tty                  Allocate a pseudo-TTY
  -u, --user string          Username or UID (format: "<name|uid>[:<group|gid>]")
  -w, --workdir string       Working directory inside the container
参考示例:例如此处拉取了JDK8镜像,并创建了容器,然后使用它来执行代码
docker exec [容器名称] java -cp /app Main 1 3

# 以上述创建好的容器为参考,选择一个容器执行代码
docker exec loving_payne java -cp /app Main 1 3
结果:4
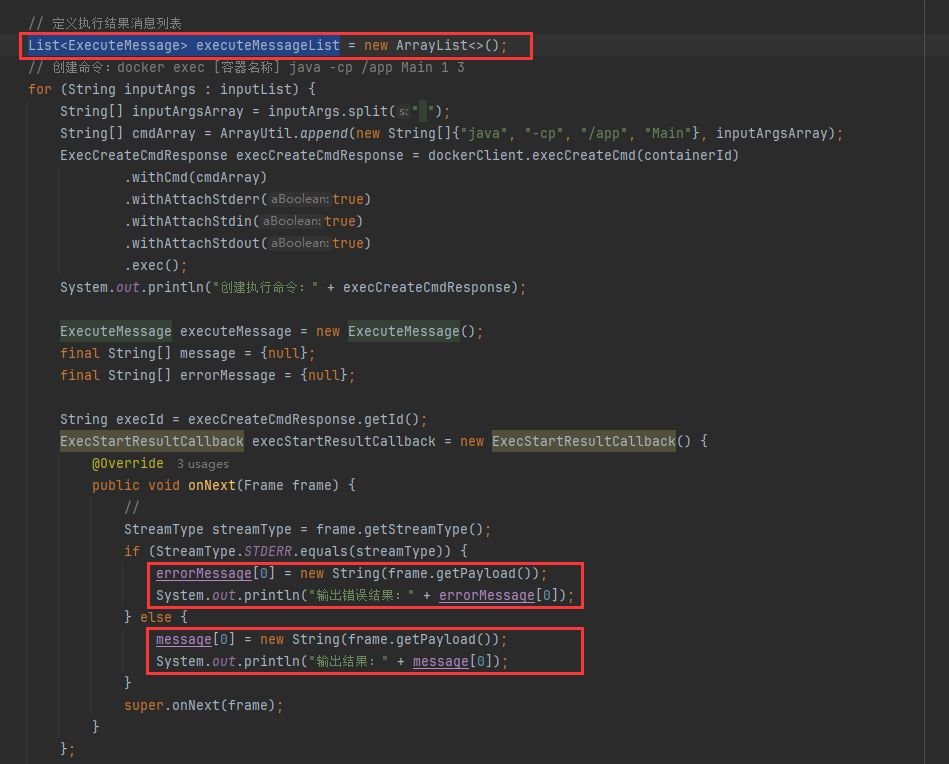
注意,要把命令按照空格拆分,作为一个数组传递,否则可能会被识别为一个字符串,而不是多个参数。完善步骤4)中的内容,实现启动容器,执行指定代码
		// 4)启动容器,执行代码
        dockerClient.startContainerCmd(containerId).exec();

        // 创建命令:docker exec [容器名称] java -cp /app Main 1 3
        for (String inputArgs : inputList) {
            String[] inputArgsArray = inputArgs.split(" ");
            String[] cmdArray = ArrayUtil.append(new String[]{"java", "-cp", "/app", "Main"}, inputArgsArray);
            ExecCreateCmdResponse execCreateCmdResponse = dockerClient.execCreateCmd(containerId)
                    .withCmd(cmdArray)
                    .withAttachStderr(true)
                    .withAttachStdin(true)
                    .withAttachStdout(true)
                    .exec();
            System.out.println("创建执行命令:" + execCreateCmdResponse);
            String execId = execCreateCmdResponse.getId();
            ExecStartResultCallback execStartResultCallback = new ExecStartResultCallback() {
                @Override
                public void onNext(Frame frame) {
                    //
                    StreamType streamType = frame.getStreamType();
                    if (StreamType.STDERR.equals(streamType)) {
                        System.out.println("输出错误结果:" + new String(frame.getPayload()));
                    } else {
                        System.out.println("输出结果:" + new String(frame.getPayload()));
                    }
                    super.onNext(frame);
                }
            };
            try {
                // 将回调结果传递过来,并且阻塞等待日志输出
                dockerClient.execStartCmd(execId)
                        .exec(execStartResultCallback)
                        .awaitCompletion();
            } catch (InterruptedException e) {
                System.out.println("程序执行异常");
                throw new RuntimeException(e);
            }
        }
编写完成,启动查看控制台信息确认命令是否可以正常执行。尽量复用之前的ExecuteMessage模式,在异步接口中填充正常信息和异常信息,进一步优化打印执行信息,定义一个List<ExecuteMessage> executeMessageList存放每条命令执行结果消息。此处需要注意一点,在内部类中使用外部的变量不能直接使用普通变量,可以根据idea提示将他调整为引用类型即可
🚀获取程序执行时间:和Java原生一样,使用StopWatch在执行前后统计时间
stopWatch.start();
dockerClient.execStartCmd(execId)
        .exec(execStartResultCallback)
        .awaitCompletion(TIME_OUT, TimeUnit.MILLISECONDS);
stopWatch.stop();
time = stopWatch.getLastTaskTimeMillis();

🚀获取程序占用内存:
程序占用的内存每个时刻都在变化,不可能获取到所有时间点的内存。因此此处设定:定义一个周期,定期的获取内存
参考示例:
// 获取占用的内存
StatsCmd statsCmd = dockerClient.statsCmd(containerId);
ResultCallback<Statistics> statisticsResultCallback = statsCmd.exec(new ResultCallback<Statistics>() {
    @Override
    public void onNext(Statistics statistics) {
        System.out.println("内存占用:" + statistics.getMemoryStats().getUsage());
        maxMemory[0] = Math.max(statistics.getMemoryStats().getUsage(), maxMemory[0]);
    }

    @Override
    public void onStart(Closeable closeable) {

    }

    @Override
    public void onError(Throwable throwable) {

    }

    @Override
    public void onComplete() {

    }

    @Override
    public void close() throws IOException {

    }
});
statsCmd.exec(statisticsResultCallback);


--------------------------------------------------------
// 记得关闭(否则可能一直输出)
statsCmd.close();
注意程序执行完毕之后要关闭统计命令:statsCmd.close()
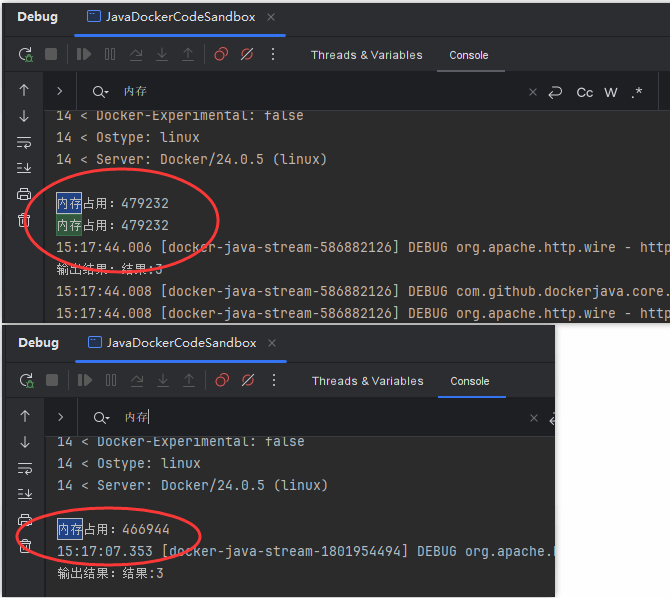
此处多次测试结果,发现测试每次输出的结果不太一样,有时候是一条、有时候是两条,可能和异步执行操作有关
3.封装响应结果、清理文件(和原生实现基本一致)
	    // 5)封装响应结果(和此前的原生Java方式完全一致)
        ExecuteCodeResponse executeCodeResponse = new ExecuteCodeResponse();
        List<String> outputList = new ArrayList<>();
        // 取用时最大值,便于判断是否超时
        long maxTime = 0;
        for (ExecuteMessage executeMessage : executeMessageList) {
            String errorMessage = executeMessage.getErrorMessage();
            if (StrUtil.isNotBlank(errorMessage)) {
                executeCodeResponse.setMessage(errorMessage);
                // 用户提交的代码执行中存在错误
                executeCodeResponse.setStatus(3);
                break;
            }
            outputList.add(executeMessage.getMessage());
            Long time = executeMessage.getTime();
            if (time != null) {
                maxTime = Math.max(maxTime, time);
            }
        }
        // 正常运行完成
        if (outputList.size() == executeMessageList.size()) {
            executeCodeResponse.setStatus(1);
        }
        executeCodeResponse.setOutputList(outputList);
        JudgeInfo judgeInfo = new JudgeInfo();
        judgeInfo.setTime(maxTime);
        // todo 要借助第三方库来获取内存占用,非常麻烦,此处不做实现
        // judgeInfo.setMemory();
        executeCodeResponse.setJudgeInfo(judgeInfo);

        // 6)文件清理
        if (userCodeFile.getParentFile() != null) {
            boolean del = FileUtil.del(userCodeParentPath);
            System.out.println("删除" + (del ? "成功" : "失败"));
        }
最终基于Docker构建初稿参考如下:
package com.noob.oj.codesandbox;

import cn.hutool.core.io.FileUtil;
import cn.hutool.core.io.resource.ResourceUtil;
import cn.hutool.core.util.ArrayUtil;
import cn.hutool.core.util.StrUtil;
import com.github.dockerjava.api.DockerClient;
import com.github.dockerjava.api.async.ResultCallback;
import com.github.dockerjava.api.command.*;
import com.github.dockerjava.core.command.ExecStartResultCallback;
import com.github.dockerjava.core.command.PullImageResultCallback;
import com.github.dockerjava.api.model.*;
import com.github.dockerjava.core.DockerClientBuilder;
import com.noob.oj.codesandbox.model.ExecuteCodeRequest;
import com.noob.oj.codesandbox.model.ExecuteCodeResponse;
import com.noob.oj.codesandbox.model.ExecuteMessage;
import com.noob.oj.codesandbox.model.JudgeInfo;
import com.noob.oj.codesandbox.utils.ProcessUtils;

import org.springframework.util.StopWatch;

import java.io.Closeable;
import java.io.File;
import java.io.IOException;
import java.nio.charset.StandardCharsets;
import java.util.ArrayList;
import java.util.Arrays;
import java.util.List;
import java.util.UUID;

/**
 * @ClassName JavaDockerCodeSandbox
 * @Description JavaDocker沙箱实现
 * @Author holic-x
 * @Date 2024/5/3 19:08
 */
public class JavaDockerCodeSandbox implements CodeSandbox {

    // 全局文件存储文件夹定义
    private static final String GLOBAL_CODE_DIR_NAME = "tmpCode";

    // 存储的文件名定义
    private static final String GLOBAL_JAVA_CLASS_NAME = "Main.java";

    // 设置超时控制时长
    private static final long TIME_OUT = 5000L;

    // 自定义安全管理器存储路径
    private static final String SECURITY_MANAGER_PATH = "E:\\workspace\\Git\\github\\PROJECT\\noob\\oj-platform\\oj-code-sandbox\\src\\main\\resources\\security";

    // 自定义安全管理器类名
    private static final String SECURITY_MANAGER_CLASS_NAME = "MySecurityManager";

    // 定义初始化
    private static final Boolean FIRST_INIT = true;

    public static void main(String[] args) {

        JavaDockerCodeSandbox javaNativeCodeSandbox = new JavaDockerCodeSandbox();
        ExecuteCodeRequest executeCodeRequest = new ExecuteCodeRequest();
        executeCodeRequest.setInputList(Arrays.asList("1 2", "1 3"));
        String code = ResourceUtil.readStr("testCode/simpleComputeArgs/Main.java", StandardCharsets.UTF_8);
        executeCodeRequest.setCode(code);
        executeCodeRequest.setLanguage("java");
        ExecuteCodeResponse executeCodeResponse = javaNativeCodeSandbox.executeCode(executeCodeRequest);
        System.out.println(executeCodeResponse);

    }


    @Override
    public ExecuteCodeResponse executeCode(ExecuteCodeRequest executeCodeRequest) {

        List<String> inputList = executeCodeRequest.getInputList();
        String code = executeCodeRequest.getCode();
        String language = executeCodeRequest.getLanguage();

        // 1)把用户的代码保存为文件
        String userDir = System.getProperty("user.dir");
        String globalCodePathName = userDir + File.separator + GLOBAL_CODE_DIR_NAME;
        // 判断全局代码目录是否存在,没有则新建
        if (!FileUtil.exist(globalCodePathName)) {
            FileUtil.mkdir(globalCodePathName);
        }

        // 把用户的代码隔离存放
        String userCodeParentPath = globalCodePathName + File.separator + UUID.randomUUID();
        String userCodePath = userCodeParentPath + File.separator + GLOBAL_JAVA_CLASS_NAME;
        File userCodeFile = FileUtil.writeString(code, userCodePath, StandardCharsets.UTF_8);


        // 2)编译代码,得到 class 文件
        String compileCmd = String.format("javac -encoding utf-8 %s", userCodeFile.getAbsolutePath());
        try {
            Process compileProcess = Runtime.getRuntime().exec(compileCmd);
            // 自定义ProcessUtils获取控制台输出(通过 exitValue 判断程序是否正常返回,通过 inputStream 和 errorStream 获取控制台输出)
            // 方式1:通过args方式输入参数(项目核心)
            ExecuteMessage executeMessage = ProcessUtils.runProcessAndGetMessage(compileProcess, "编译");
            System.out.println(executeMessage);
        } catch (Exception e) {
            return getErrorResponse(e);
        }

        // 3)创建容器,把编译好的文件上传到容器环境内
        // 获取默认的 Docker Client
        DockerClient dockerClient = DockerClientBuilder.getInstance().build();
        String image = "openjdk:8-alpine";
        if (FIRST_INIT) {
            // 初始化镜像(不用每次都去拉取镜像,只需要初始化一次)
            PullImageCmd pullImageCmd = dockerClient.pullImageCmd(image);
            PullImageResultCallback pullImageResultCallback = new PullImageResultCallback() {
                @Override
                public void onNext(PullResponseItem item) {
                    System.out.println("下载镜像:" + item.getStatus());
                    super.onNext(item);
                }
            };
            try {
                pullImageCmd
                        .exec(pullImageResultCallback)
                        .awaitCompletion();
            } catch (InterruptedException e) {
                System.out.println("拉取镜像异常");
                throw new RuntimeException(e);
            }
            System.out.println("下载完成");
        }

        // 创建容器
        CreateContainerCmd containerCmd = dockerClient.createContainerCmd(image);
        HostConfig hostConfig = new HostConfig();
        hostConfig.withMemory(100 * 1000 * 1000L); // 限制内存
        hostConfig.withMemorySwap(0L);
        hostConfig.withCpuCount(1L); // 限制CPU
//        hostConfig.withSecurityOpts(Arrays.asList("seccomp=安全管理配置字符串"));
        hostConfig.setBinds(new Bind(userCodeParentPath, new Volume("/app"))); // 容器映射,一般不要放在根目录
        CreateContainerResponse createContainerResponse = containerCmd
                .withHostConfig(hostConfig)
                .withNetworkDisabled(true)
                .withReadonlyRootfs(true)
                .withAttachStdin(true)
                .withAttachStderr(true)
                .withAttachStdout(true)
                .withTty(true)
                .exec();
        System.out.println(createContainerResponse);
        String containerId = createContainerResponse.getId();

        // 4)启动容器,执行代码
        dockerClient.startContainerCmd(containerId).exec();

        // 定义执行结果消息列表
        List<ExecuteMessage> executeMessageList = new ArrayList<>();
        // 创建命令:docker exec [容器名称] java -cp /app Main 1 3
        for (String inputArgs : inputList) {
            // 定义计时器
            StopWatch stopWatch = new StopWatch();
            long time = 0L;

            String[] inputArgsArray = inputArgs.split(" ");
            String[] cmdArray = ArrayUtil.append(new String[]{"java", "-cp", "/app", "Main"}, inputArgsArray);
            ExecCreateCmdResponse execCreateCmdResponse = dockerClient.execCreateCmd(containerId)
                    .withCmd(cmdArray)
                    .withAttachStderr(true)
                    .withAttachStdin(true)
                    .withAttachStdout(true)
                    .exec();
            System.out.println("创建执行命令:" + execCreateCmdResponse);

            ExecuteMessage executeMessage = new ExecuteMessage();
            final String[] message = {null};
            final String[] errorMessage = {null};

            String execId = execCreateCmdResponse.getId();
            ExecStartResultCallback execStartResultCallback = new ExecStartResultCallback() {
                @Override
                public void onNext(Frame frame) {
                    //
                    StreamType streamType = frame.getStreamType();
                    if (StreamType.STDERR.equals(streamType)) {
                        errorMessage[0] = new String(frame.getPayload());
                        System.out.println("输出错误结果:" + errorMessage[0]);
                    } else {
                        message[0] = new String(frame.getPayload());
                        System.out.println("输出结果:" + message[0]);
                    }
                    super.onNext(frame);
                }
            };

            final long[] maxMemory = {0L};
            // 获取占用的内存
            StatsCmd statsCmd = dockerClient.statsCmd(containerId);
            ResultCallback<Statistics> statisticsResultCallback = statsCmd.exec(new ResultCallback<Statistics>() {

                @Override
                public void onNext(Statistics statistics) {
                    System.out.println("内存占用:" + statistics.getMemoryStats().getUsage());
                    maxMemory[0] = Math.max(statistics.getMemoryStats().getUsage(), maxMemory[0]);
                }

                @Override
                public void close() throws IOException {

                }

                @Override
                public void onStart(Closeable closeable) {

                }

                @Override
                public void onError(Throwable throwable) {

                }

                @Override
                public void onComplete() {

                }
            });
            statsCmd.exec(statisticsResultCallback);

            try {
                stopWatch.start();
                // 将回调结果传递过来,并且阻塞等待日志输出
                dockerClient.execStartCmd(execId)
                        .exec(execStartResultCallback)
                        .awaitCompletion();
                stopWatch.stop();
                time = stopWatch.getLastTaskTimeMillis();

                // 关闭(否则可能一直输出)
                statsCmd.close();

            } catch (InterruptedException e) {
                System.out.println("程序执行异常");
                throw new RuntimeException(e);
            }

            // 设置执行信息
            executeMessage.setMessage(message[0]);
            executeMessage.setErrorMessage(errorMessage[0]);
            executeMessage.setTime(time);
            executeMessage.setMemory(maxMemory[0]);
            // 将执行信息加入列表
            executeMessageList.add(executeMessage);
        }

        // 5)封装响应结果(和此前的原生Java方式完全一致)
        ExecuteCodeResponse executeCodeResponse = new ExecuteCodeResponse();
        List<String> outputList = new ArrayList<>();
        // 取用时最大值,便于判断是否超时
        long maxTime = 0;
        for (ExecuteMessage executeMessage : executeMessageList) {
            String errorMessage = executeMessage.getErrorMessage();
            if (StrUtil.isNotBlank(errorMessage)) {
                executeCodeResponse.setMessage(errorMessage);
                // 用户提交的代码执行中存在错误
                executeCodeResponse.setStatus(3);
                break;
            }
            outputList.add(executeMessage.getMessage());
            Long time = executeMessage.getTime();
            if (time != null) {
                maxTime = Math.max(maxTime, time);
            }
        }
        // 正常运行完成
        if (outputList.size() == executeMessageList.size()) {
            executeCodeResponse.setStatus(1);
        }
        executeCodeResponse.setOutputList(outputList);
        JudgeInfo judgeInfo = new JudgeInfo();
        judgeInfo.setTime(maxTime);
        // todo 要借助第三方库来获取内存占用,非常麻烦,此处不做实现
        // judgeInfo.setMemory();
        executeCodeResponse.setJudgeInfo(judgeInfo);

        // 6)文件清理
        if (userCodeFile.getParentFile() != null) {
            boolean del = FileUtil.del(userCodeParentPath);
            System.out.println("删除" + (del ? "成功" : "失败"));
        }

        // 7)错误处理,提升程序健壮性(通过自定义封装getErrorResponse错误处理方法,当程序抛出异常时,直接返回错误响应)参考getErrorResponse方法

        // 返回执行代码结果响应
        return executeCodeResponse;
    }

    /**
     * 获取错误响应
     *
     * @param e
     * @return
     */
    private ExecuteCodeResponse getErrorResponse(Throwable e) {
        ExecuteCodeResponse executeCodeResponse = new ExecuteCodeResponse();
        executeCodeResponse.setOutputList(new ArrayList<>());
        executeCodeResponse.setMessage(e.getMessage());
        // 表示代码沙箱错误
        executeCodeResponse.setStatus(2);
        executeCodeResponse.setJudgeInfo(new JudgeInfo());
        return executeCodeResponse;
    }
}
Docker代码沙箱优化
参考基于Java原生方式构建,针对各种异常代码攻击来优化代码实现
1.超时控制
实现思路
- 设置容器的超时控制
- 判断是否超时
实现说明
执行容器时,可以增加超时参数控制值:awaitCompletion的TIMEOUT参数配置(如果执行超时则退掉)
dockerClient.execStartCmd(execId)
                        .exec(execStartResultCallback)
                        .awaitCompletion(TIME_OUT, TimeUnit.MILLISECONDS);
但是,这种方式无论超时与否,都会往下执行,无法判断是否超时
解决方案:**可以定义一个标志,如果程序执行完成,把标志设置为false。**即假设初始状态是超时的,如果执行回调完成则说明没有超时(因为如果超时了会受到上面的超时控制限制,如果是正常完成则会通过回调函数把这个超时参数给“纠正”过来,进而可以得到一个可以判断是否超时的参数(类似于设置它是否完成概念))
示例代码如下:
// 判断是否超时
final boolean[] timeout = {true};
String execId = execCreateCmdResponse.getId();
ExecStartResultCallback execStartResultCallback = new ExecStartResultCallback() {

    @Override
    public void onComplete() {
        // 如果执行完成,则表示没超时
        timeout[0] = false;
        super.onComplete();
    }

    ...
};
2.内存资源
创建容器的时候可以指定内容限制,通过hostConfig的withMemory方法设置,hostConfig.withMemory(100 * 1000 * 1000L);
CreateContainerCmd containerCmd = dockerClient.createContainerCmd(image);
HostConfig hostConfig = new HostConfig();
hostConfig.withMemory(100 * 1000 * 1000L);
hostConfig.withMemorySwap(0L);
hostConfig.withCpuCount(1L);
CreateContainerResponse createContainerResponse = containerCmd
        .withHostConfig(hostConfig)
        .exec();
3.限制网络资源
创建容器的时候可以设置网络配置为管理:
CreateContainerResponse createContainerResponse = containerCmd
                .withHostConfig(hostConfig)
                .withNetworkDisabled(true)
4.权限管理
Docker 容器已经做了系统层面的隔离,比较安全,但不能保证绝对安全
- 结合 Java 安全管理器去使用
- 限制用户不能向 root 根目录写文件
CreateContainerResponse createContainerResponse = containerCmd
        .withHostConfig(hostConfig)
        .withNetworkDisabled(true)
        .withReadonlyRootfs(true)
Linux 自带的一些安全管理措施 seccomp(Security Compute Mode),是一个用于 Linux 内核的安全功能,它允许你限制进程可以执行的系统调用,从而减少潜在的攻击面和提高容器的安全性。通过配置 seccomp,可以控制容器内进程可以使用的系统调用类型和参数
hostConfig.withSecurityOpts(Arrays.asList("seccomp=安全管理配置字符串"));
# 示例 seccomp 配置文件 profile.json
{
  "defaultAction": "SCMP_ACT_ALLOW",
  "syscalls" : [
    {
      "name": "write",
      "action": "SCMP_ACT_ALLOW"
    },
    {
      "name": "read",
      "action": "SCMP_ACT_ALLOW"
    }
  ]
}
在 hostConfig 中开启安全机制:可以将profile.json放在resources下,然后通过ResourceUtil读取文件内容,然后通过hostConfig进行配置拼接(或者直接把json字符串拼接到字符串后面)
String profileConfig = ResourceUtil.readUtf8Str("profile.json");
hostConfig.withSecurityOpts(Arrays.asList("seccomp=" + profileConfig));