【noob-rpc】⑫扩展版RPC-启动机制和注解驱动
【noob-rpc】⑫扩展版RPC-启动机制和注解驱动
开发扩展说明
【1】启动机制:提供 ProviderBootstrap、 ConsumerBootstrap分别作为服务提供者、服务消费者启动类,在项目中引用其初始化RPC框架
【2】注解驱动:引入自定义注解,实现类似Dubbo框架应用的注解配置:@EnableRpc、@RpcService、@RpcReference
【3】构建sample-springboot-provider、sample-springboot-consumer引入starter,使用注解配置完成RPC框架应用
需求分析
基于前面的RPC框架构建,目前RPC 框架的功能已经比较完善,则需进一步思考如何优化这个框架。框架是给开发者用的,换位思考:如果自己是一名开发者,会选择怎样的一款框架呢?优先选择符合自身需求的框架作为参考。
- 框架的知名度和用户数:尽量选主流的、用户多的,经过了充分的市场验证
- 生态和社区活跃度:尽量选社区活跃的、能和其他技术兼容的
- 简单易用易上手:最好能开箱即用,不用花很多时间去上手。这点可能是我们在做个人小型项目时最关注的,可以把精力聚焦到业务开发上。
- 选择框架的过程其实还有一个专业术语(技术选型)
1.RPC框架优化思考
分析现有RPC框架实现
参考CoreProviderSample服务提供者,如果作为一个服务提供者需要完成下述操作进行相关配置,但对于每个开发者来说都要用到这块的内容,为了简化框架的使用,提升开发者开发效率,也避免一些重复代码编写的工作量,此处考虑建立合适的启动机制和注解启动机制,提升框架的易用性。
作为服务提供者,使用RPC框架提供服务需要执行下述操作:
- 框架初始化
- 服务注册(将服务注册到注册中心)
- 启动web服务
/**
 * 服务提供者启动类,通过main方法编写提供服务的代码
 */
public class CoreProviderSample {
    public static void main(String[] args) {
        // 框架初始化
        RpcApplication.init();

        // 服务注册
        String serviceName = UserService.class.getName();
        LocalRegistry.register(serviceName, UserServiceImpl.class);

        // 注册服务到注册中心
        RpcConfig rpcConfig = RpcApplication.getRpcConfig();
        RegistryConfig registryConfig = rpcConfig.getRegistryConfig();
        Registry registry = RegistryFactory.getInstance(registryConfig.getRegistry());
        ServiceMetaInfo serviceMetaInfo = new ServiceMetaInfo();
        serviceMetaInfo.setServiceName(serviceName);
        serviceMetaInfo.setServiceHost(rpcConfig.getServerHost());
        serviceMetaInfo.setServicePort(rpcConfig.getServerPort());
        try {
            registry.register(serviceMetaInfo);
        } catch (Exception e) {
            throw new RuntimeException(e);
        }

        // 启动web服务(从RPC框架中的全局配置中获取端口)
//        HttpServer httpServer = new VertxHttpServer();
//        httpServer.doStart(RpcApplication.getRpcConfig().getServerPort());
        VertxTcpServer vertxTcpServer = new VertxTcpServer();
        vertxTcpServer.doStart(RpcApplication.getRpcConfig().getServerPort());
    }
}
2.优化方案设计
启动机制
启动机制设计:将所有的启动代码封装为一个专门的启动类、方法,然后由服务消费者/服务提供者进行调用。
此处需注意区分服务消费者和服务提供者两者需要初始化的模块有点不同,服务提供者需要额外启动web服务,而服务消费者不需要,因此需要针对二者分别提供一个启动类(可以将一些公共初始化模块抽离出来,放在全局应用类RpcApplication中,在复用代码的同时保证启动类的可维护性、可扩展性)
参考Dubbo框架类似设计(参考对应api文档说明)
注解驱动
注解驱动设计:除了启动类这种方式,还可借助注解驱动这种方式帮助开发者使用框架。
参考Dubbo框架设计:项目通过注解配置启动Dubbo服务配置,而服务提供者通过@DubboService注册/发布服务、服务消费者通过@DubboReference引用服务。且目前Java项目大部分是基于Springboot框架,因此Dubbo还推出SpringBoot Starter,让开发者用更少的代码在SpringBoot项目中使用框架。
整体构建思路:
【1】创建一个Springboot Starter项目(参考此前SDK构建的思路)
【2】通过注解驱动框架的初始化,完成服务注册和获取引用
- 方式1:主动扫描:让开发者指定要扫描的路径,遍历所有的类文件,针对有注解的类文件,执行自定义的操作
- 方式2:监听 Bean 加载:在 Spring 项目中,可以通过实现 BeanPostProcessor 接口,在 Bean 初始化后执行自定义的操作
实现步骤
1.启动机制
构建步骤说明
【1】基础字段属性封装:ServiceRegisterInfo(定义注册服务相关的字段)
【2】创建bootstrap包:存储所有和框架启动初始化相关的代码(ProviderBootstrap、ConsumerBootstrap)
涉及修改内容
# noob-rpc-core
bootstrap:
	- ConsumerBootstrap
	- ProviderBootstrap
model:
	- ServiceRegisterInfo

# sample-provider
CoreProviderSampleByBootstrap

# sample-consumer
CoreProviderSample
构建步骤
ServiceRegisterInfo
/**
 * 服务注册信息类
 */
@Data
@AllArgsConstructor
@NoArgsConstructor
public class ServiceRegisterInfo<T> {

    /**
     * 服务名称
     */
    private String serviceName;

    /**
     * 实现类
     */
    private Class<? extends T> implClass;
}
ProviderBootstrap(服务提供者启动类)
将原有CoreProviderSample引用RPC框架的片段进行调整,放在ProviderBootstrap中实现
/**
 * 服务提供者启动类
 */
public class ProviderBootstrap {

    // 框架初始化方法
//    public static void init(List<ServiceRegisterInfo<?>> serviceRegisterInfoList) {
    public static void init(List<ServiceRegisterInfo> serviceRegisterInfoList) {
        // 框架初始化
        RpcApplication.init();

        // 全局配置
        final RpcConfig rpcConfig = RpcApplication.getRpcConfig();

        // 注册服务
        for (ServiceRegisterInfo<?> serviceRegisterInfo : serviceRegisterInfoList) {
            String serviceName = serviceRegisterInfo.getServiceName();
            // 本地注册
            LocalRegistry.register(serviceName, serviceRegisterInfo.getImplClass());

            // 注册服务到注册中心
            RegistryConfig registryConfig = rpcConfig.getRegistryConfig();
            Registry registry = RegistryFactory.getInstance(registryConfig.getRegistry());
            ServiceMetaInfo serviceMetaInfo = new ServiceMetaInfo();
            serviceMetaInfo.setServiceName(serviceName);
            serviceMetaInfo.setServiceHost(rpcConfig.getServerHost());
            serviceMetaInfo.setServicePort(rpcConfig.getServerPort());
            try {
                registry.register(serviceMetaInfo);
            } catch (Exception e) {
                throw new RuntimeException(serviceName + " 服务注册失败", e);
            }
        }

        // 启动web服务(从RPC框架中的全局配置中获取端口)
//        HttpServer httpServer = new VertxHttpServer();
//        httpServer.doStart(RpcApplication.getRpcConfig().getServerPort());
        VertxTcpServer vertxTcpServer = new VertxTcpServer();
        vertxTcpServer.doStart(RpcApplication.getRpcConfig().getServerPort());
    }
}
ConsumerBootstrap(服务消费者启动类)
/**
 * 服务消费者启动类(初始化)
 */
public class ConsumerBootstrap {

    /**
     * 初始化
     */
    public static void init() {
        // RPC 框架初始化(配置和注册中心)
        RpcApplication.init();
    }

}
测试(CoreProviderSampleByBootstrap、CoreConsumerSampleByBootstrap)
先后启动服务提供者、服务消费者,随后查看是否正常响应
服务提供者:定义注册服务列表,调用提供者服务启动类进行初始化
服务消费者:调用服务消费者启动类进行初始化,随后使用代理对象处理业务逻辑
/**
 * 服务提供者启动类,通过main方法编写提供服务的代码
 */
public class CoreProviderSampleByBootstrap {
    public static void main(String[] args) {
        // 定义要初始化的服务列表
        List<ServiceRegisterInfo> serviceRegisterInfoList = new ArrayList<>();
        ServiceRegisterInfo serviceRegisterInfo = new ServiceRegisterInfo(UserService.class.getName(),UserServiceImpl.class);
        serviceRegisterInfoList.add(serviceRegisterInfo);

        // 框架初始化
        ProviderBootstrap.init(serviceRegisterInfoList);
    }
}
/**
 * 消费者调用请求
 */
public class CoreConsumerSampleByBootstrap {
    public static void main(String[] args) {
        // 服务消费者初始化
        ConsumerBootstrap.init();

        // 动态代理模式
        UserService userService = ServiceProxyFactory.getProxy(UserService.class);
        User user = new User("noob");

        // 单次调用
        User newUser = userService.getUser(user);
        if(newUser != null) {
            System.out.println(newUser.getName());
        }else {
            System.out.println("user == null");
        }
    }
}
2.注解驱动
为了避免和原有代码混淆,此处单独使用springboot构建新的服务提供者、服务消费者进行构建
Springboot Starter项目初始化
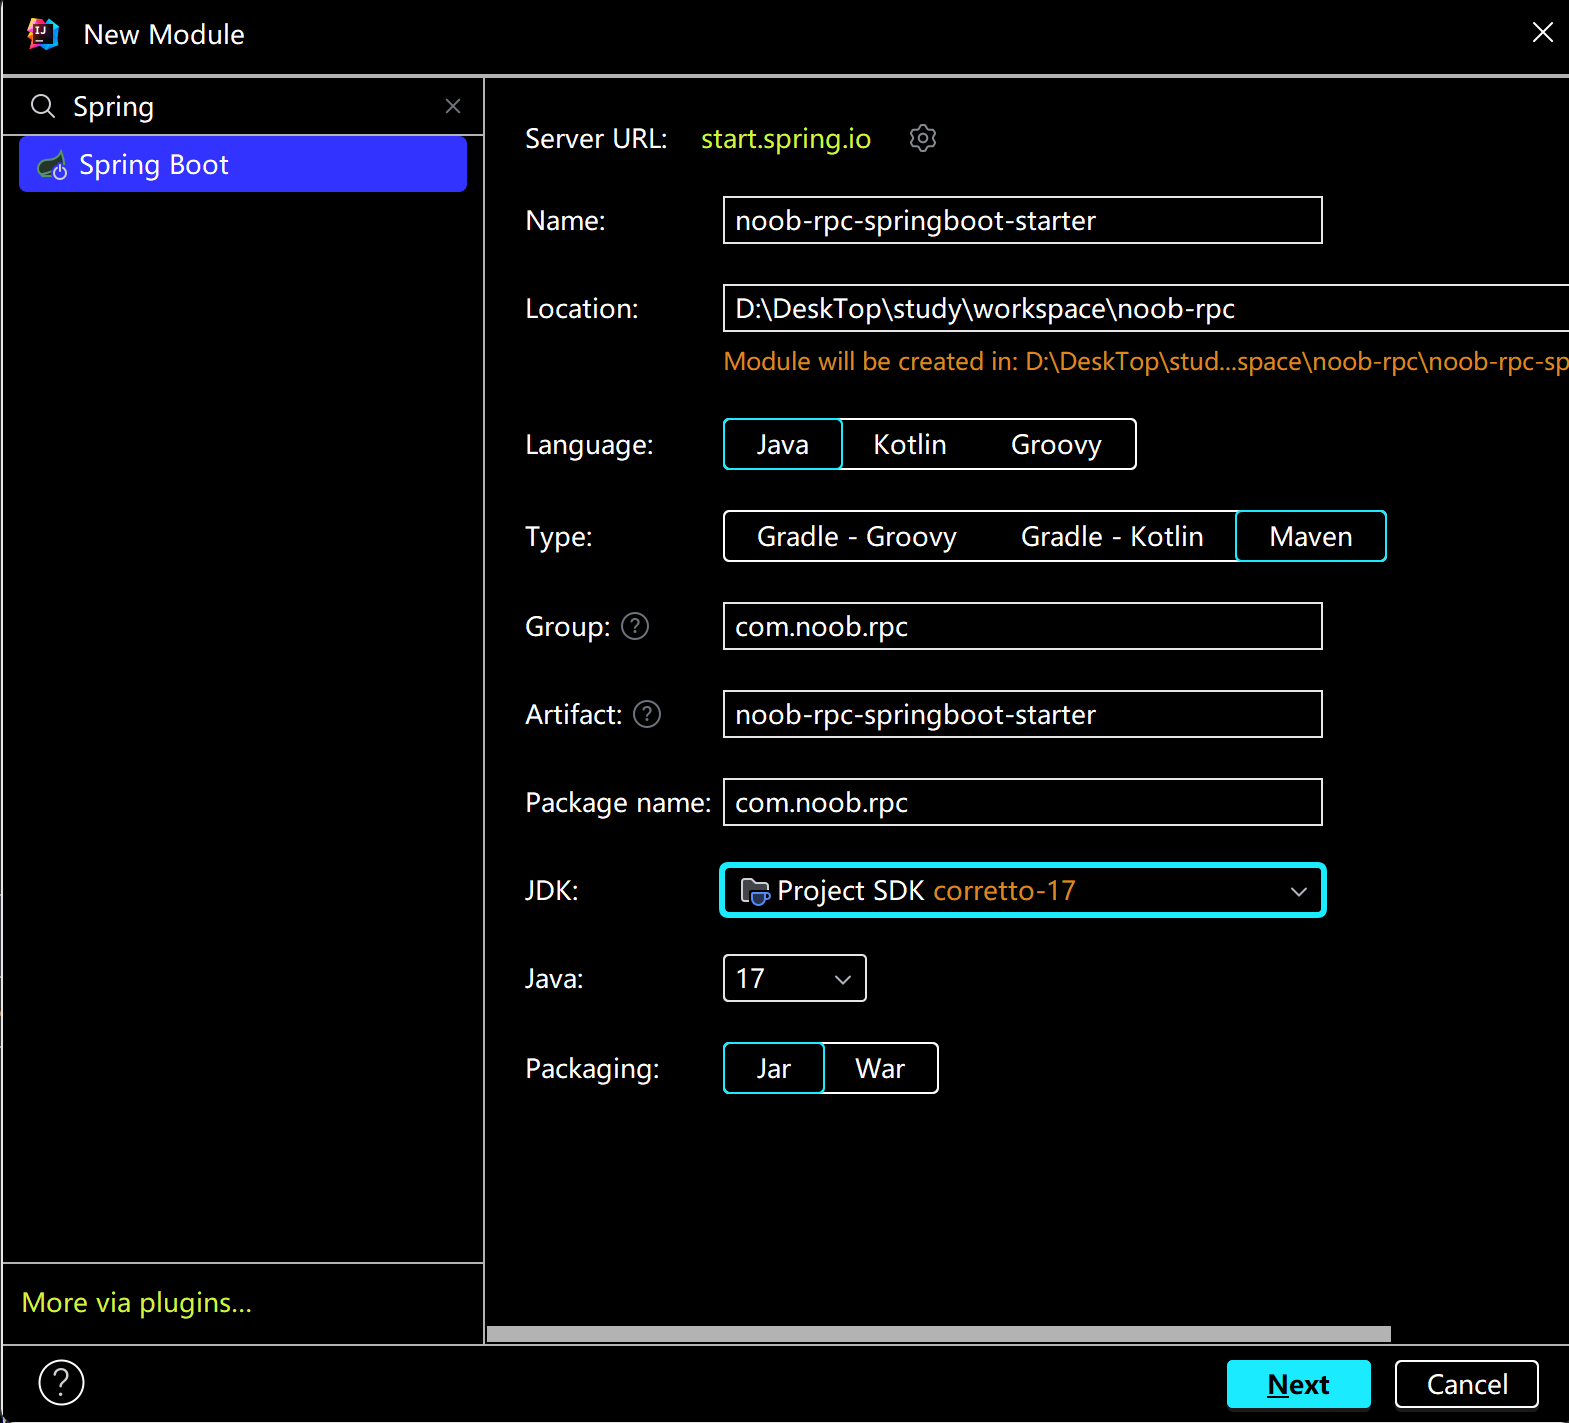
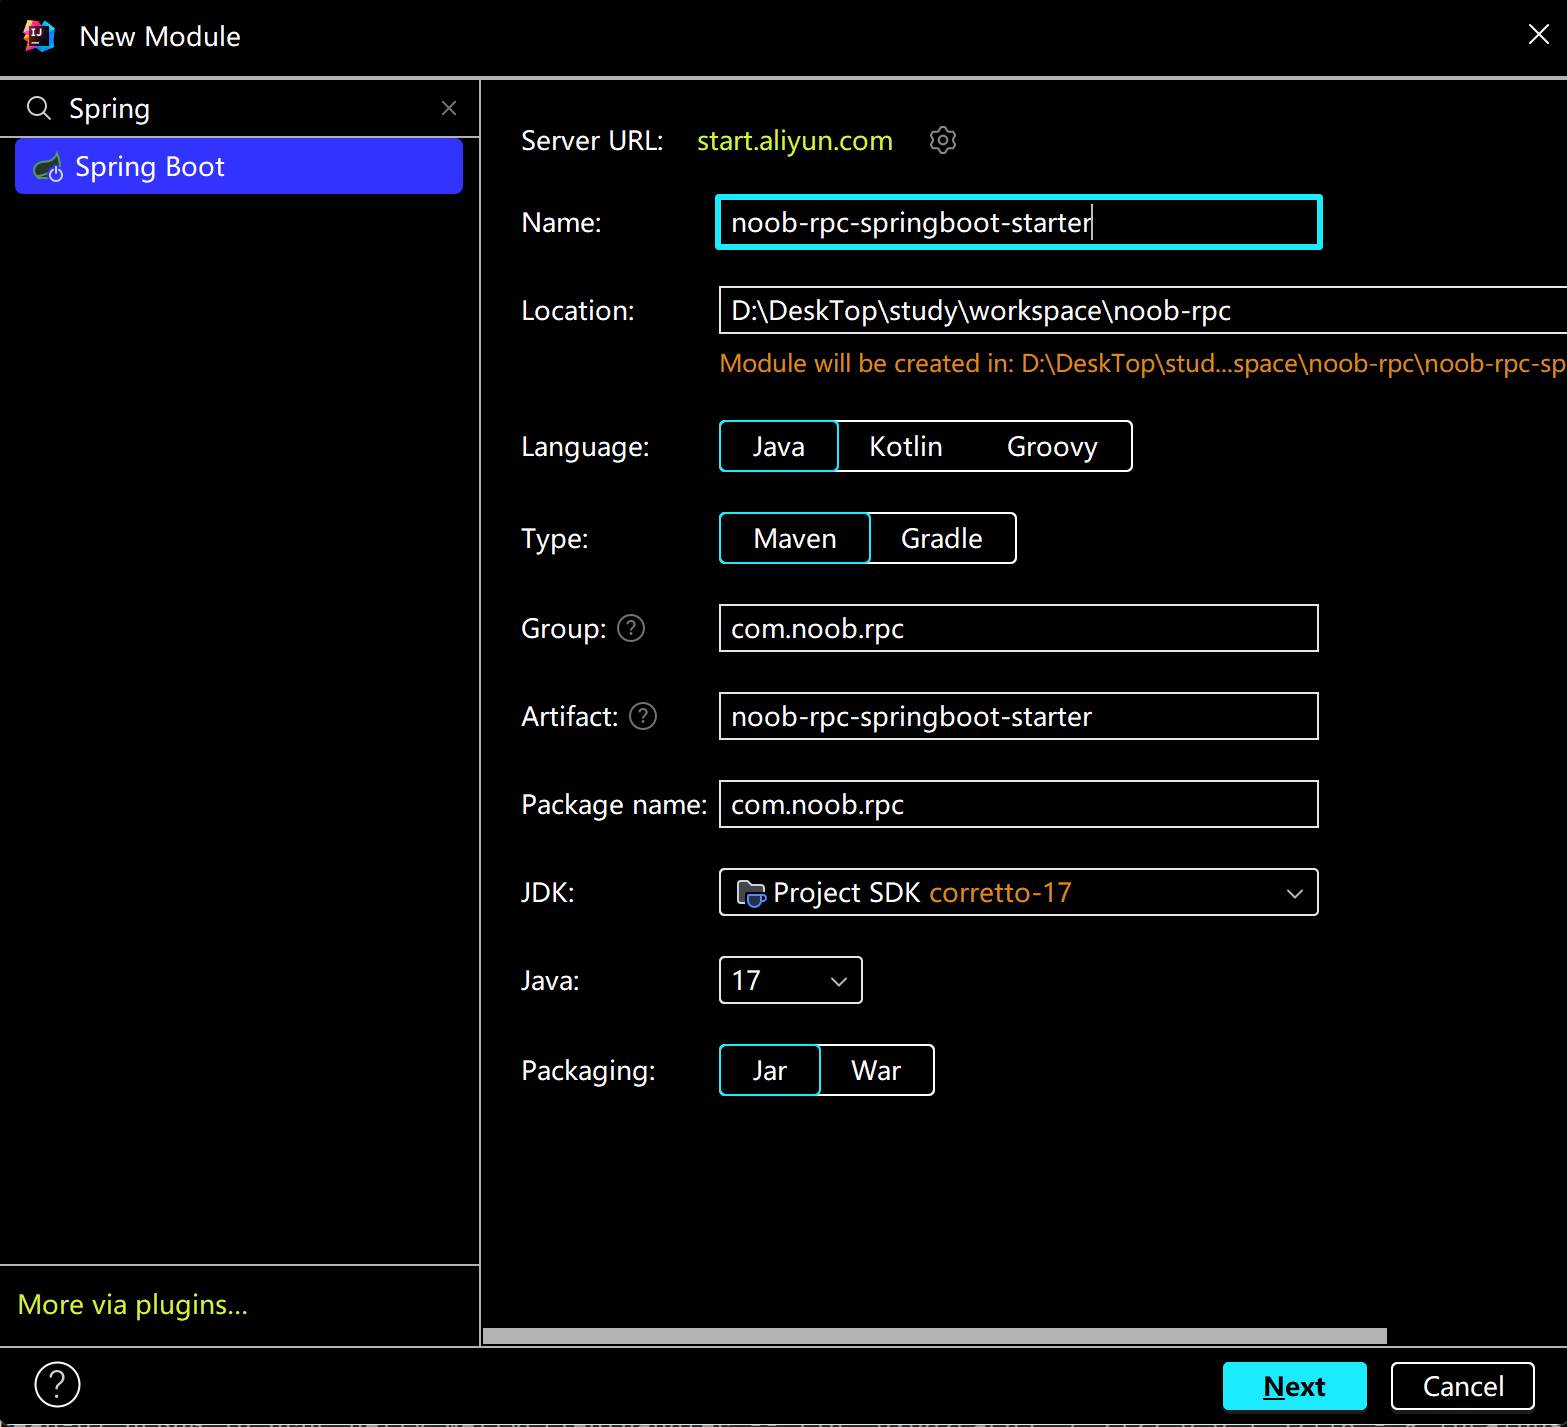
新建Module(noob-rpc-springboot-starter)=》选择Springboot(Spring Initializr)=》修改Server URL(start.aliyun.com)=》JDK版本(按需选择)


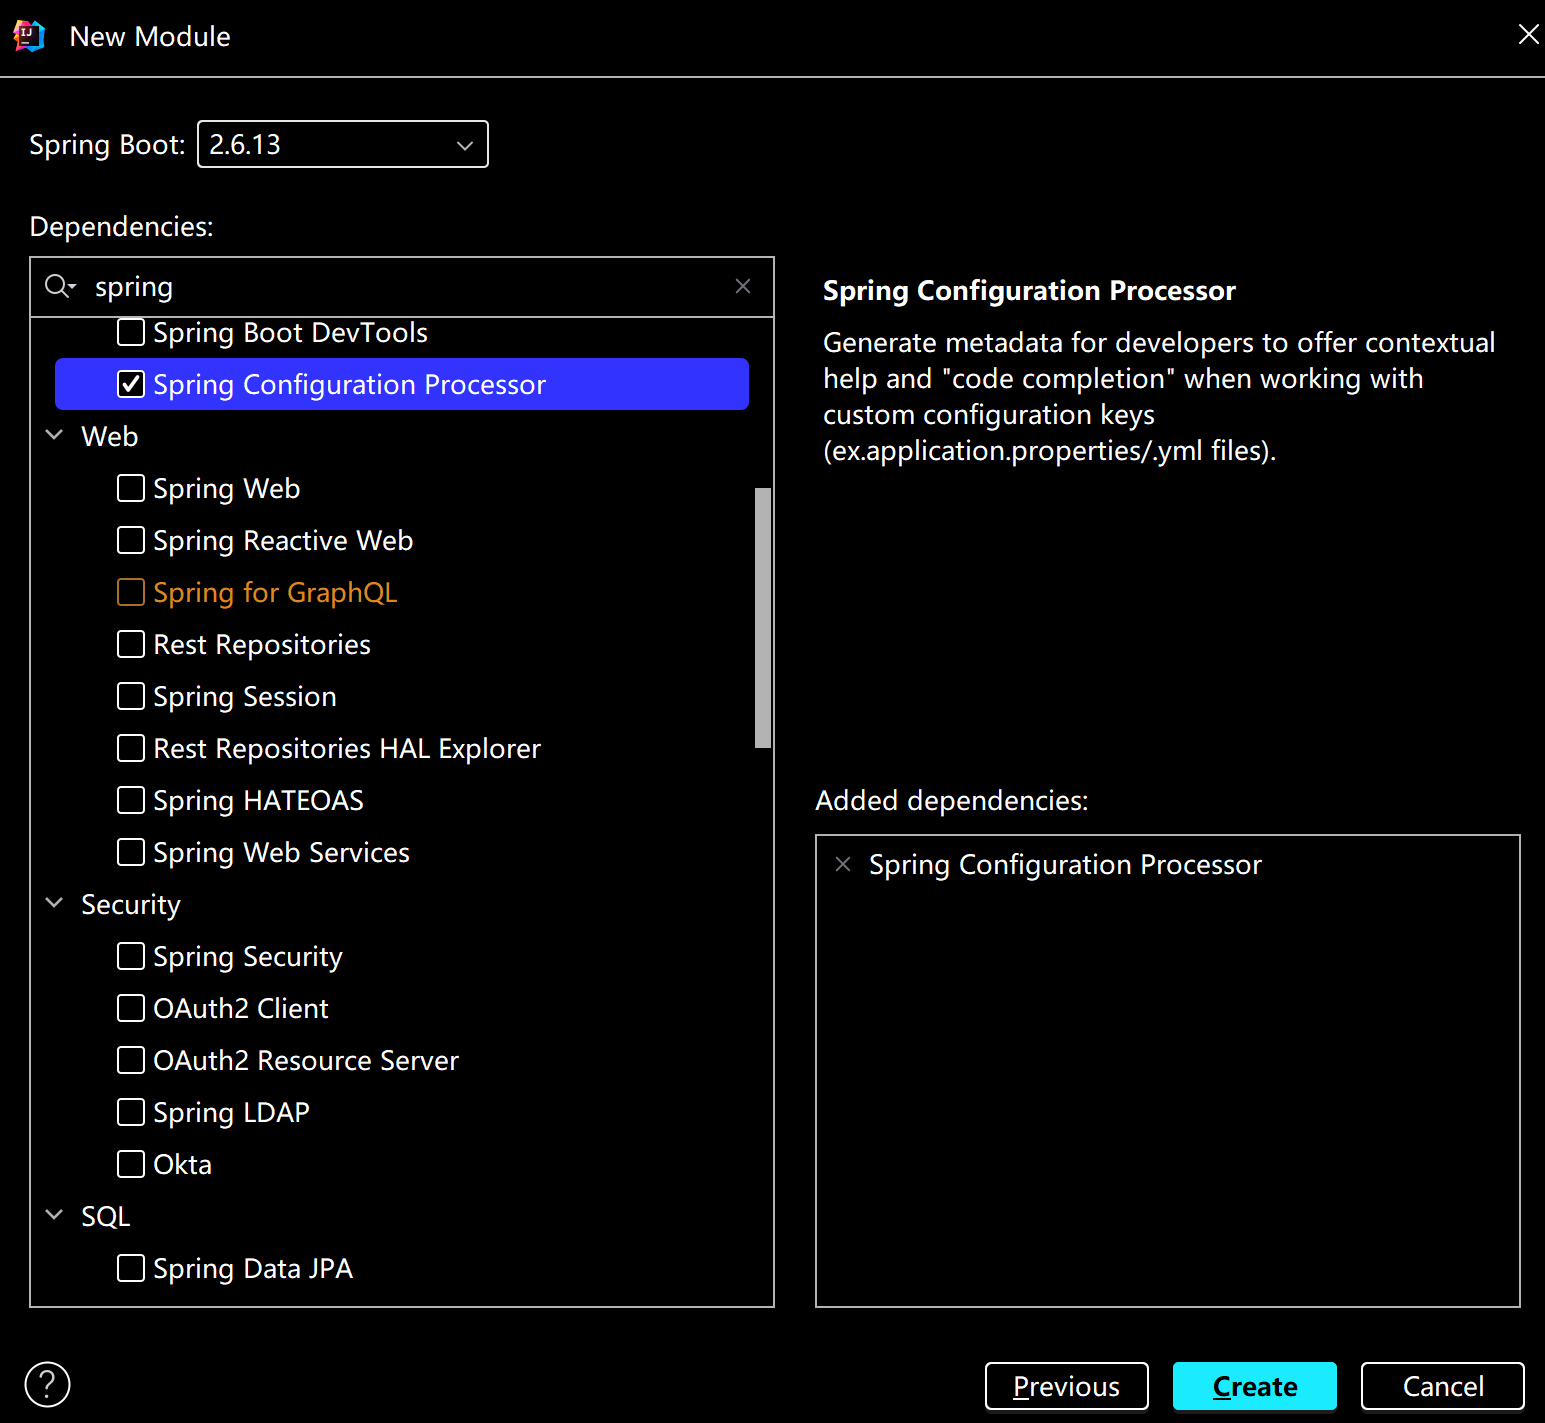
选择springboot-2.6.13版本,选择依赖Spring Configuration Processor,创建项目等待依赖加载(配置maven仓库)

清理一些无用的依赖内容,引入开发好的rpc框架(noob-rpc-core)
        <!-- 引入rpc框架 -->
        <dependency>
            <groupId>com.noob.rpc</groupId>
            <artifactId>noob-rpc-core</artifactId>
            <version>1.0-SNAPSHOT</version>
        </dependency>
涉及文件
# springboot-starter:简化PRC框架应用
noob-rpc-springboot-starter:
	- starter
		- annotation
			- EnableRpc
			- RpcService
			- RpcReference
		- bootstrap
			- RpcInitBootstrap
			- RpcProviderBootstrap
			- RpcConsumerBootstrap

# 基于springboot的服务提供者
sample-springboot-provider:
	- SampleSpringbootProviderApplication
	- service:
		- UserServiceImpl

# 基于springboot的服务消费者
sample-springboot-consumer:
	- SampleSpringbootConsumerApplication
	- service:
		- UserServiceImpl

	- SampleSpringbootConsumerApplicationTests
定义注解
可参考Dubbo的注解配置
【1】@EnableDubbo:在 Spring Boot 主应用类上使用,用于启用 Dubbo 功能
【2】@DubboComponentScan:在 Spring Boot 主应用类上使用,用于指定 Dubbo 组件扫描的包路径
【3】@DubboReference:在消费者中使用,用于声明 Dubbo 服务引用
【4】@DubboService:在提供者中使用,用于声明 Dubbo 服务。
【5】@DubboMethod:在提供者和消费者中使用,用于配置 Dubbo 方法的参数、超时时间等
【6】@DubboTransported:在 Dubbo 提供者和消费者中使用,用于指定传输协议和参数,例如传输协议的类型、端口等。
此处构建基础可定义3个核心注解(调通调用流程):@EnableRpc、@RpcReference、@RpcService
- @EnableRpc:用于全局标识项目需要引入RPC框架,执行初始化方法
- @RpcService:服务提供者注解,在需要注册和提供服务的类上使用
- @RpcReference:服务消费者注解,在需要注入服务代理对象的属性上使用
@EnableRpc
考虑到消费者、提供者启动提供的初始化模块不同,因此需要在注解中指定是否需要启动web服务器。或者可以考虑将EnableRpc拆分为两个注解分别对应标识服务提供者EnableRpcProvider和服务消费者EnableRpcConsumer(但这种情况可能存在模块重复初始化的可能性)
@RpcService
服务提供者注解:RpcService 注解中,需要指定服务注册信息属性,比如服务接口实现类、版本号等(也可以包括服务名称)
@RpcReference
服务消费者注解:在需要注入服务代理对象的属性上使用,类似 Spring 中的 @Resource 注解 RpcReference 注解中,需要指定调用服务相关的属性,比如服务接口类(可能存在多个接口)、版本号、负载均衡器、重试策略、是否 Mock 模拟调用等。
实现说明
在starter项目中新建bootstrap包,分别针对上述3个注解新建启动类
RpcInitBootstrap:RPC框架全局启动类
在Spring框架初始化时,获取@EnableRpc注解的属性,并初始化RPC框架。可以通过实现Spring的ImportBeanDefinitionRegistrar接口,并在registerBeanDefinitions方法中获取到项目的注解和注解属性
/**
 * Rpc 框架启动类
 */
@Slf4j
public class RpcInitBootstrap implements ImportBeanDefinitionRegistrar {

    /**
     * Spring 初始化时执行,初始化 RPC 框架
     *
     * @param importingClassMetadata
     * @param registry
     */
    @Override
    public void registerBeanDefinitions(AnnotationMetadata importingClassMetadata, BeanDefinitionRegistry registry) {
        // 获取 EnableRpc 注解的属性值
        boolean needServer = (boolean) importingClassMetadata.getAnnotationAttributes(EnableRpc.class.getName())
                .get("needServer");

        // RPC 框架初始化(配置和注册中心)
        RpcApplication.init();

        // 全局配置
        final RpcConfig rpcConfig = RpcApplication.getRpcConfig();

        // 启动服务器
        if (needServer) {
            VertxTcpServer vertxTcpServer = new VertxTcpServer();
            vertxTcpServer.doStart(rpcConfig.getServerPort());
        } else {
            log.info("不启动 server");
        }

    }
}
参考上述代码实现,从@EnableRpc注解中获取到needServer属性,从而决定是否要启动web服务器
RpcProviderBootstrap:RPC服务提供者启动类
服务提供者启动类的作用是,获取到所有包含 @RpcSenice 注解的类,并且通过注解的属性和反射机制,获取到要注册的服务信息,并且完成服务注册。
怎么获取到所有包含 @Rpcservice 注解的类呢?可以主动扫描包,也可以利用 Spring 的特性监听 Bean 的加载
此处选择后者,实现更简单,而且能直接获取到服务提供者类的 Bean 对象,只需要让启动类实现 BeanPostProcessor 接口的 postProcessAfterinitialization 方法,就可以在某个服务提供者 Bean 初始化后,执行注册服务等操作了。
/**
 * Rpc 服务提供者启动类
 */
@Slf4j
public class RpcProviderBootstrap implements BeanPostProcessor {

    /**
     * Bean 初始化后执行,注册服务
     *
     * @param bean
     * @param beanName
     * @return
     * @throws BeansException
     */
    @Override
    public Object postProcessAfterInitialization(Object bean, String beanName) throws BeansException {
        Class<?> beanClass = bean.getClass();
        RpcService rpcService = beanClass.getAnnotation(RpcService.class);
        if (rpcService != null) {
            // 需要注册服务
            // 1. 获取服务基本信息
            Class<?> interfaceClass = rpcService.interfaceClass();
            // 默认值处理
            if (interfaceClass == void.class) {
                interfaceClass = beanClass.getInterfaces()[0];
            }
            String serviceName = interfaceClass.getName();
            String serviceVersion = rpcService.serviceVersion();
            // 2. 注册服务
            // 本地注册
            LocalRegistry.register(serviceName, beanClass);

            // 全局配置
            final RpcConfig rpcConfig = RpcApplication.getRpcConfig();
            // 注册服务到注册中心
            RegistryConfig registryConfig = rpcConfig.getRegistryConfig();
            Registry registry = RegistryFactory.getInstance(registryConfig.getRegistry());
            ServiceMetaInfo serviceMetaInfo = new ServiceMetaInfo();
            serviceMetaInfo.setServiceName(serviceName);
            serviceMetaInfo.setServiceVersion(serviceVersion);
            serviceMetaInfo.setServiceHost(rpcConfig.getServerHost());
            serviceMetaInfo.setServicePort(rpcConfig.getServerPort());
            try {
                registry.register(serviceMetaInfo);
            } catch (Exception e) {
                throw new RuntimeException(serviceName + " 服务注册失败", e);
            }
        }

        return BeanPostProcessor.super.postProcessAfterInitialization(bean, beanName);
    }
}
其核心构建思路和之前的启动类实现差不多,只不过此处换了一种参数获取方式。
RpcConsumerBootstrap:RPC服务消费者启动类
和服务提供者启动类的实现方式类似,在 Bean 初始化后,通过反射获取到 Bean 的所有属性,如果属性包含@RpcReference 注解,那么就为该属性动态生成代理对象并赋值。
/**
 * Rpc 服务消费者启动类
 */
@Slf4j
public class RpcConsumerBootstrap implements BeanPostProcessor {

    /**
     * Bean 初始化后执行,注入服务
     *
     * @param bean
     * @param beanName
     * @return
     * @throws BeansException
     */
    @Override
    public Object postProcessAfterInitialization(Object bean, String beanName) throws BeansException {
        Class<?> beanClass = bean.getClass();
        // 遍历对象的所有属性
        Field[] declaredFields = beanClass.getDeclaredFields();
        for (Field field : declaredFields) {
            RpcReference rpcReference = field.getAnnotation(RpcReference.class);
            if (rpcReference != null) {
                // 为属性生成代理对象
                Class<?> interfaceClass = rpcReference.interfaceClass();
                if (interfaceClass == void.class) {
                    interfaceClass = field.getType();
                }
                field.setAccessible(true);
                Object proxyObject = ServiceProxyFactory.getProxy(interfaceClass);
                try {
                    field.set(bean, proxyObject);
                    field.setAccessible(false);
                } catch (IllegalAccessException e) {
                    throw new RuntimeException("为字段注入代理对象失败", e);
                }
            }
        }
        return BeanPostProcessor.super.postProcessAfterInitialization(bean, beanName);
    }

}
注册启动类
在Spring中加载已经编写好的启动类。
构建说明:在用户使用@EnableRpc注解时才启动RPC框架,可以通过给EnableRpc增加@Import注解,注册自定义的启动类,实现灵活的可选加载
/**
 * 启用 Rpc 注解
 */
@Target({ElementType.TYPE})
@Retention(RetentionPolicy.RUNTIME)
@Import({RpcInitBootstrap.class, RpcProviderBootstrap.class, RpcConsumerBootstrap.class})
public @interface EnableRpc {

    /**
     * 是否需要启动 server
     *
     * @return
     */
    boolean needServer() default true;
}
基于上述操作配置,一个基于注解驱动的RPC框架Starter开发完成
3.测试
构建两个springboot项目测试基于注解驱动的RPC框架
- sample-springboot-provider:服务提供者
- sample-springboot-consumer:服务消费者
pom.xml
<!-- 引入公共模块 -->
        <dependency>
            <groupId>com.noob.rpc</groupId>
            <artifactId>sample-common</artifactId>
            <version>1.0-SNAPSHOT</version>
        </dependency>

        <!-- 引入RPC框架相关 -->
        <dependency>
            <groupId>com.noob.rpc</groupId>
            <artifactId>noob-rpc-springboot-starter</artifactId>
            <version>0.0.1-SNAPSHOT</version>
        </dependency>
sample-springboot-provider
在服务提供者项目启动类上添加@EnableRpc注解
@EnableRpc
@SpringBootApplication
public class SampleSpringbootProviderApplication {

    public static void main(String[] args) {
        SpringApplication.run(SampleSpringbootProviderApplication.class, args);
    }

}
提供一个简单的服务实例
service:UserServiceImpl
/**
 * 用户接口实现类
 */
@RpcService
@Service
public class UserServiceImpl implements UserService {
    @Override
    public User getUser(User user) {
        System.out.println("用户名:"+user.getName());
        return user;
    }
}
sample-springboot-consumer
在服务消费者项目启动类上添加@EnableRpc注解(指定needServer属性为false)
@EnableRpc(needServer = false)
@SpringBootApplication
public class SampleSpringbootConsumerApplication {

    public static void main(String[] args) {
        SpringApplication.run(SampleSpringbootConsumerApplication.class, args);
    }

}
提供方法供测试
service/UserServiceImpl
/**
 * 用户操作
 */
@Service
public class UserServiceImpl {

    @RpcReference
    private UserService userService;

    public void getName(){
        User user = new User("我的名字叫做noob");
        User resultUser = userService.getUser(user);
        System.out.printf(resultUser.getName());
    }
}
编写测试用例进行测试:先后启动提供者启动类、消费者启动类、执行单元测试方法(此处需注意用例方法提示错误则可能需要手动指定启动类(手动指定了启动类之后则不用单独启动指定的启动类,单元测试会自动装配))
//@SpringBootTest(classes = SampleSpringbootConsumerApplication.class)
@SpringBootTest
class SampleSpringbootConsumerApplicationTests {

    @Resource
    private UserServiceImpl userService;

    @Test
    void contextLoads() {
        userService.getName();
    }

}
测试过程中关注日志输出,检查服务提供者、服务消费者是否正常操作
扩展说明
扩展说明
【1】Spring Boot Starter 项目支持读取 yml /yaml 配置文件来启动 RPC 框架
参考思路:像读取 properties 文件一样,提供一个工具类来读取 ym 配置。服务提供者启动逻辑也可以改 bean 后置执行为“使用组件扫描”。
