【taotao】⑥redis缓存&solr搜索系统
【taotao】⑥redis缓存&solr搜索系统
基本内容
1.在业务逻辑中添加缓存
a) 缓存可以使用redis作为缓存
b) Redis集群
c) 在java代码中使用redis单机版、集群版
d) 在业务逻辑中添加缓存
2.搜索系统的实现
a) 创建一个搜索的工程
b) 使用solr实现搜索
c) Solr集群搭建
1.缓存添加
【1】Redis单机版
redis单机版安装
第一步:安装gcc编译环境:yum install gcc-c++
第二步:把redis的源码上传到linux服务器(cd /root)
第三步:解压缩(tar -zxvf redis-3.0.0.tar.gz)
第四步:进入到解压后的redis文件夹中执行make指令(如果执行失败则可能是gcc环境没有弄好,删除相关文件夹之后重新安装配置)
第五步:指定安装目录:make install PREFIX=/usr/local/redis
(如果执行目录是/usr/local,则默认安装到其对应bin目录下,进入/usr/local/bin目录查看信息。此处指定安装目录为/usr/local/redis)完成安装,(如果换路径,通过移动相关文件夹即可:“mv bin/ redis”)
redis启动:前端启动、后台启动
- 前端启动:./redis-server(进入到redis安装目录,执行指令)
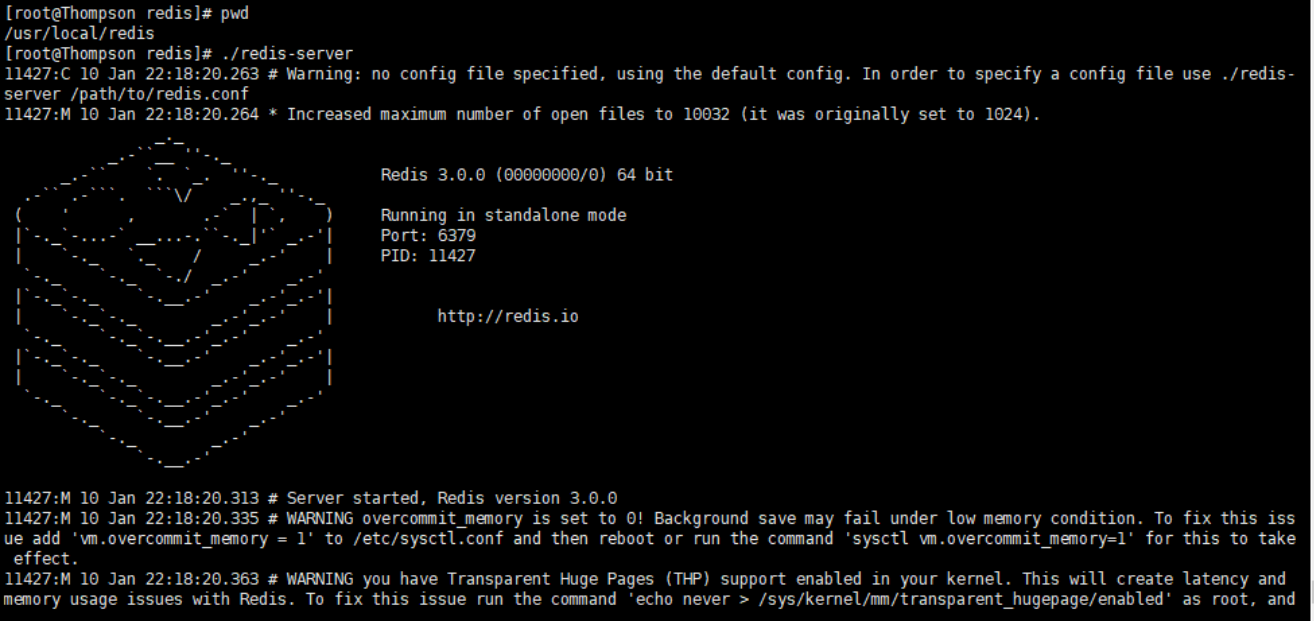
- 后台启动
1)复制redis.conf到redis的安装目录(进入redis解压包将redis.conf文件复制到redis安装目录)
cp redis.conf /usr/local/redis/
2)修改redis.conf(修改daemonize yes)
3)启动:./redis-server redis.conf
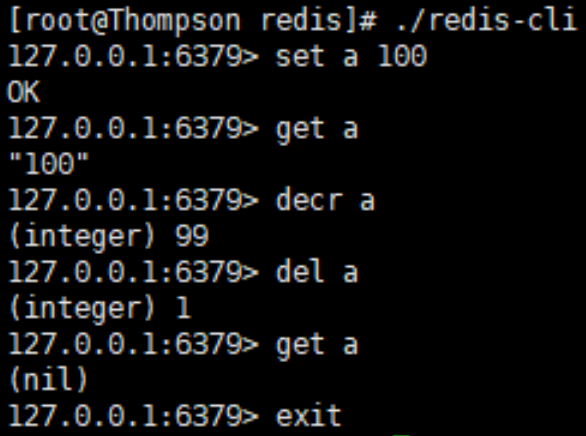
客户端连接
redis-cli -p 端口 -h ip地址 <-c>连接集群时使用此参数
默认端口:6379      Ip:localhost(127.0.0.1)
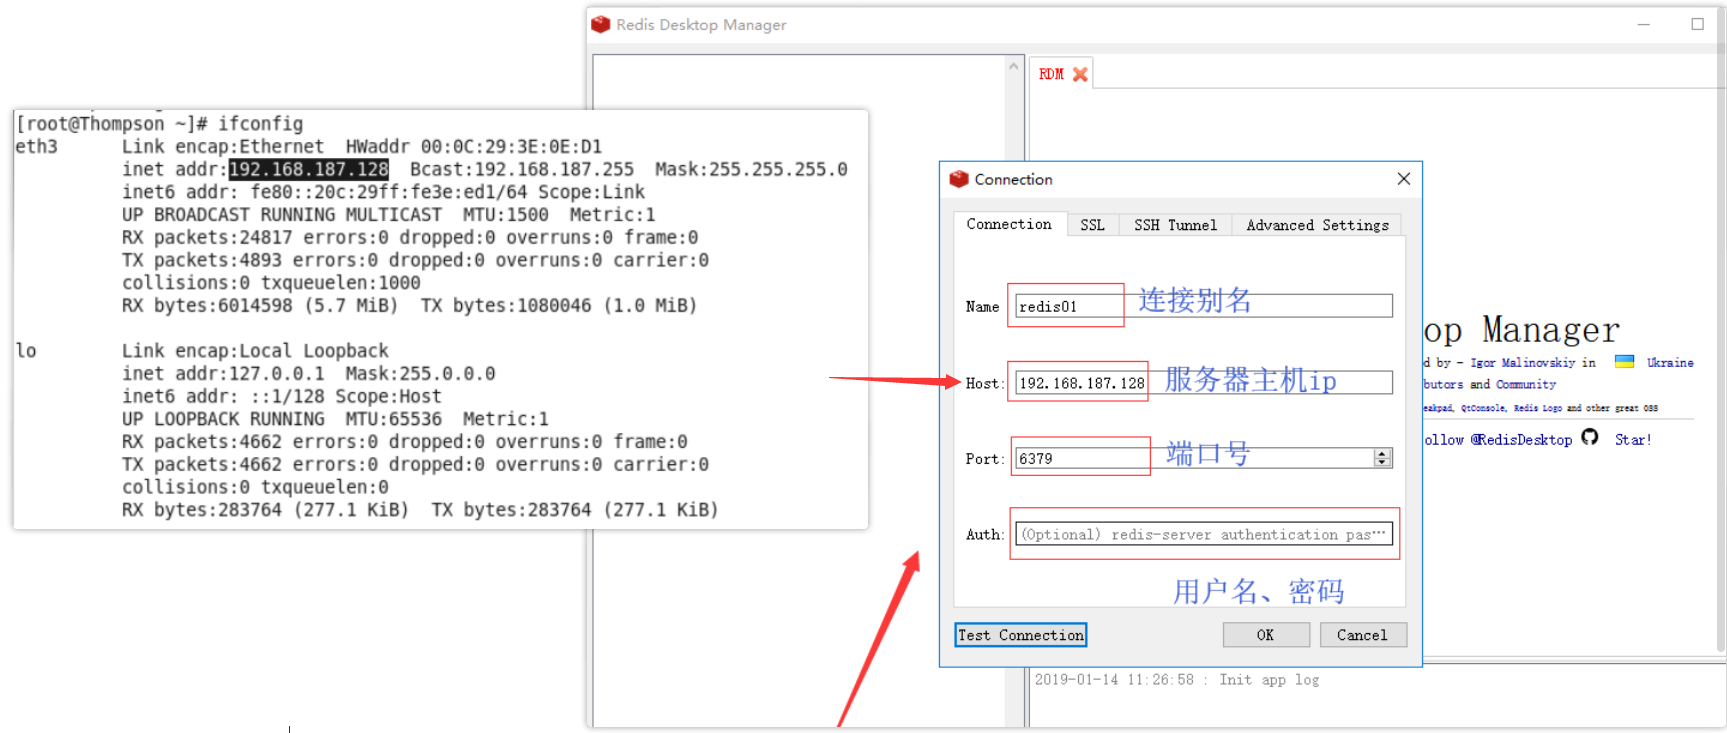
RedisDesktopManager:
虚拟机配置,虚拟ip为192.168.187.128,如果连接失败,则需要查看出错原因,例如防火墙是否关闭?redis.conf配置文件“#bind 127.0.0.1是否已注释”、“是否配置requirepass密码”等,一一进行排除(但RedisDesktopManager工具只能在单机版环境使用,不支持redis集群)
【2】Redis集群
基本概念
redis-cluster架构图
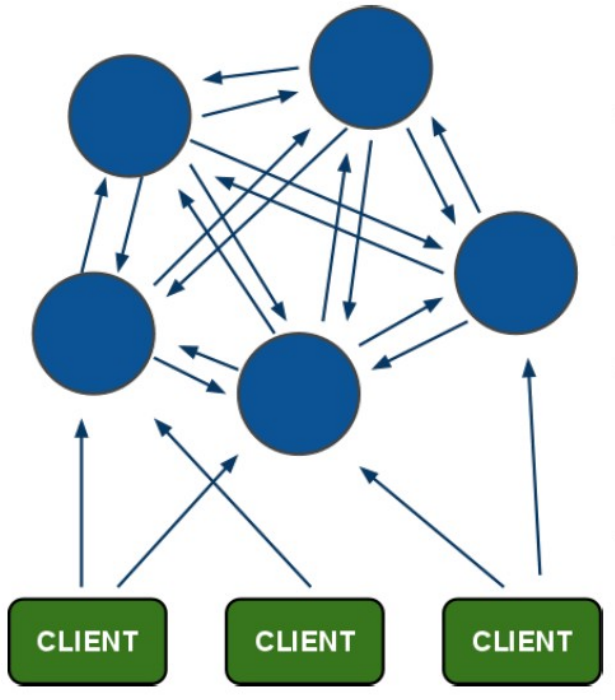
- 架构细节:
- 所有的redis节点彼此互联(PING-PONG机制),内部使用二进制协议优化传输速度和带宽
- 节点的fail是通过集群中超过半数的节点检测失效时才生效
- 客户端与redis节点直连,不需要中间proxy层.客户端不需要连接集群所有节点,连接集群中任何一个可用节点即可
- redis-cluster把所有的物理节点映射到[0-16383]slot上,cluster 负责维护node<->slot<->value
Redis 集群中内置了 16384 个哈希槽,当需要在 Redis 集群中放置一个 key-value 时,redis 先对 key 使用 crc16 算法算出一个结果,然后把结果对 16384 求余数,这样每个 key 都会对应一个编号在 0-16383 之间的哈希槽,redis 会根据节点数量大致均等的将哈希槽映射到不同的节点
集群搭建
(1)搭建步骤参考
集群中应该至少有三个节点,每个节点有一备份节点(需要6台服务器,搭建伪分布式)
第一步:创建6个redis实例指定端口从7001到7006
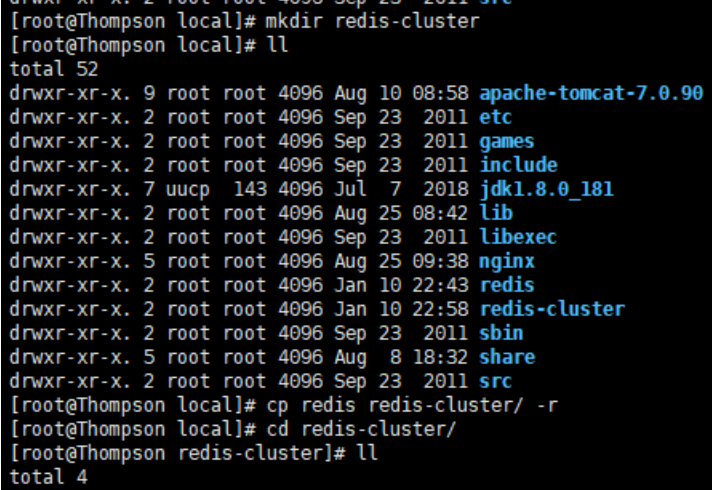
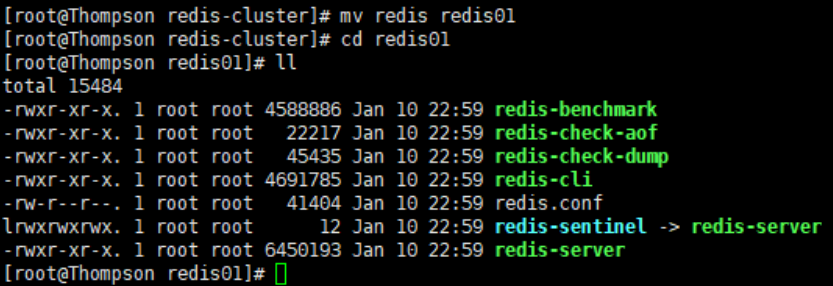
修改redis名称,进入redis01文件夹下,如果存在dump.rdb文件(快照文件),删除该文件
第二步:修改redis.conf 配置文件,修改端口号,打开Cluster-enable yes前面的注释
修改redis01的端口号为7001,设置cluster-enable为yes
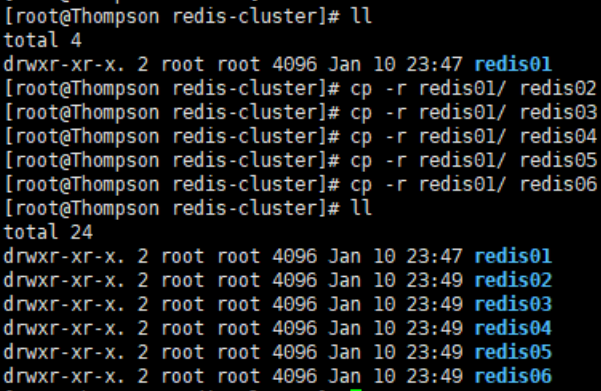
以此类推,复制多个redis
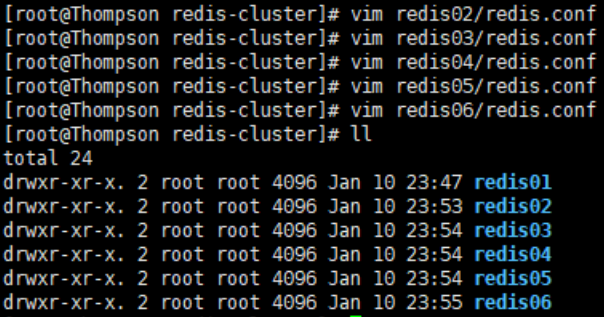
进入到每个redis文件夹中,修改相应的端口号:依次对应
redis01-7001、redis02-7002、redis03-7003、redis04-7004、redis05-7005、redis06-7006
第三步:需要一个ruby脚本。在redis源码文件夹下的src目录下(redis-trib.rb)
第四步:把redis-trib.rb文件复制到到redis-cluster目录下

第五步:执行ruby脚本之前,需要安装ruby环境
yum install ruby
yum install rubygems
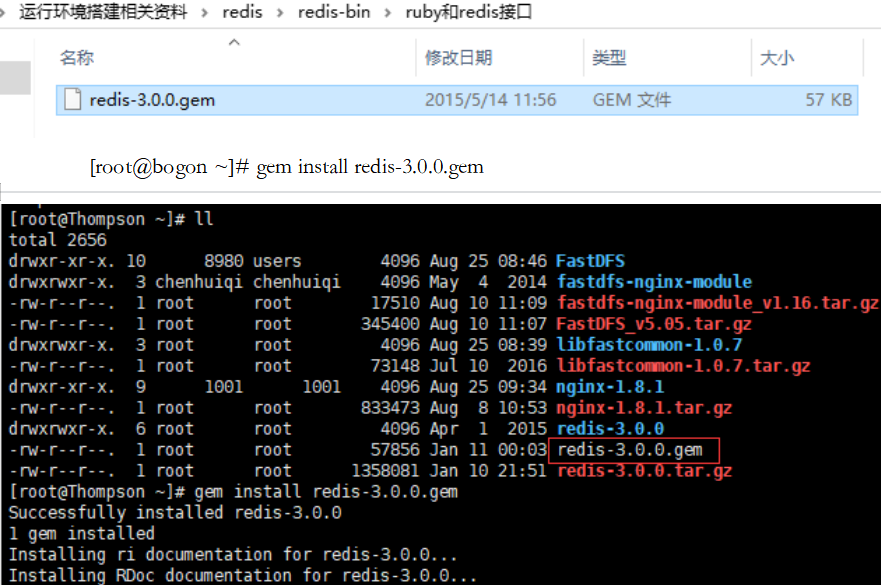
安装redis-trib.rb运行依赖的ruby的包(将相关包上传到服务器)
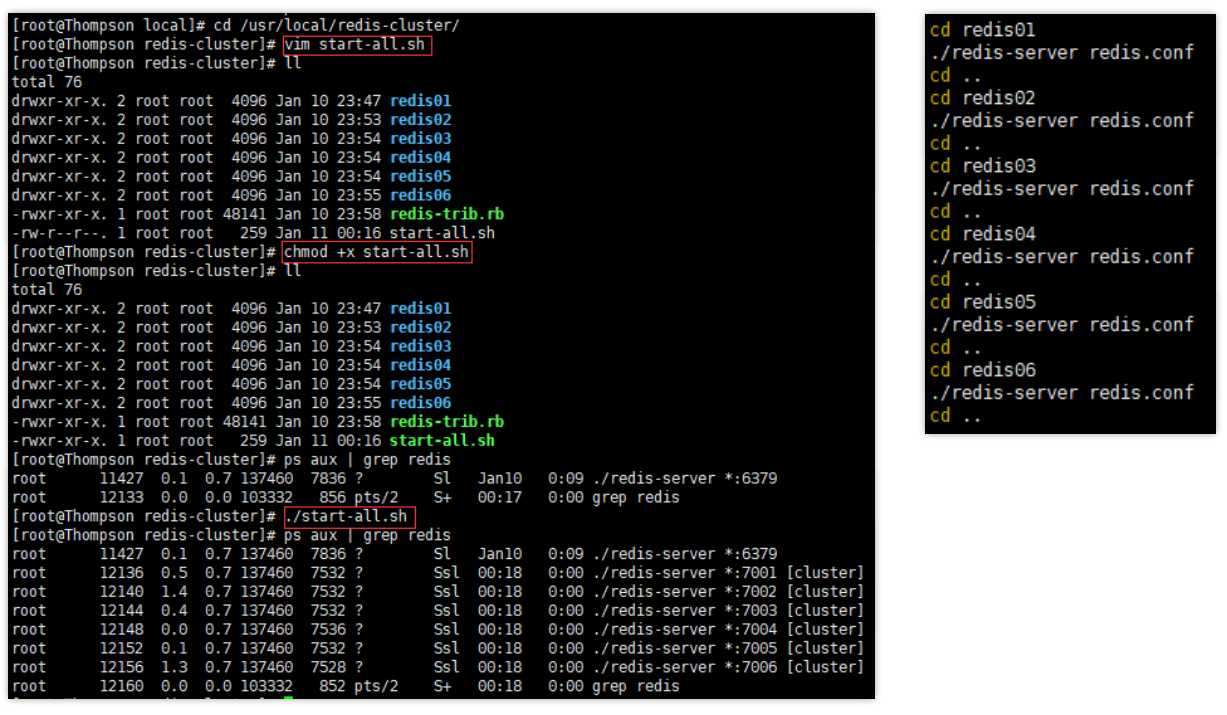
第六步:启动所有的redis实例
第七步:使用redis-trib.rb创建集群(将对应ip修改为指定的服务器ip)
./redis-trib.rb create --replicas 1 192.168.187.128:7001 192.168.187.128:7002 192.168.187.128:7003 192.168.187.128:7004 192.168.187.128:7005 192.168.187.128:7006
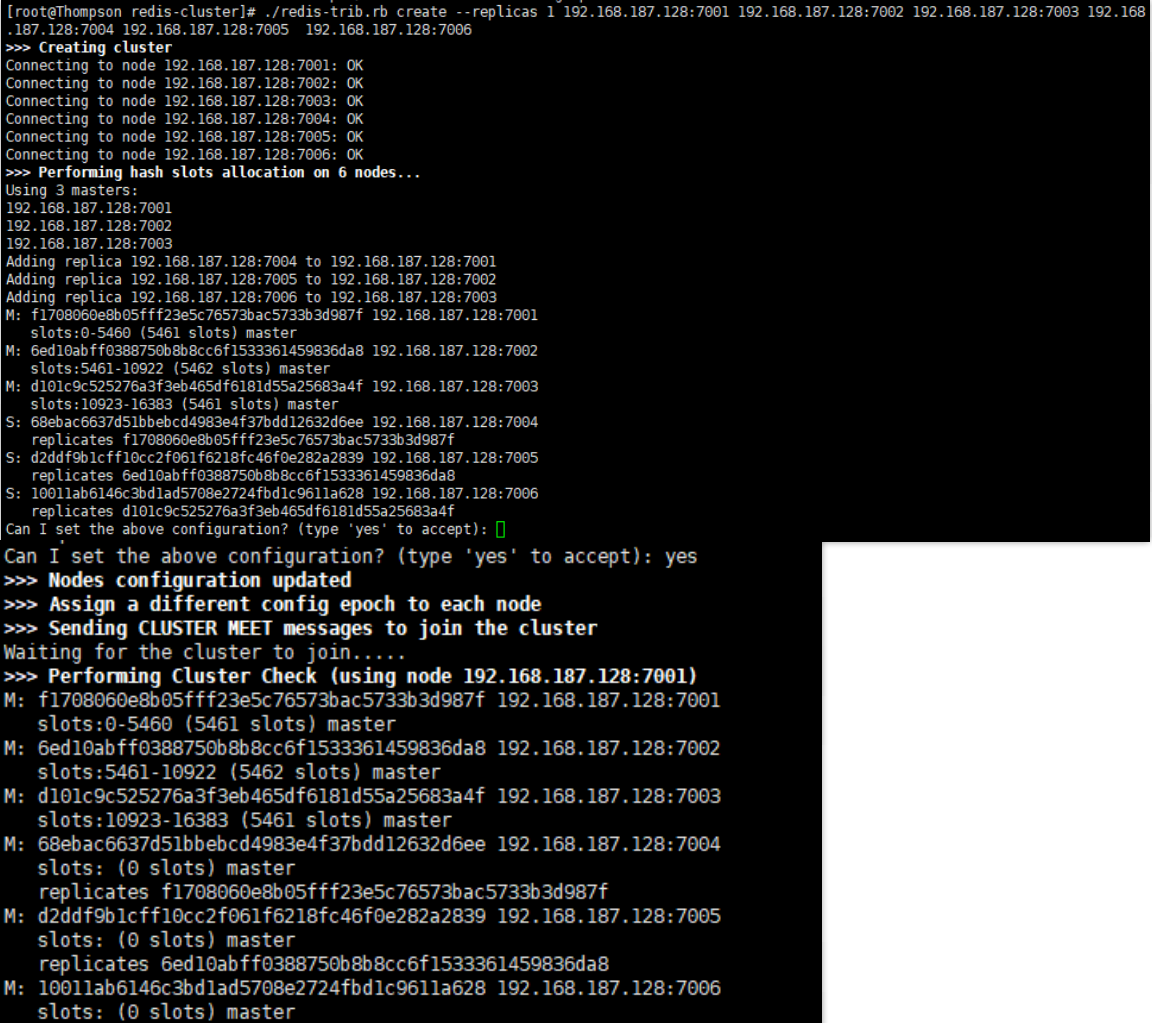
使用客户端连接集群: redis01/redis-cli -p 7001 -c

【3】java客户端使用Jedis连接redis
🔖连接单机版
(1)普通测试
步骤1:jar引入
把jedis依赖的jar包添加到工程中:在taotao-rest工程下的pom.xml中添加jedis依赖
<!-- redis客户端 -->
<dependency>
  <groupId>redis.clients</groupId>
  <artifactId>jedis</artifactId>
</dependency>
步骤2:java客户端编写代码连接测试
	//单机版测试
	@Test
	public void testJedisSingle() throws Exception {
		//创建一个Jedis对象
		Jedis jedis = new Jedis("192.168.25.153", 6379);
		jedis.set("test", "hello jedis");
		String string = jedis.get("test");
		System.out.println(string);
		jedis.close();
	}
步骤3:单机版测试
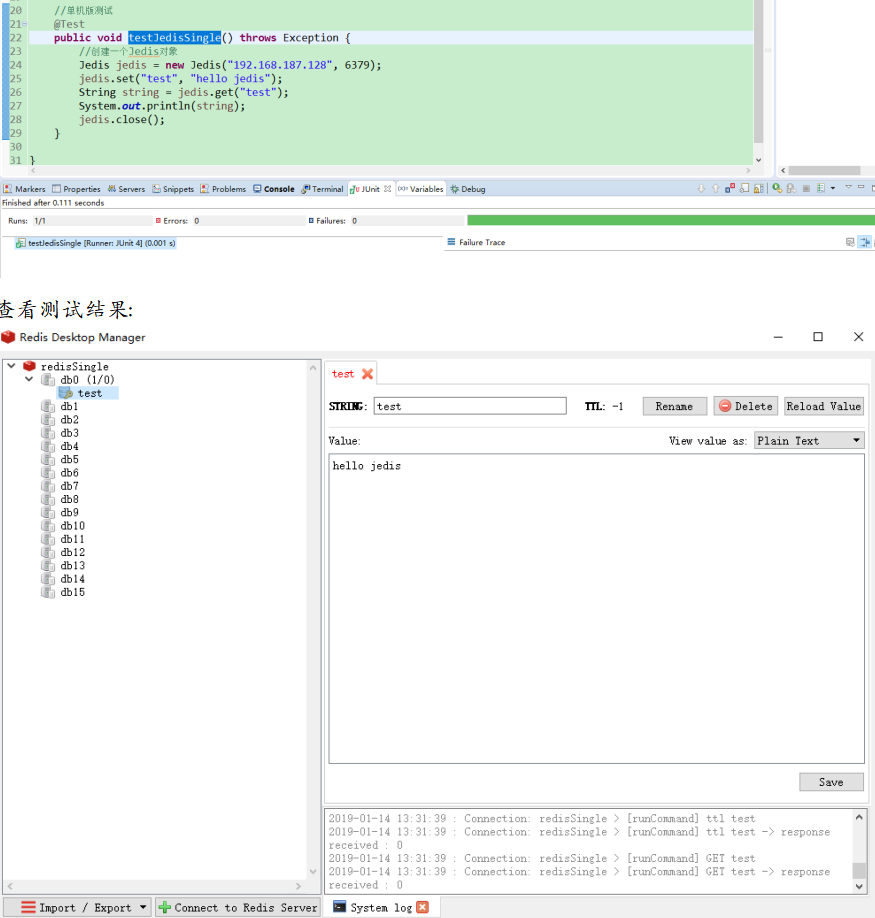
(2)数据库连接池测试
步骤1:jar引入
与上述内容相同
步骤2:java客户端编写代码连接测试,使用连接池
	//使用连接池
	@Test
	public void testJedisPool() throws Exception {
		//创建一个连接池对象
		//系统中应该是单例的。
		JedisPool jedisPool = new JedisPool("192.168.25.153", 6379);
		//从连接池中获得一个连接
		Jedis jedis = jedisPool.getResource();
		String result = jedis.get("test");
		System.out.println(result);
		//jedis必须关闭
		jedis.close();

		//系统关闭时关闭连接池
		jedisPool.close();

	}
步骤3:单机版连接池测试
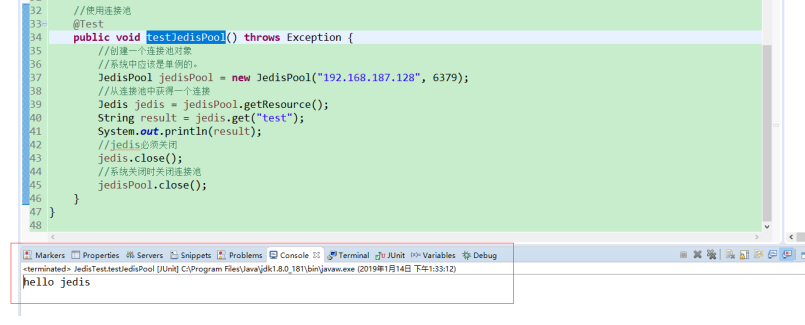
🔖集群版连接
步骤1:jar引入
与上述内容相同
步骤2:java客户端编写代码连接测试,集群版
	// 连接redis集群
	@Test
	public void testJedisCluster() throws Exception {
		//创建一个JedisCluster对象
		Set<HostAndPort> nodes = new HashSet<>();
		nodes.add(new HostAndPort("192.168.25.153", 7001));
		nodes.add(new HostAndPort("192.168.25.153", 7002));
		nodes.add(new HostAndPort("192.168.25.153", 7003));
		nodes.add(new HostAndPort("192.168.25.153", 7004));
		nodes.add(new HostAndPort("192.168.25.153", 7005));
		nodes.add(new HostAndPort("192.168.25.153", 7006));
		//在nodes中指定每个节点的地址
		//jedisCluster在系统中是单例的。
		JedisCluster jedisCluster = new JedisCluster(nodes);
		jedisCluster.set("name", "zhangsan");
		jedisCluster.set("value", "100");
		String name = jedisCluster.get("name");
		String value = jedisCluster.get("value");
		System.out.println(name);
		System.out.println(value);


		//系统关闭时关闭jedisCluster
		jedisCluster.close();
	}
步骤3:测试结果
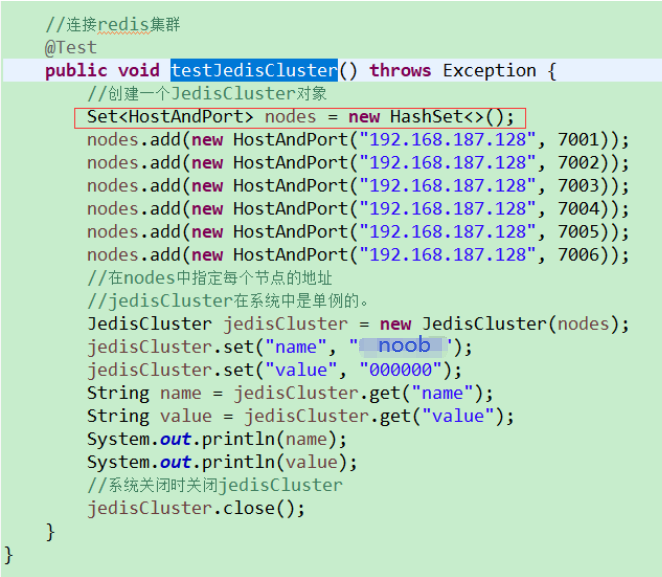
⚡项目中使用jedis
1>构建参考
构建思路:创建一个redis操作的接口。分别创建两个实现类对应redis 的单机版和集群版。当使用单机版redis时,配置单机版的实现类,当使用集群版本的时候,配置集群版的实现类
接口定义
public interface JedisClient {
	public String set(String key,String value);
	public String get(String key);
	public Long hset(String key,String item,String value);
	public String hget(String key,String item);
	public Long incr(String key);
	public Long decr(String key);
	public Long expire(String key,int second);
	public Long ttl(String key);
	public Long hdel(String key,String item);
}
单机版实现类
package com.taotao.rest.component.impl;
import org.springframework.beans.factory.annotation.Autowired;
import redis.clients.jedis.Jedis;
import redis.clients.jedis.JedisPool;
public class JedisClientSingle implements JedisClient{
	@Autowired
	private JedisPool jedisPool;
	@Override
	public String set(String key, String value) {
		Jedis jedis = jedisPool.getResource();
		String result = jedis.set(key, value);
		jedis.close();
		return result;
	}
	@Override
	public String get(String key) {
		Jedis jedis = jedisPool.getResource();
		String result = jedis.get(key);
		jedis.close();
		return result;
	}
	@Override
	public Long hset(String key, String item, String value) {
		Jedis jedis = jedisPool.getResource();
		Long result = jedis.hset(key, item, value);
		jedis.close();
		return result;
	}
	@Override
	public String hget(String key, String item) {
		Jedis jedis = jedisPool.getResource();
		String result = jedis.hget(key, item);
		jedis.close();
		return result;
	}
	@Override
	public Long incr(String key) {
		Jedis jedis = jedisPool.getResource();
		Long result = jedis.incr(key);
		jedis.close();
		return result;
	}
	@Override
	public Long decr(String key) {
		Jedis jedis = jedisPool.getResource();
		Long result = jedis.decr(key);
		jedis.close();
		return result;
	}
	@Override
	public Long expire(String key, int second) {
		Jedis jedis = jedisPool.getResource();
		Long result = jedis.expire(key, second);
		jedis.close();
		return result;
	}
	@Override
	public Long ttl(String key) {
		Jedis jedis = jedisPool.getResource();
		Long result = jedis.ttl(key);
		jedis.close();
		return result;
	}
@Override
	public Long hdel(String key, String item) {
		Jedis jedis = jedisPool.getResource();
		Long result = jedis.hdel(key, item);
		jedis.close();
		return result;
	}
}
集群版实现类
package com.taotao.rest.component.impl;

import org.springframework.beans.factory.annotation.Autowired;
import com.taotao.rest.component.JedisClient;
import redis.clients.jedis.JedisCluster;

public class JedisClientCluster implements JedisClient {
	@Autowired
	private JedisCluster jedisCluster;
	@Override
	public String set(String key, String value) {
		return jedisCluster.set(key, value);
	}
	@Override
	public String get(String key) {
		return jedisCluster.get(key);
	}
	@Override
	public Long hset(String key, String item, String value) {
		return jedisCluster.hset(key, item, value);
	}
	@Override
	public String hget(String key, String item) {
		return jedisCluster.hget(key, item);
	}
	@Override
	public Long incr(String key) {
		return jedisCluster.incr(key);
	}
	@Override
	public Long decr(String key) {
		return jedisCluster.decr(key);
	}
	@Override
	public Long expire(String key, int second) {
		return jedisCluster.expire(key, second);
	}
	@Override
	public Long ttl(String key) {
		return jedisCluster.ttl(key);
	}
	@Override
	public Long hdel(String key, String item) {
		return jedisCluster.hdel(key, item);
	}
}
spring配置
相应的在spring配置文件中引入相关配置(单机版、集群版)
<?xml version="1.0" encoding="UTF-8"?>
<beans xmlns="http://www.springframework.org/schema/beans"
	xmlns:context="http://www.springframework.org/schema/context" xmlns:p="http://www.springframework.org/schema/p"
	xmlns:aop="http://www.springframework.org/schema/aop" xmlns:tx="http://www.springframework.org/schema/tx"
	xmlns:xsi="http://www.w3.org/2001/XMLSchema-instance"
	xsi:schemaLocation="http://www.springframework.org/schema/beans http://www.springframework.org/schema/beans/spring-beans-4.0.xsd
	http://www.springframework.org/schema/context http://www.springframework.org/schema/context/spring-context-4.0.xsd
	http://www.springframework.org/schema/aop http://www.springframework.org/schema/aop/spring-aop-4.0.xsd http://www.springframework.org/schema/tx http://www.springframework.org/schema/tx/spring-tx-4.0.xsd
	http://www.springframework.org/schema/util http://www.springframework.org/schema/util/spring-util-4.0.xsd">

	<!-- 包扫描器,扫描带@Service注解的类 -->
	<context:component-scan base-package="com.taotao.rest.service"></context:component-scan>
	<!-- 配置redis客户端单机版 -->
	<bean id="jedisPool" class="redis.clients.jedis.JedisPool">
		<constructor-arg name="host" value="192.168.25.153"></constructor-arg>
		<constructor-arg name="port" value="6379"></constructor-arg>
	</bean>
	<!-- 配置redis客户端实现类 -->
	<bean id="jedisClientSingle" class="com.taotao.rest.component.impl.JedisClientSingle"/>

	<!-- 配置redis客户端集群版 -->
	<!-- <bean id="jedisCluster" class="redis.clients.jedis.JedisCluster">
		<constructor-arg>
			<set>
				<bean class="redis.clients.jedis.HostAndPort">
					<constructor-arg name="host" value="192.168.25.153"/>
					<constructor-arg name="port" value="7001"/>
				</bean>
				<bean class="redis.clients.jedis.HostAndPort">
					<constructor-arg name="host" value="192.168.25.153"/>
					<constructor-arg name="port" value="7002"/>
				</bean>
				<bean class="redis.clients.jedis.HostAndPort">
					<constructor-arg name="host" value="192.168.25.153"/>
					<constructor-arg name="port" value="7003"/>
				</bean>
				<bean class="redis.clients.jedis.HostAndPort">
					<constructor-arg name="host" value="192.168.25.153"/>
					<constructor-arg name="port" value="7004"/>
				</bean>
				<bean class="redis.clients.jedis.HostAndPort">
					<constructor-arg name="host" value="192.168.25.153"/>
					<constructor-arg name="port" value="7005"/>
				</bean>
				<bean class="redis.clients.jedis.HostAndPort">
					<constructor-arg name="host" value="192.168.25.153"/>
					<constructor-arg name="port" value="7006"/>
				</bean>
			</set>
		</constructor-arg>
	</bean>
	<bean id="jedisClientCluster" class="com.taotao.rest.component.impl.JedisClientCluster"/> -->
</beans>
2>测试
测试代码定义
	@Test
	public void testJedisClientSpring() throws Exception {
		//创建一个spring容器
		ApplicationContext applicationContext = new ClassPathXmlApplicationContext("classpath:spring/applicationContext-*.xml");
		//从容器中获得JedisClient对象
		JedisClient jedisClient = applicationContext.getBean(JedisClient.class);
		//jedisClient操作redis
		jedisClient.set("cliet1", "1000");
		String string = jedisClient.get("cliet1");
		System.out.println(string);
	}
测试结果
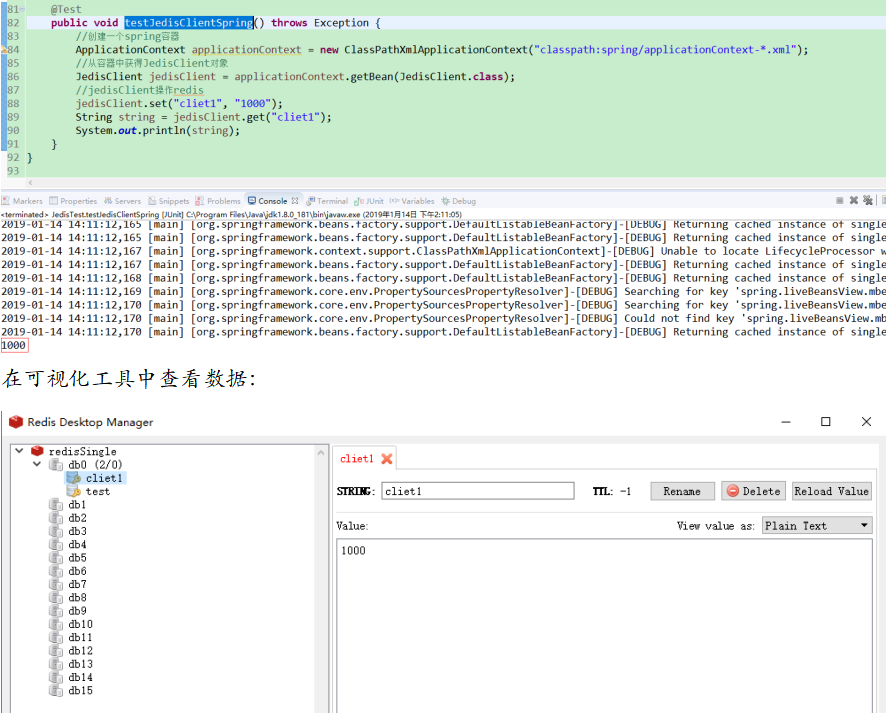
集群版切换,修改applicationContext-service.xml文件,将单机版配置注释,打开集群注释,再次测试即可
【4】业务逻辑中添加redis缓存概念
🔖从缓存读取数据
添加redis缓存的同时尽量避免影响业务的正常逻辑,此处以ContentServiceImpl中的内容列表管理为例,在查询内容列表的时候先从缓存中获取,如果缓存数据不存在则从数据库获取,构建步骤参考如下
a.在resource.properties中定义redis对应存储的key值
b.修改ContentServiceImpl中内容列表查询逻辑
c.注意缓存同步的处理(可通过定时处理,或者监听数据变化的时候实现缓存同步)
步骤1:resource.properties中定义
# content key in redis
REDIS_CONTENT_KEY=REDIS_CONTENT_KEY
步骤2:修改ContentServiceImpl中内容列表查询逻辑
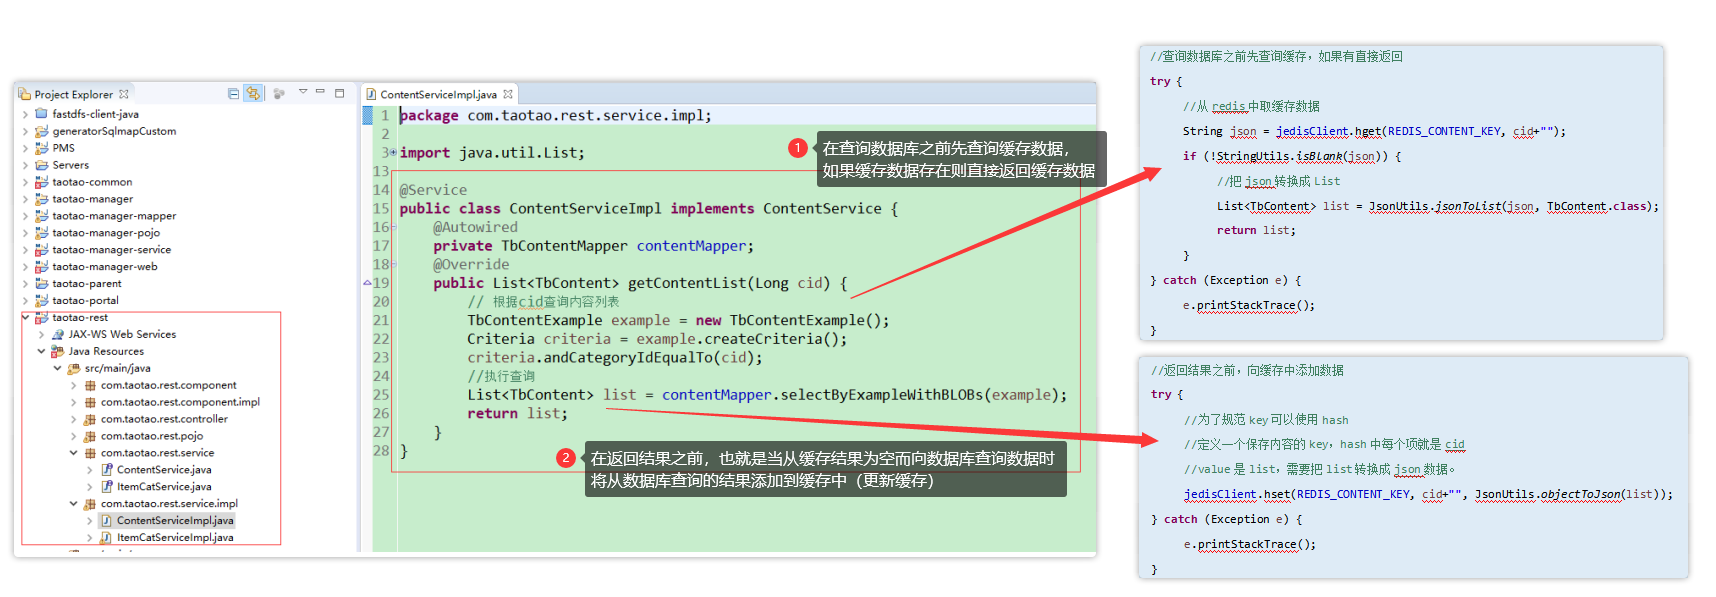
🔖缓存同步
缓存同步是指当指定数据集合内容发生变化的时候相应的要将这一变化同步到相应的缓存中,以确保用户在每一时刻所获取的内容是最新的,涉及数据集合变化的操作一般是增加、修改、删除操作,缓存失效这一场景则可通过查询操作弥补缓存更新
当后台修改内容信息后,只需要把redis中缓存的数据删除即可(后台系统不直接操作redis数据库,而是在taotao-rest中发布一个服务,当后台对内容信息修改后,调用服务即可,该服务的功能就是根据cid删除redis中缓存数据)
(1)服务发布
dao层
使用JedisClient实现(单机版或者集群版)
service层
接收cid,根据cid调用JedisClient删除redis中缓存的数据。返回结果TaotaoResult
	@Override
	public TaotaoResult syncContent(Long cid) {
		jedisClient.hdel(REDIS_CONTENT_KEY, cid + "");
		return TaotaoResult.ok();
	}
controller层
发布服务,接收参数cid,返回结果TaotaoResult
	@RequestMapping("/sync/content/{cid}")
	@ResponseBody
	public TaotaoResult sysncContent(@PathVariable Long cid) {
		try {
			TaotaoResult result = contentService.syncContent(cid);
			return result;
		} catch (Exception e) {
			e.printStackTrace();
			return TaotaoResult.build(500, ExceptionUtil.getStackTrace(e));
		}
	}
测试
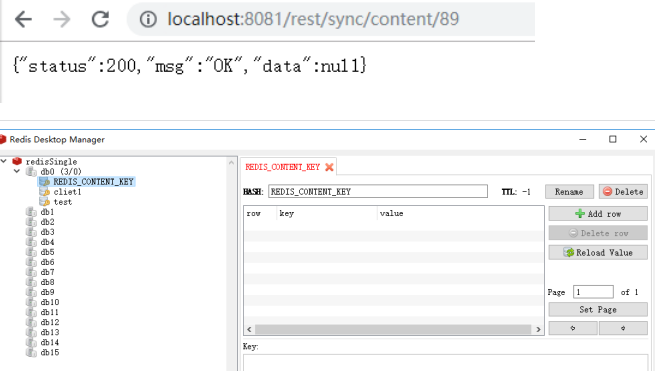
测试:http://localhost:8081/rest/sync/content/89
(2)调用缓存同步服务
taotao-manager-web后台系统中,只要内容发生变化(增删改操作)均需要调用缓存同步的服务

启动taotao-rest、taotao-manager、taotao-portal进行测试(taotao-rest没开则导致redis数据访问失败)
测试:如果redis数据没有及时更新,则首页访问获取的数据是脏数据!
先将REDIS_CONTENT_KEY数据删除,随后访问taotao商城首页刷新数据,可以查看到REDIS_CONTENT_KEY数据添加到redis缓存中,随后在taotao后台管理系统中添加大广告图片,之后再查看redis的GUI工具可以看到REDIS_CONTENT_KEY被清理,重新访问taotao首页则可看到REDIS_CONTENT_KEY又重新被加载到redis缓存!
⚡商品类目添加缓存
(1)JedisClient接口封装
public interface JedisClient {
	public String set(String key,String value);
	public String get(String key);
	public Long hset(String key,String item,String value);
	public String hget(String key,String item);
	public Long incr(String key);
	public Long decr(String key);
	public Long expire(String key,int second);
	public Long ttl(String key);
	public Long hdel(String key,String item);
  public Long del(String key);
}
(2)resource.properties
# itemCat key in redis
REDIS_ITEM_CAT_KEY=REDIS_ITEM_CAT_KEY
(3)商品类目Service接口定义
public interface ItemCatService {
	// 获取分类列表
	public ItemCatResult getItemCatList();
	// 同步内容信息
	public TaotaoResult syncItemCat();
}
@Service
public class ItemCatServiceImpl implements ItemCatService {
	@Autowired
	private TbItemCatMapper itemCatMapper;

	@Autowired
	private JedisClient jedisClient;

	@Value("${REDIS_ITEM_CAT_KEY}")
	private String REDIS_ITEM_CAT_KEY;

	@Override
	public ItemCatResult getItemCatList() {
		//调用递归方法查询商品分类列表
		//查询数据库之前先查询缓存,如果有直接返回
		try {
			//从redis中取商品分类缓存数据
			String json = jedisClient.get(REDIS_ITEM_CAT_KEY);
			if (!StringUtils.isBlank(json)) {
				//把json转换成List
				List list = JsonUtils.jsonToList(json, CatNode.class);
				ItemCatResult result = new ItemCatResult();
				result.setData(list);
				return result;
			}
		} catch (Exception e) {
			e.printStackTrace();
		}
		List catList = getItemCatList(0l);
		//返回结果之前,向缓存中添加数据
		try {
			//为了规范key可以使用hash
			//定义一个保存内容的key,hash中每个项就是cid
			//value是list,需要把list转换成json数据。
			jedisClient.set(REDIS_ITEM_CAT_KEY, JsonUtils.objectToJson(catList));
		} catch (Exception e) {
			e.printStackTrace();
		}
		ItemCatResult result = new ItemCatResult();
		result.setData(catList);
		return result;
	}

	private List getItemCatList(Long parentId) {
		//根据parentId查询列表
		TbItemCatExample example = new TbItemCatExample();
		Criteria criteria = example.createCriteria();
		criteria.andParentIdEqualTo(parentId);
		//执行查询
		List<TbItemCat> list = itemCatMapper.selectByExample(example);
		List resultList = new ArrayList<>();
		// 定义计数器
		int index = 0;
		for (TbItemCat tbItemCat : list) {
			// 判断index是否到达临界值
			if(index>=14) {
				break;
			}
			//如果是父节点
			if (tbItemCat.getIsParent()) {
				CatNode node = new CatNode();
				node.setUrl("/products/"+tbItemCat.getId()+".html");
				//如果当前节点为第一级节点
				if (tbItemCat.getParentId() == 0) {
					node.setName("<a href='/products/"+tbItemCat.getId()+".html'>"+tbItemCat.getName()+"</a>");
					// 第一级节点设置不能超过14
					index++;
				} else {
					node.setName(tbItemCat.getName());
				}
				node.setItems(getItemCatList(tbItemCat.getId()));
				//把node添加到列表
				resultList.add(node);
			} else {
				//如果是叶子节点
				String item = "/products/"+tbItemCat.getId()+".html|" + tbItemCat.getName();
				resultList.add(item);
			}
		}
		return resultList;
	}

	@Override
	public TaotaoResult syncItemCat() {
		jedisClient.del(REDIS_ITEM_CAT_KEY);
		return TaotaoResult.ok();
	}
}
(4)Controller定义
@Controller
@RequestMapping("/item/cat")
public class ItemCatController {

	@Autowired
	private ItemCatService itemCatService;

//	@RequestMapping(value="/list")
//	@ResponseBody
//	public ItemCatResult testGetItemCatList() {
//		return itemCatService.getItemCatList();
//	}

	// 方法1
//	@RequestMapping(value="/list",produces=MediaType.APPLICATION_JSON_VALUE+";charset=utf-8")
//	@ResponseBody
//	public String getItemCatList(String callback) {
//		ItemCatResult result = itemCatService.getItemCatList();
//		if (StringUtils.isBlank(callback)) {
//			//需要把result转换成字符串
//			String json = JsonUtils.objectToJson(result);
//			return json;
//		}
//		//如果字符串不为空,需要支持jsonp调用
//		//需要把result转换成字符串
//		String json = JsonUtils.objectToJson(result);
//		return callback + "(" + json + ");";
//	}

	// 方法2
	@RequestMapping(value="/list")
	@ResponseBody
	public Object getItemCatList(String callback) {
		ItemCatResult result = itemCatService.getItemCatList();
		if (StringUtils.isBlank(callback)) {
			//需要把result转换成字符串
			return result;
		}
		//如果字符串不为空,需要支持jsonp调用
		MappingJacksonValue mappingJacksonValue = new MappingJacksonValue(result);
		mappingJacksonValue.setJsonpFunction(callback);
		return mappingJacksonValue;
	}

	@RequestMapping(value="/sync")
	@ResponseBody
	public TaotaoResult sysncItemCat() {
		try {
			TaotaoResult result = itemCatService.syncItemCat();
			return result;
		} catch (Exception e) {
			e.printStackTrace();
			return TaotaoResult.build(500, ExceptionUtil.getStackTrace(e));
		}
	}
}
测试同步:http://localhost:8081/rest/item/cat/sync

2.搜索系统搭建
【1】taotao-search系统工程搭建
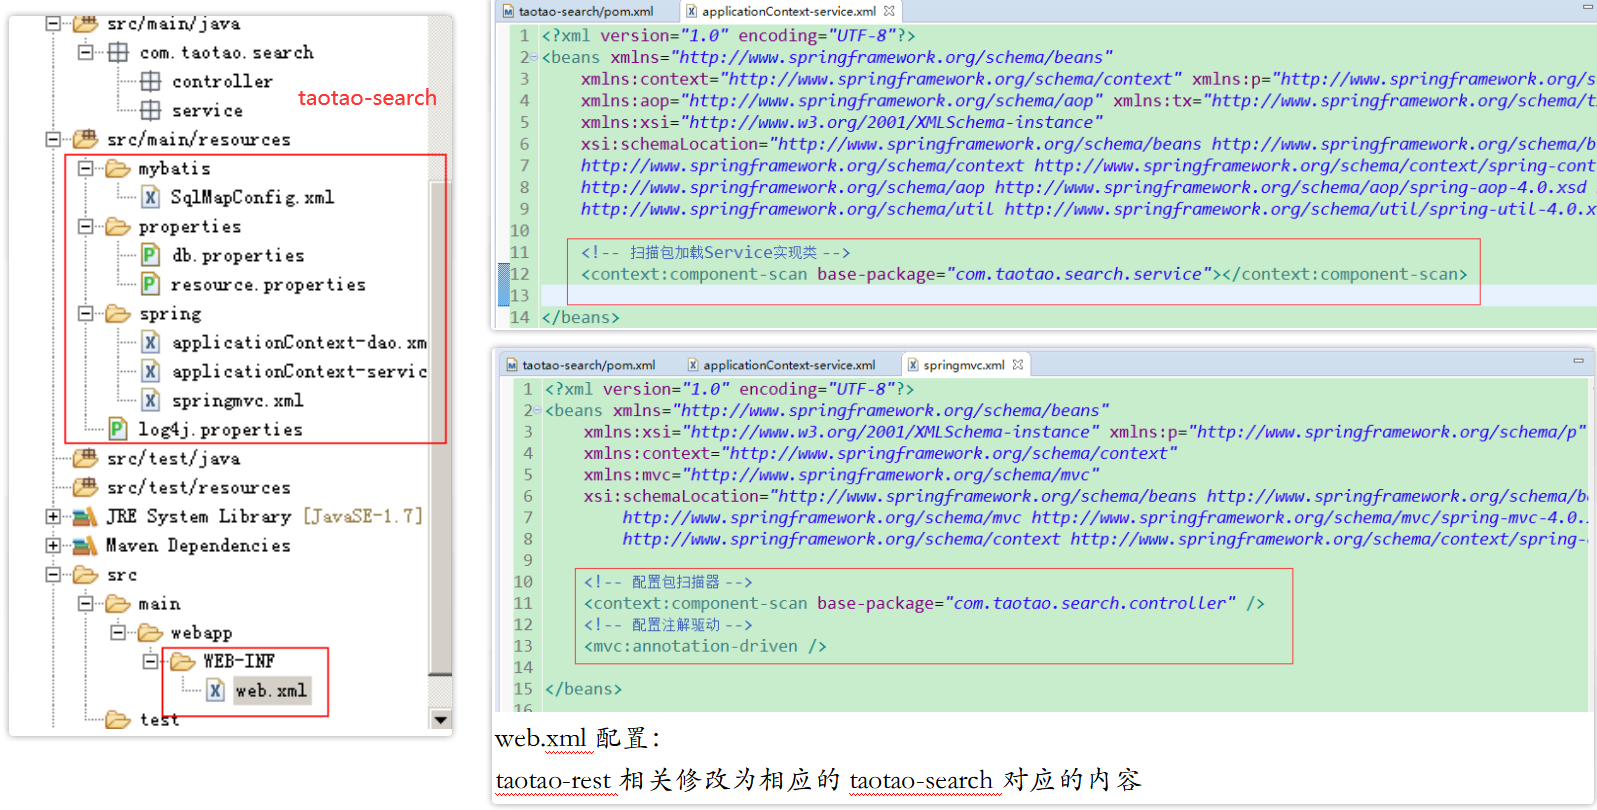
创建搜索系统(可参考taotao-rest的搭建说明),使用技术:mybatis、spring、springmvc(发布服务)、solrJ(solr服务客户端)

pom.xml配置
<project xmlns="http://maven.apache.org/POM/4.0.0" xmlns:xsi="http://www.w3.org/2001/XMLSchema-instance"
	xsi:schemaLocation="http://maven.apache.org/POM/4.0.0 http://maven.apache.org/xsd/maven-4.0.0.xsd">
	<modelVersion>4.0.0</modelVersion>
	<parent>
		<groupId>com.taotao</groupId>
		<artifactId>taotao-parent</artifactId>
		<version>0.0.1-SNAPSHOT</version>
	</parent>
	<groupId>com.taotao</groupId>
	<artifactId>taotao-search</artifactId>
	<version>0.0.1-SNAPSHOT</version>
	<packaging>war</packaging>
	<dependencies>
		<dependency>
			<groupId>com.taotao</groupId>
			<artifactId>taotao-manager-mapper</artifactId>
			<version>0.0.1-SNAPSHOT</version>
		</dependency>
		<!-- Spring -->
		<dependency>
			<groupId>org.springframework</groupId>
			<artifactId>spring-context</artifactId>
		</dependency>
		<dependency>
			<groupId>org.springframework</groupId>
			<artifactId>spring-beans</artifactId>
		</dependency>
		<dependency>
			<groupId>org.springframework</groupId>
			<artifactId>spring-webmvc</artifactId>
		</dependency>
		<dependency>
			<groupId>org.springframework</groupId>
			<artifactId>spring-jdbc</artifactId>
		</dependency>
		<dependency>
			<groupId>org.springframework</groupId>
			<artifactId>spring-aspects</artifactId>
		</dependency>
		<dependency>
			<groupId>javax.servlet</groupId>
			<artifactId>servlet-api</artifactId>
			<scope>provided</scope>
		</dependency>
		<dependency>
			<groupId>javax.servlet</groupId>
			<artifactId>jsp-api</artifactId>
			<scope>provided</scope>
		</dependency>
		<!-- solr客户端 -->
		<dependency>
			<groupId>org.apache.solr</groupId>
			<artifactId>solr-solrj</artifactId>
		</dependency>
	</dependencies>
	<!-- 添加tomcat插件 -->
	<build>
	 	<pluginManagement>
			<plugins>
				<plugin>
					<groupId>org.apache.tomcat.maven</groupId>
					<artifactId>tomcat7-maven-plugin</artifactId>
					<configuration>
						<port>8083</port>
						<path>/</path>
					</configuration>
				</plugin>
				<plugin>
	        <groupId>org.apache.maven.plugins</groupId>
	        <artifactId>maven-war-plugin</artifactId>
	        <configuration>
	          <failOnMissingWebXml>false</failOnMissingWebXml>
	        </configuration>
	      </plugin>
			</plugins>
		</pluginManagement>
	</build>
</project>
框架整合
常见问题
问题说明:web.xml is missing and <failOnMissingWebXml> is set to true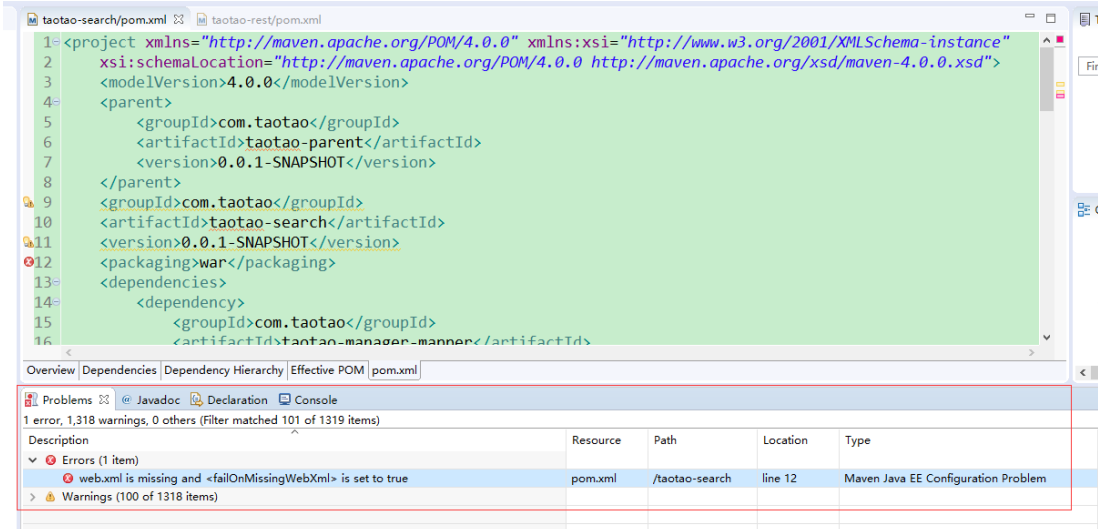
问题分析:maven默认简单构建项目是servlet3.0版本,web.xml并非必须的,因此需要手动创建webapp/WEB-INF/web.xml(可以从已有项目中复制进行修改)
解决方案1:如果工程不是web项目则可在pom.xml中添加配置(配置failOnMissingWebXml)
<build>
  <plugins>
   <plugin>
    <groupId>org.apache.maven.plugins</groupId>
    <artifactId>maven-war-plugin</artifactId>
    <version>2.6</version>
    <configuration>
     <failOnMissingWebXml>false</failOnMissingWebXml>
    </configuration>
   </plugin>
  </plugins>
 </build>
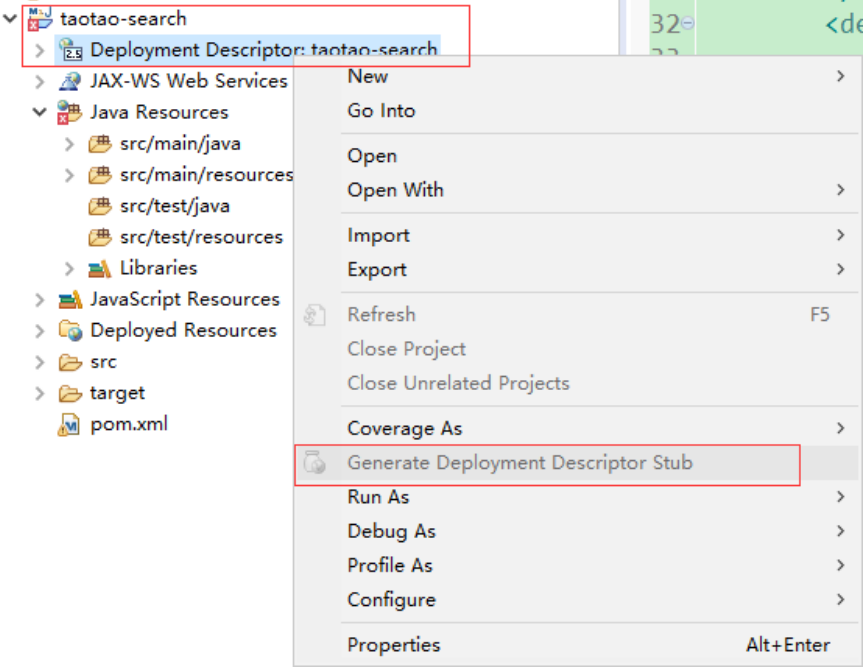
解决方法2:针对web项目解决:在视图Project Explorer中操作,右击项目—>Java EE Tools—>Generate Deployment Descriptor Stub,然后系统会在src/main/webapp/WEB_INF文件加下创建web.xml文件(或者从已有项目中复制进行修改)
【2】solr服务搭建
在linux系统下搭建solr服务(需要安装tomcat、jdk)
🔖CentOS单机版安装
步骤1:安装jdk、安装tomcat
在/root/soft下导入相关的压缩包,安装jdk、tomcat
------ 1.JDK安装配置 ------
# jdk解压,也可选择将jdk复制到/usr/local/software目录下(手动创建)
tar -zxvf jdk-7u55-linux-i586.tar.gz
# jdk配置,通过vim /etc/profile指令修改配置(jdk配置:配置环境变量)
	export PATH USER LOGNAME MAIL HOSTNAME HISTSIZE HISTCONTROL
	export JAVA_HOME=/usr/local/software/jdk1.7
	export PATH=$JAVA_HOME/bin:PATH
# 配置完成,通过source /etc/profile指令使配置文件生效,通过java –version查看当前配置的jdk版本
source /etc/profile
java –version

------ 2.Tomcat安装配置 ------
# Tomcat解压
tar -zxf apache-tomcat-7.0.47.tar.gz
在/usr/local/目录下创建solr目录,将tomcat复制到该目录
- 多版本jdk问题处理:
配置完成,发现使用的是默认的jdk版本,而不是配置的jdk1.7,可通过which java查看当前使用的是哪个路径的java,如果需要切换jdk版本,可通过alternatives --config java进行调整
- ”没有那个文件或目录,需要安装glibc”问题处理
安装好jdk之后,通过java -version、javac、java等命令测试是否安装成功时出现错误
-bash: /usr/java/jdk1.7.0_71/bin/java: /lib/ld-linux.so.2: bad ELF interpreter: No such file or directory
终端输入sudo yum install glibc.i686命令,安装好glibc,问题解决
步骤2:solr安装,并将解压后的solr目录/dist/solr-4.10.3.war部署到tomcat下,启动tomcat解压
# 解压solr压缩包
tar -zxf solr-4.10.3.tgz.tgz
# 手动将目录下的dist/solr-4.10.3.war部署到tomcat/webapps下(可重命名为solr.war)

# 启动tomcat服务(等待solr.war正常解压,解压完成则可将war包删除)
cd /usr/local/solr/tomcat/bin
./startup.sh
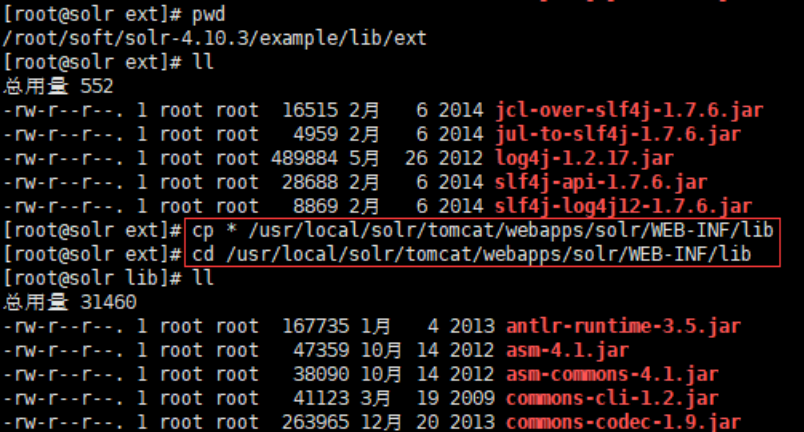
步骤3:把/root/soft/solr-4.10.3/example/lib/ext目录下的所有的jar包添加到solr工程中
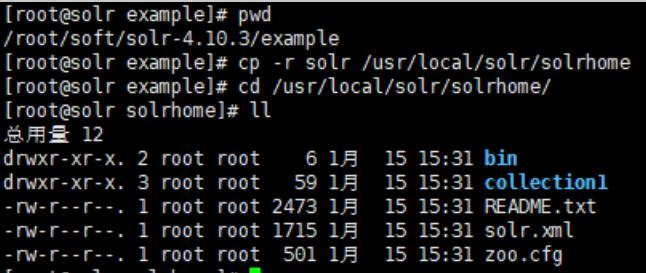
步骤4:创建solrhome
把/root/solr-4.10.3/example/solr文件夹复制一份作为solrhome复制到:/usr/local/solr/solrhome
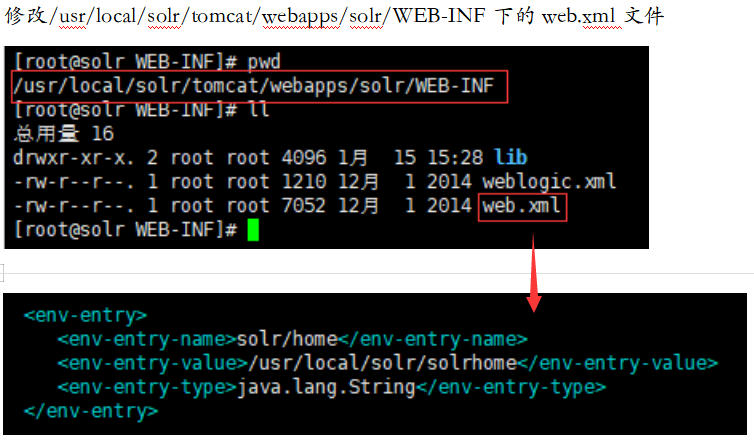
步骤4:告诉solr服务solrhome的位置(修改web.xml),并重启tomcat测试
- wget访问测试
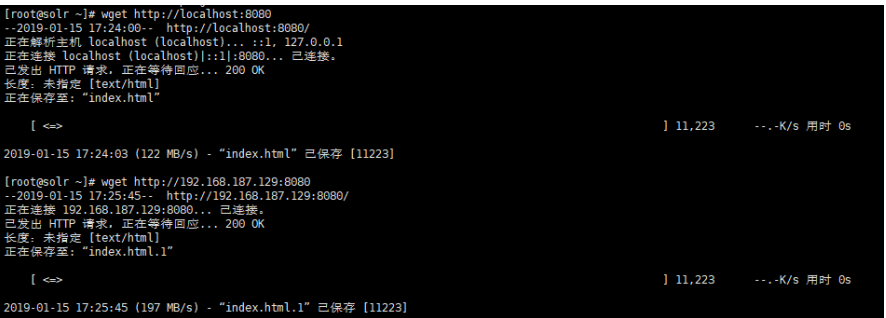
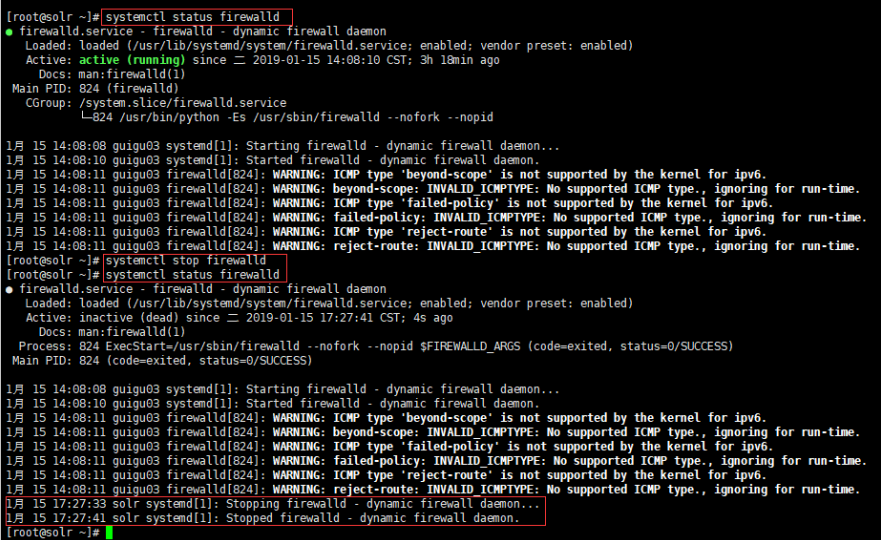
如果出现外网无法访问的情况,尝试关闭防火墙进行测试:systemctl status firewalld、systemctl stop firewalld
- 访问服务测试
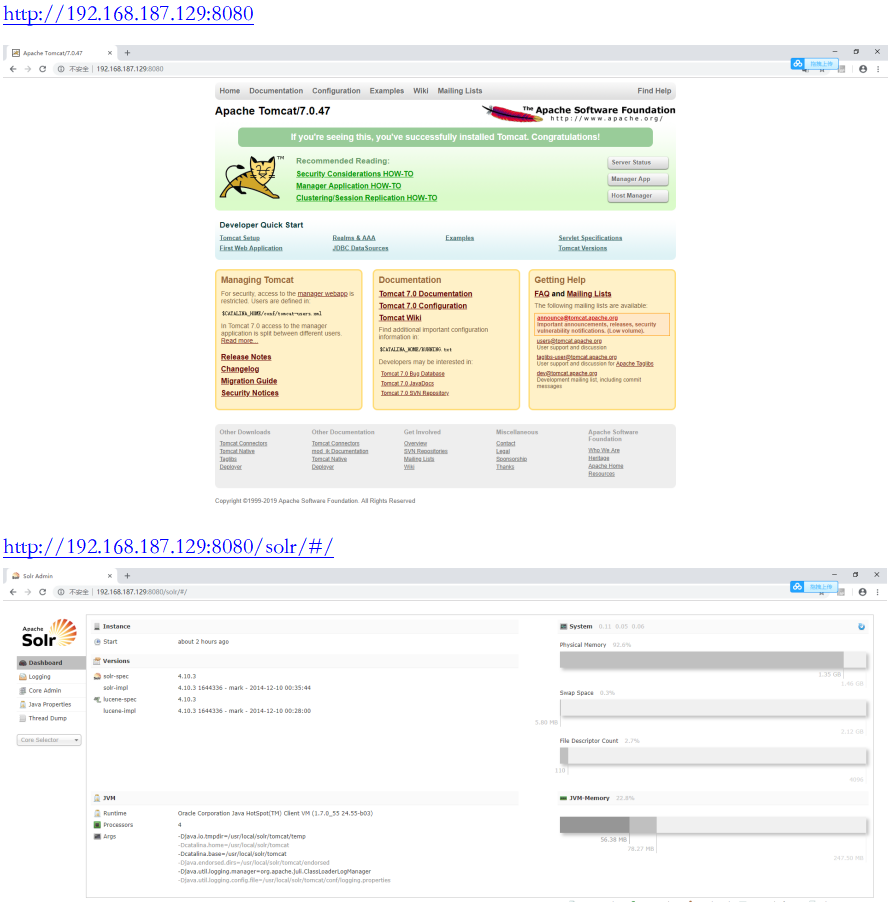
🔖配置中文分析器、自定义业务域
步骤1:把IKAnalyzer依赖的jar包添加到solr工程中。把分析器使用的扩展词典添加到classpath中
把IKAnalyzer依赖的jar包添加到solr工程中

把分析器使用的扩展词典添加到classpath中,如果对应路径没有classes文件夹则需要手动创建,随后再将相关数据复制到该文件夹
(/usr/local/solr/tomcat/webapps/solr/WEB-INF/classes)

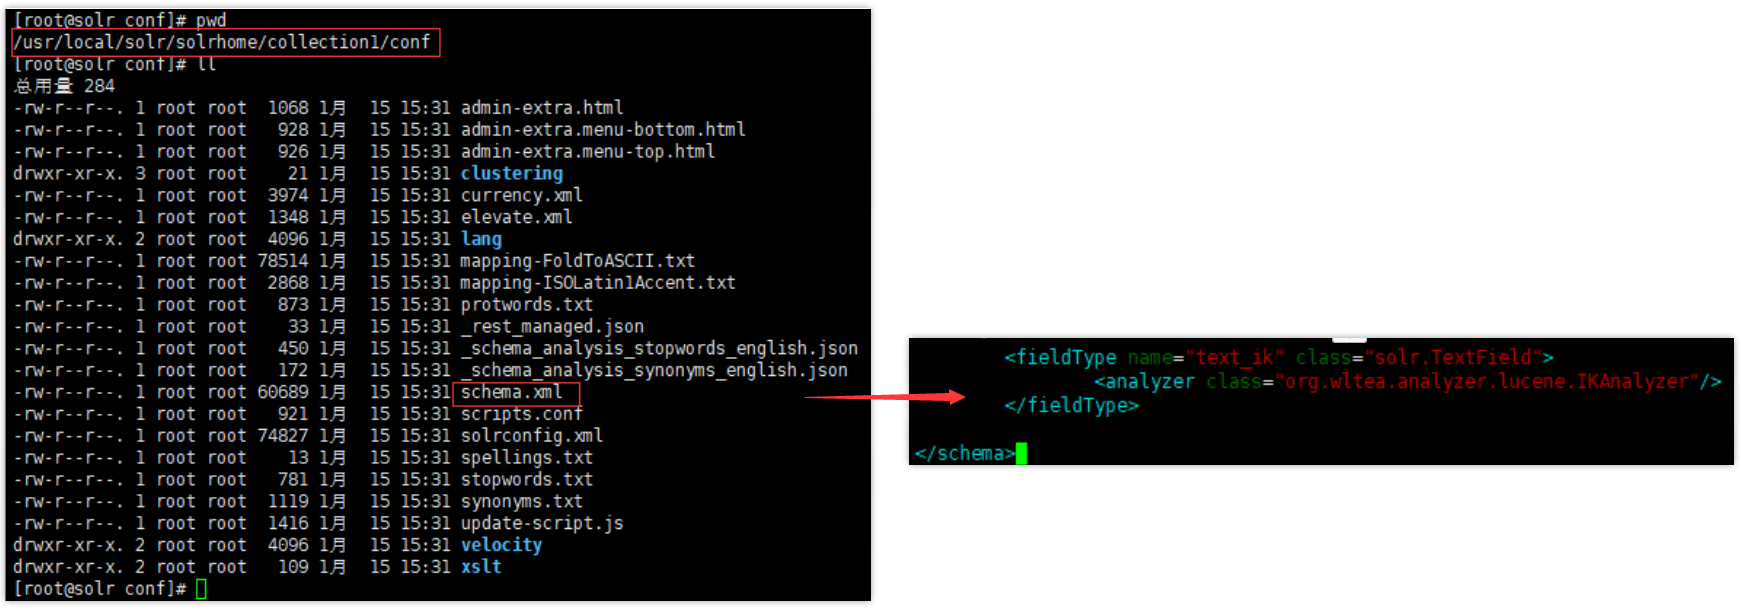
步骤2:自定义一个FieldType(Schema.xml中定义),可以在FieldType中指定中文分析器
修改指定路径的文件,在末尾添加如下信息
<fieldType name="text_ik" class="solr.TextField">
  <analyzer class="org.wltea.analyzer.lucene.IKAnalyzer"/>
</fieldType>
步骤3:自定义域,指定域的类型为自定义的FieldType
# Sql语句:指定关键字查询之类的语句
SELECT
	a.id,
	a.title,
	a.sell_point,
	a.price,
	a.image,
	b.name category_name,
	c.item_desc
FROM
	tb_item a
LEFT JOIN tb_item_cat b ON a.cid = b.id
LEFT JOIN tb_item_desc c ON a.id = c.item_id
WHERE
	a.status = 1
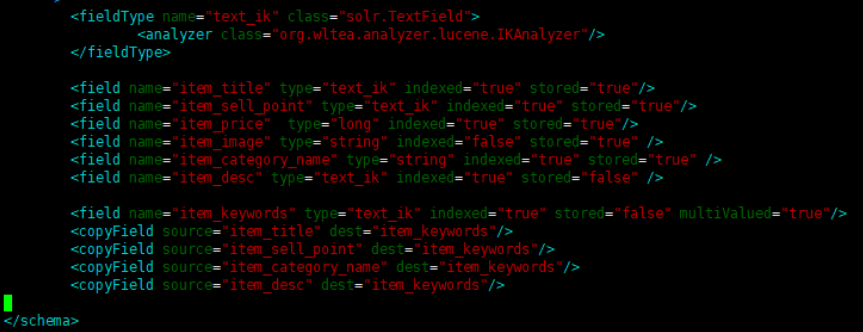
将下面的数据添加到schema.xml文件下方
<field name="item_title" type="text_ik" indexed="true" stored="true"/>
<field name="item_sell_point" type="text_ik" indexed="true" stored="true"/>
<field name="item_price"  type="long" indexed="true" stored="true"/>
<field name="item_image" type="string" indexed="false" stored="true" />
<field name="item_category_name" type="string" indexed="true" stored="true" />
<field name="item_desc" type="text_ik" indexed="true" stored="false" />

<field name="item_keywords" type="text_ik" indexed="true" stored="false" multiValued="true"/>
<copyField source="item_title" dest="item_keywords"/>
<copyField source="item_sell_point" dest="item_keywords"/>
<copyField source="item_category_name" dest="item_keywords"/>
<copyField source="item_desc" dest="item_keywords"/>
步骤4:重启tomcat进行测试
如果发现数据没有加载成功,需要确认配置文件schema.xml(如果是直接通过word复制的数据可能会出现和linux系统中空格字符格式不匹配的情况,此处需要注意),其次先关闭tomcat再次重启测试
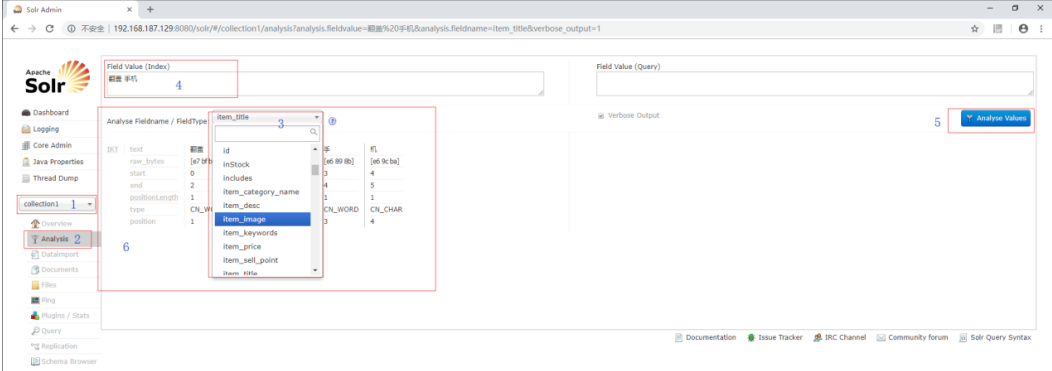
⚡索引库中导入数据
(1)solrj的使用
SolrJTest测试
public class SolrJTest {

	@Test
	public void testSolrJ() throws Exception {
		//创建连接
		SolrServer solrServer = new HttpSolrServer("http://192.168.25.154:8080/solr");
		//创建一个文档对象
		SolrInputDocument document = new SolrInputDocument();
		//添加域
		document.addField("id", "solrtest01");
		document.addField("item_title", "测试商品");
		document.addField("item_sell_point", "卖点");
		//添加到索引库
		solrServer.add(document);
		//提交
		solrServer.commit();
	}

	@Test
	public void testQuery() throws Exception {
		//创建连接
		SolrServer solrServer = new HttpSolrServer("http://192.168.25.154:8080/solr");
		//创建一个查询对象
		SolrQuery query = new SolrQuery();
		query.setQuery("*:*");
		//执行查询
		QueryResponse response = solrServer.query(query);
		//取查询结果
		SolrDocumentList solrDocumentList = response.getResults();
		for (SolrDocument solrDocument : solrDocumentList) {
			System.out.println(solrDocument.get("id"));
			System.out.println(solrDocument.get("item_title"));
			System.out.println(solrDocument.get("item_sell_point"));
		}
	}
}
测试分析
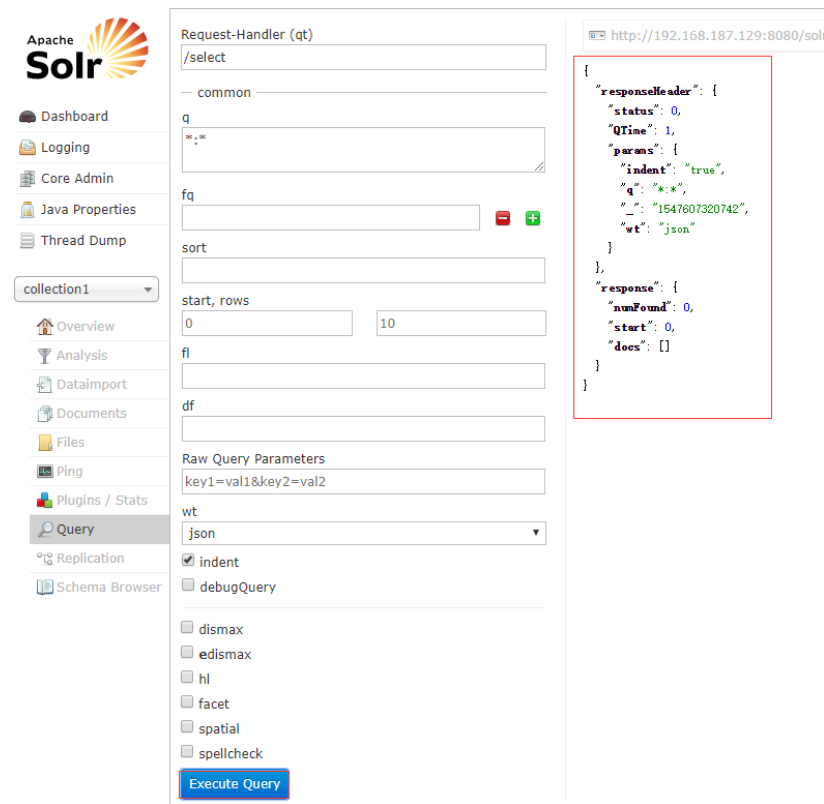
执行testSolrJ方法,随后在网页中访问solr主工程测试是否成功
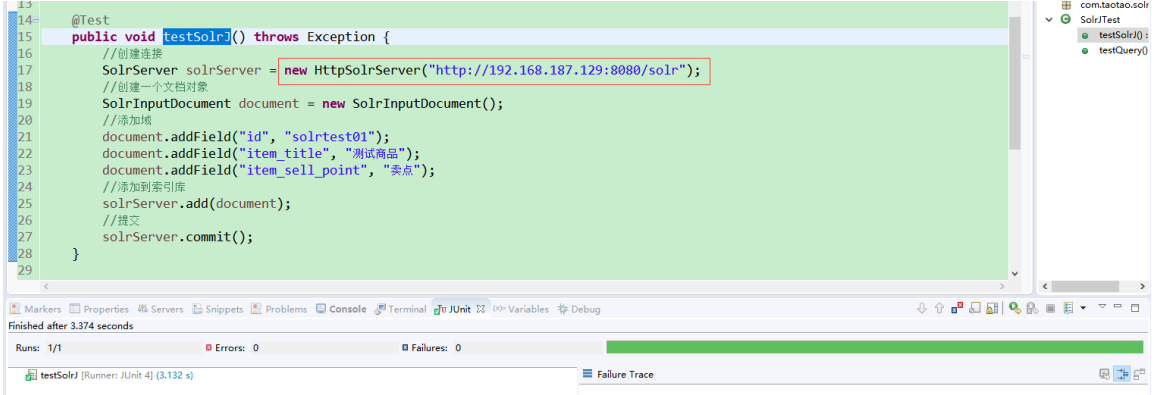
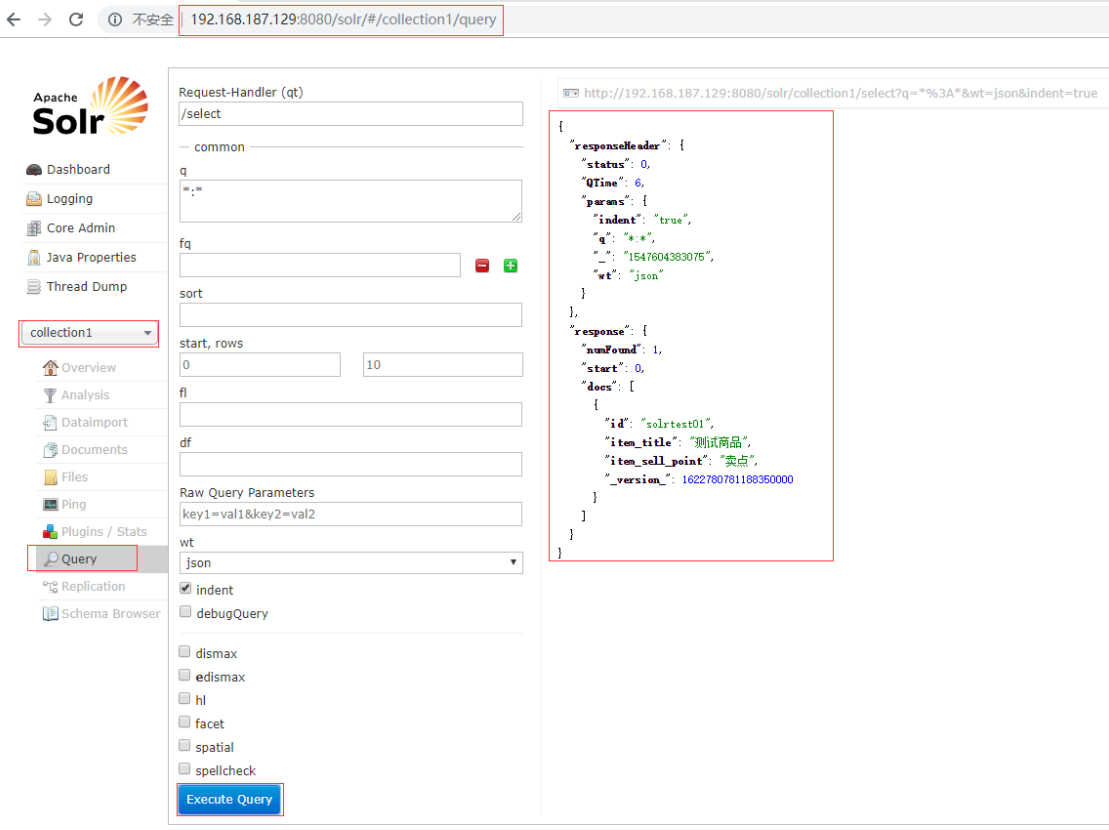
- 执行testQuery方法,显示查找的数据信息

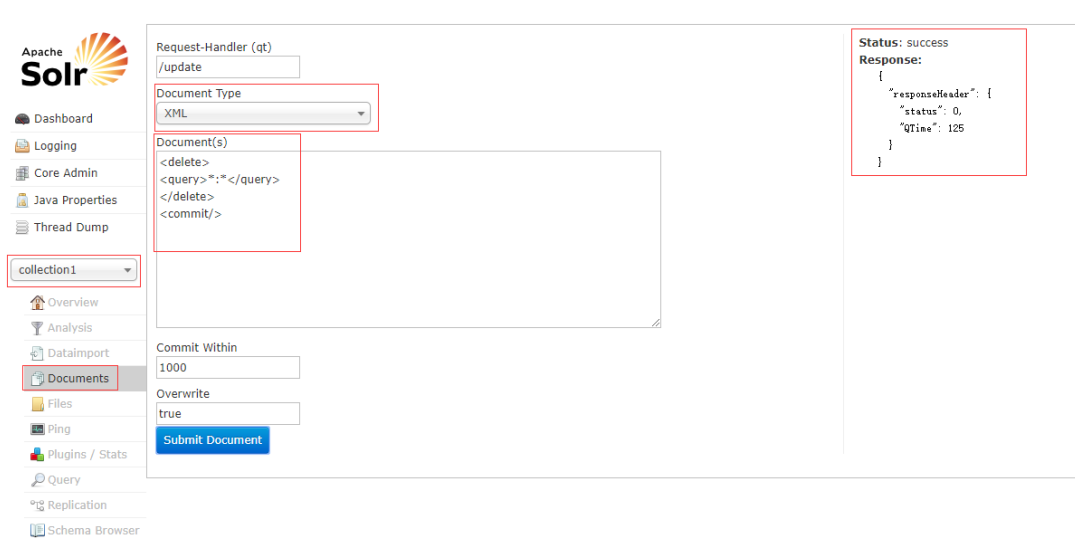
- 使用后台管理系统删除数据库,随后再次点击查找可看到数据被清空
(2)搜索数据导入
实现说明
从数据库中根据sql语句查询数据,遍历数据创建文档对象,把文档对象写入索引库
需要创建一个mapper文件,并在taotao-search中创建相关的pojo、mapper、service、controller包,创建SearchItem接收查找结果
dao层
- sql定义
# sql定义
SELECT
	a.id,
	a.title,
	a.sell_point,
	a.price,
	a.image,
	b.`name` category_name,
	c.item_desc
FROM
	tb_item a
LEFT JOIN tb_item_cat b ON a.cid = b.id
LEFT JOIN tb_item_desc c ON a.id = c.item_id
WHERE
	a.`status` = 1
- ItemMapper
package com.taotao.search.mapper;
import java.util.List;
import com.taotao.search.pojo.SearchItem;
public interface ItemMapper {
	List<SearchItem> getItemList();
}
<?xml version="1.0" encoding="UTF-8" ?>
<!DOCTYPE mapper PUBLIC "-//mybatis.org//DTD Mapper 3.0//EN" "http://mybatis.org/dtd/mybatis-3-mapper.dtd" >
<mapper namespace="com.taotao.search.mapper.ItemMapper" >
	<select id="getItemList" resultType="com.taotao.search.pojo.SearchItem">
		SELECT
			a.id,
			a.title,
			a.sell_point,
			a.price,
			a.image,
			b.`name` category_name,
			c.item_desc
		FROM
			tb_item a
		LEFT JOIN tb_item_cat b ON a.cid = b.id
		LEFT JOIN tb_item_desc c ON a.id = c.item_id
		WHERE
			a.`status` = 1
	</select>
</mapper>
需注意相应在SSM整合文件applicationContext-dao.xml文件中配置mapper扫描包

service层
取商品列表,遍历列表,创建文档对象,把文档对象写入索引库。
要操作索引库需要SolrServer对象,可以把SolrServer放到spring容器中,注入到Service
- solr客户端配置(单机版)

- ItemService接口定义及实现
public interface ItemService {
	public TaotaoResult importItems() throws Exception;
}
ServiceImpl:
package com.taotao.search.service.impl;
import java.util.List;
import org.apache.solr.client.solrj.SolrServer;
import org.apache.solr.common.SolrInputDocument;
import org.springframework.beans.factory.annotation.Autowired;
import org.springframework.stereotype.Service;
import com.taotao.common.result.TaotaoResult;
import com.taotao.search.mapper.ItemMapper;
import com.taotao.search.pojo.SearchItem;
import com.taotao.search.service.ItemService;
@Service
public class ItemServiceImpl implements ItemService {
	@Autowired
	private SolrServer solrServer;
	@Autowired
	private ItemMapper itemMapper;
	@Override
	public TaotaoResult importItems() throws Exception {
		//查询数据库获得商品列表
		List<SearchItem> itemList = itemMapper.getItemList();
		//遍历列表
		for (SearchItem item : itemList) {
			//创建文档对象
			SolrInputDocument document = new SolrInputDocument();
			//添加域
			document.addField("id", item.getId());
			document.addField("item_title", item.getTitle());
			document.addField("item_sell_point", item.getSell_point());
			document.addField("item_price", item.getPrice());
			document.addField("item_image", item.getImage());
			document.addField("item_category_name", item.getCategory_name());
			document.addField("item_desc", item.getItem_desc());
			//写入索引库
			solrServer.add(document);
		}
		//提交
		solrServer.commit();
		return TaotaoResult.ok();
	}
}
controller层
请求一个url,返回TaotaoResult
package com.taotao.search.controller;
import org.springframework.beans.factory.annotation.Autowired;
import org.springframework.stereotype.Controller;
import org.springframework.web.bind.annotation.RequestMapping;
import org.springframework.web.bind.annotation.ResponseBody;
import com.taotao.common.result.TaotaoResult;
import com.taotao.common.utils.ExceptionUtil;
import com.taotao.search.service.ItemService;
@Controller
public class ItemController {
	@Autowired
	private ItemService itemService;

	@RequestMapping("/importall")
	@ResponseBody
	public TaotaoResult importAll() {
		try {
			TaotaoResult result = itemService.importItems();
			return result;
		} catch (Exception e) {
			e.printStackTrace();
			return TaotaoResult.build(500, ExceptionUtil.getStackTrace(e));
		}
	}
}
可能出现的问题:

相关的资源文件没有找到,导致数据绑定失败,需要在pom.xml中添加相关的配置。Pom.xml文件修改如下
<build>
  <pluginManagement>
  	......
  </pluginManagement>
	<resources>
			<resource>
				<directory>src/main/java</directory>
				<includes>
					<include>**/*.properties</include>
					<include>**/*.xml</include>
				</includes>
				<filtering>false</filtering>
			</resource>
			<resource>
				<directory>src/main/resources</directory>
				<includes>
					<include>**/*.properties</include>
					<include>**/*.xml</include>
				</includes>
				<filtering>false</filtering>
			</resource>
		</resources>
</build>
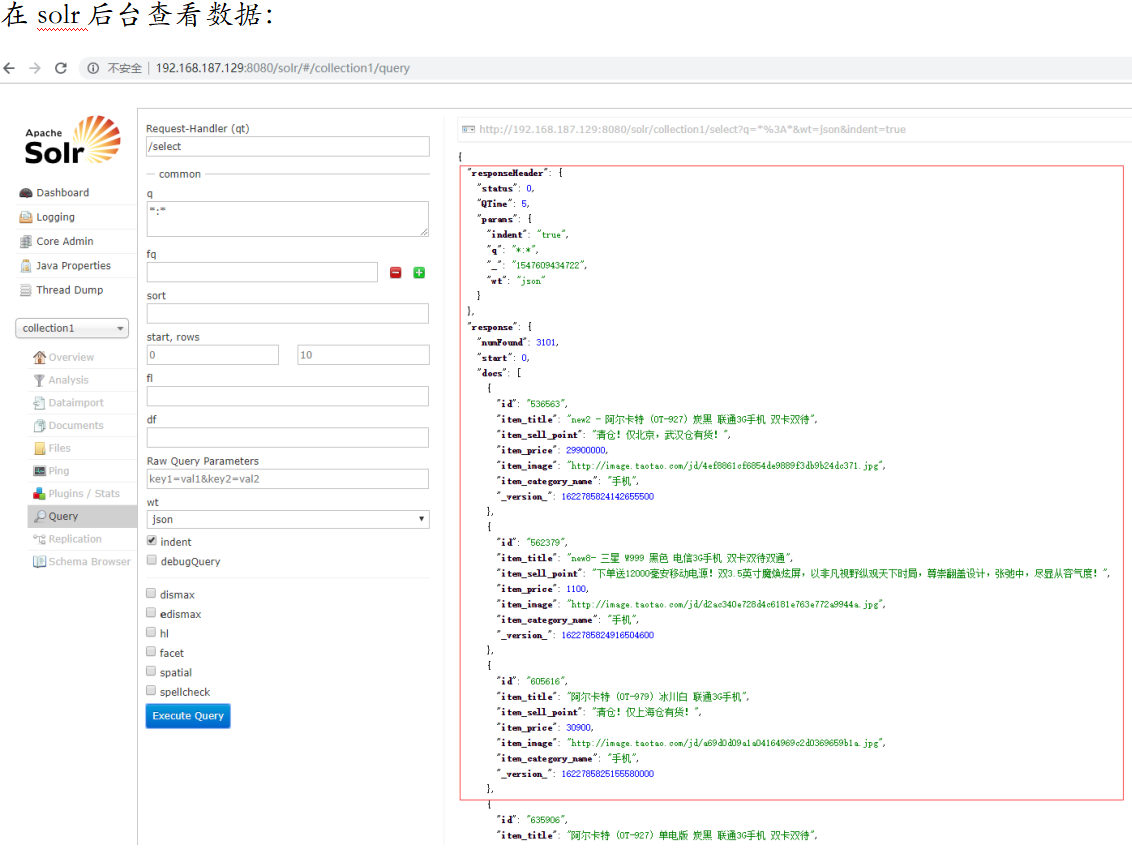
测试,访问数据:http://localhost:8083/search/importall

【3】搜索系統实现
🔖搜索服务发布
基本概念
调用服务传递过来一个查询条件,根据查询条件进行查询。返回查询结果。参数中包括分页条件。
参数:String queryString,Int page,Int rows
返回结果:返回json数据(查询结果的列表SearchItem、查询结果总记录数、查询结果的总页数、当前页码、查询的状态、错误信息)
创建一个SearchResult:商品列表、查询结果总记录数、查询结果的总页数、当前页码,使用TaotaoResult包装一个SearchResult返回结果
public class SearchResult {
	private List<SearchItem> itemList;
	private Long recordCount;
	private int pageCount;
	private int curPage;
}
dao层实现
根据查询条件进行查询,返回查询结果。
参数:SolrQuery对象
返回结果SearchResult:查询结果的商品列表、查询结果的总记录数
在taotao-search工程下创建com.taotao.search.dao、com.taotao.search.dao.impl层
public interface SearchDao {
	public SearchResult search(SolrQuery query) throws Exception;
}
SearchDaoImpl:
@Repository
public class SearchDaoImpl implements SearchDao {
	@Autowired
	private SolrServer solrServer;
	@Override
	public SearchResult search(SolrQuery query) throws Exception {
		//执行查询
		QueryResponse response = solrServer.query(query);
		//取查询结果列表
		SolrDocumentList solrDocumentList = response.getResults();
		List<SearchItem> itemList = new ArrayList<>();
		for (SolrDocument solrDocument : solrDocumentList) {
			//创建一个SearchItem对象
			SearchItem item = new SearchItem();
			item.setCategory_name((String) solrDocument.get("item_category_name"));
			item.setId((String) solrDocument.get("id"));
			item.setImage((String) solrDocument.get("item_image"));
			item.setPrice((Long) solrDocument.get("item_price"));
			item.setSell_point((String) solrDocument.get("item_sell_point"));
			//取高亮显示
			Map<String, Map<String, List<String>>> highlighting = response.getHighlighting();
			List<String> list = highlighting.get(solrDocument.get("id")).get("item_title");
			String itemTitle = "";
			if (list != null && list.size() > 0) {
				//取高亮后的结果
				itemTitle = list.get(0);
			} else {
				itemTitle = (String) solrDocument.get("item_title");
			}
			item.setTitle(itemTitle);
			//添加到列表
			itemList.add(item);
		}
		SearchResult result = new SearchResult();
		result.setItemList(itemList);
		//查询结果总数量
		result.setRecordCount(solrDocumentList.getNumFound());
		return result;
	}
}
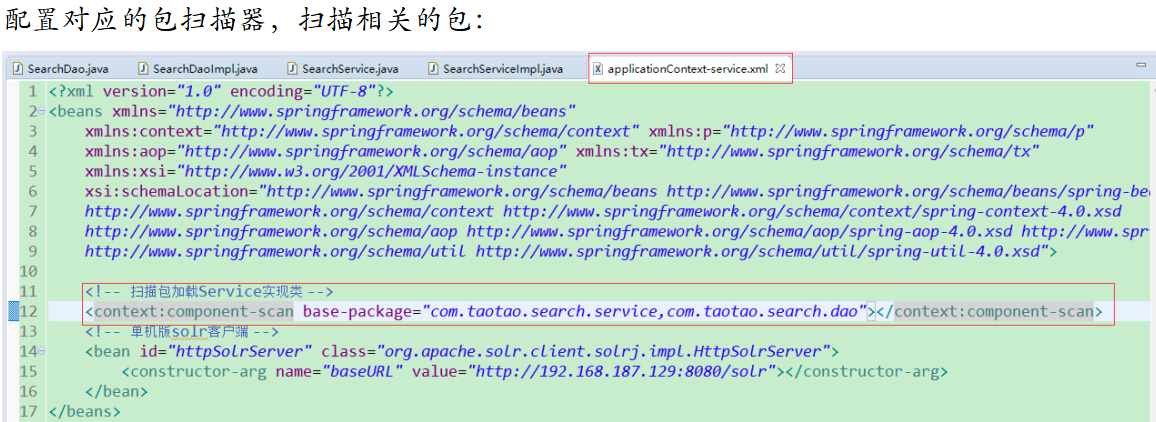
service实现
1)接收查询条件、分页条件。
2)创建SolrQuery对象,设置查询条件、分页条件。
3)调用dao进行搜索
4)计算总页数,把总页数设置到SearchResult对象中,设置当前页属性。
5)返回SearchResult
参数:查询条件、Page、Rows
返回结果:SearchResult
public interface SearchService {

	public SearchResult search(String queryString, int page, int rows) throws Exception;

}
SearchServiceImpl:
@Service
public class SearchServiceImpl implements SearchService {
	@Autowired
	private SearchDao searchDao;
	@Override
	public SearchResult search(String queryString, int page, int rows) throws Exception {
		//创建查询条件
		SolrQuery query = new SolrQuery();
		//设置查询条件
		query.setQuery(queryString);
		//设置分页条件
		query.setStart((page-1)*rows);
		query.setRows(rows);
		//设置默认搜索域
		query.set("df", "item_title");
		//设置高亮
		query.setHighlight(true);
		query.addHighlightField("item_title");
		query.setHighlightSimplePre("<font class=\"skcolor_ljg\">");
		query.setHighlightSimplePost("");
		//执行查询
		SearchResult searchResult = searchDao.search(query);
		//计算总页数
		Long recordCount = searchResult.getRecordCount();
		int pageCount = (int) (recordCount / rows);
		if (recordCount % rows > 0) {
			pageCount++;
		}
		searchResult.setPageCount(pageCount);
		searchResult.setCurPage(page);
		return searchResult;
	}
}
controller层实现
发布服务,搜索服务的url:/search/q?keyword=xxx&page=1&rows=30
参数:keyword、page、rows
返回结果:json数据,使用TaotaoResult包装SearchResult
package com.taotao.search.controller;

@Controller
public class SearchController {

	@Autowired
	private SearchService searchService;
	@RequestMapping("/q")
	@ResponseBody
	public TaotaoResult search(@RequestParam(defaultValue="")String keyword,
			@RequestParam(defaultValue="1")Integer page,
			@RequestParam(defaultValue="30")Integer rows) {
		try {
			//转换字符集
			keyword = new String(keyword.getBytes("iso8859-1"), "utf-8");
			SearchResult searchResult = searchService.search(keyword, page, rows);
			return TaotaoResult.ok(searchResult);
		} catch (Exception e) {
			e.printStackTrace();
			return TaotaoResult.build(500, ExceptionUtil.getStackTrace(e));
		}
	}
}
测试:访问链接 http://localhost:8083/search/q?keyword=手机&page=1&rows=10
🔖在portal中实现搜索(调用搜索服务)
基本概念
调用taotao-search发布的服务,实现搜索。使用HttpClient调用服务。返回json数据。需要把json转换成java对象。把java对象传递给页面。Index.jsp中引用来了common/header.jsp,其中定义了搜索按钮

请求的url:http://localhost:8082/search.html
参数:q:查询条件
返回结果:jsp页面(search.jsp)
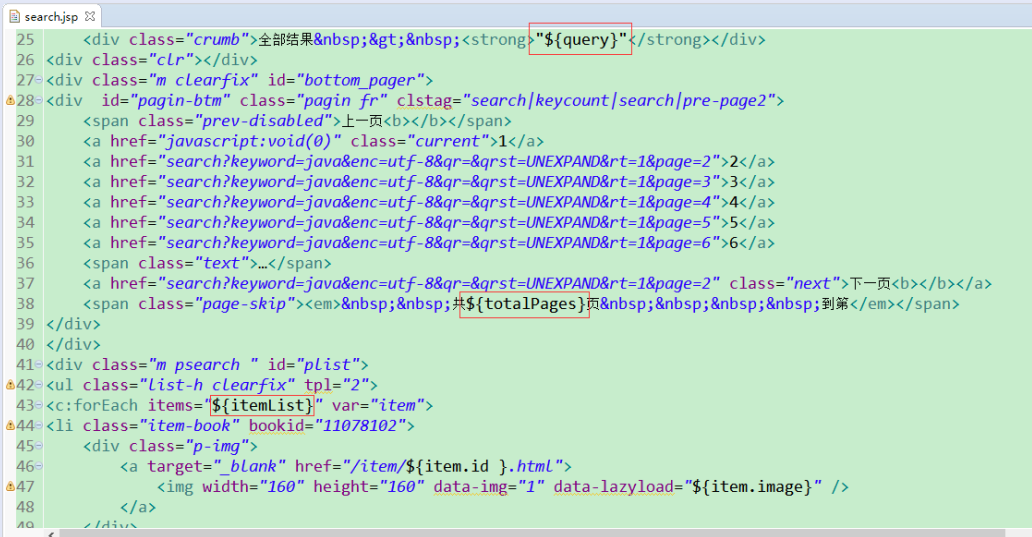
Search.jsp分析:
- Query:查询条件
- totalPages:总页数
- itemList:商品列表(每个元素可以是SearchItem)
- Page:当前页
此处将需要用到的taotao-search工程下的SearchItem.java、SearchResult.java复制到taotao-potral工程下(也可考虑将其复制到taotao-common下,然后将taotao-common重新打包,将其作为公共的内容进行引用)
service层
参数:查询条件、page、rows。
根据查询调用taotao-search发布的服务,查询商品列表。得到json数据,需要把json转换成java对象,返回SearchResult
public interface SearchService {
	public SearchResult search(String keyword, int page, int rows);
}
SearchServiceImpl:
package com.taotao.portal.service.impl;
import java.util.HashMap;
import java.util.Map;
import org.springframework.beans.factory.annotation.Value;
import org.springframework.stereotype.Service;
import com.taotao.common.pojo.HttpClientUtil;
import com.taotao.common.result.TaotaoResult;
import com.taotao.portal.pojo.SearchResult;
import com.taotao.portal.service.SearchService;
@Service
public class SearchServiceImpl implements SearchService {
	@Value("${SEARCH_BASE_URL}")
	private String SEARCH_BASE_URL;
	@Override
	public SearchResult search(String keyword, int page, int rows) {
		//调用服务查询商品列表
		Map<String, String> param = new HashMap<>();
		param.put("keyword", keyword);
		param.put("page", page + "");
		param.put("rows", rows + "");
		//调用服务
		String json = HttpClientUtil.doGet(SEARCH_BASE_URL, param);
		//转换成java对象
		TaotaoResult taotaoResult = TaotaoResult.formatToPojo(json, SearchResult.class);
		//取返回的结果
		SearchResult searchResult = (SearchResult) taotaoResult.getData();
		return searchResult;
	}
}
- 在resource.properties配置SEARCH_BASE_URL
# SEARCH_BASE_URL:search service url
SEARCH_BASE_URL=http://localhost:8083/search/q
controller层
请求的url:/search
接收三个参数:查询条件、page、rows
调用服务查询商品列表。把商品列表传递给jsp、参数回显,返回逻辑视图(search.jsp)
package com.taotao.portal.controller;

@Controller
public class SearchController {
	@Autowired
	private SearchService searchService;
	@RequestMapping("/search")
	public String search(@RequestParam("q")String keyword,
			@RequestParam(defaultValue="1")Integer page,
			@RequestParam(defaultValue="60")Integer rows, Model model) {
		//get乱码处理
		try {
			keyword = new String(keyword.getBytes("iso8859-1"), "utf-8");
		} catch (UnsupportedEncodingException e) {
			keyword = "";
			e.printStackTrace();
		}
		SearchResult searchResult = searchService.search(keyword, page, rows);
		//参数传递 给页面
		model.addAttribute("query", keyword);
		model.addAttribute("totalPages", searchResult.getPageCount());
		model.addAttribute("itemList", searchResult.getItemList());
		model.addAttribute("page", searchResult.getCurPage());
		//返回逻辑视图
		return "search";
	}
}
访问测试:(需要启动taotao-search、再启动taotao-portal进行测试)
http://localhost:8082/search.html?q=手机
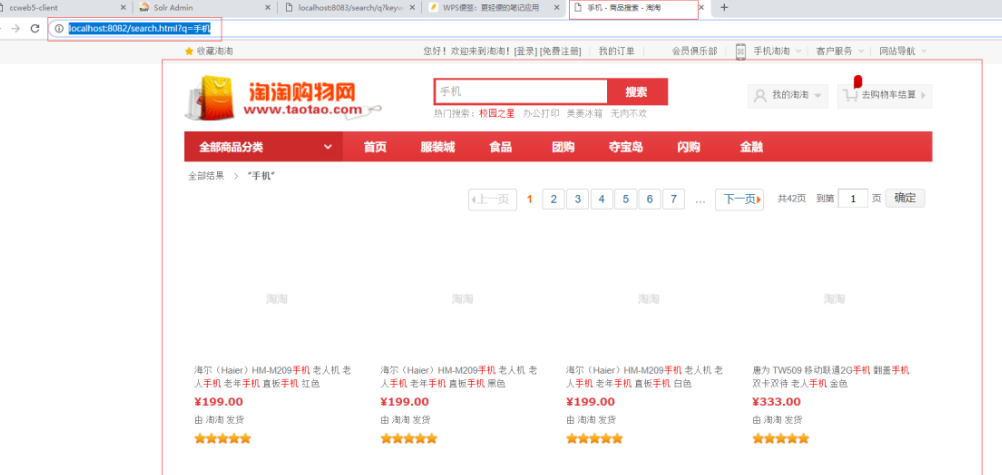
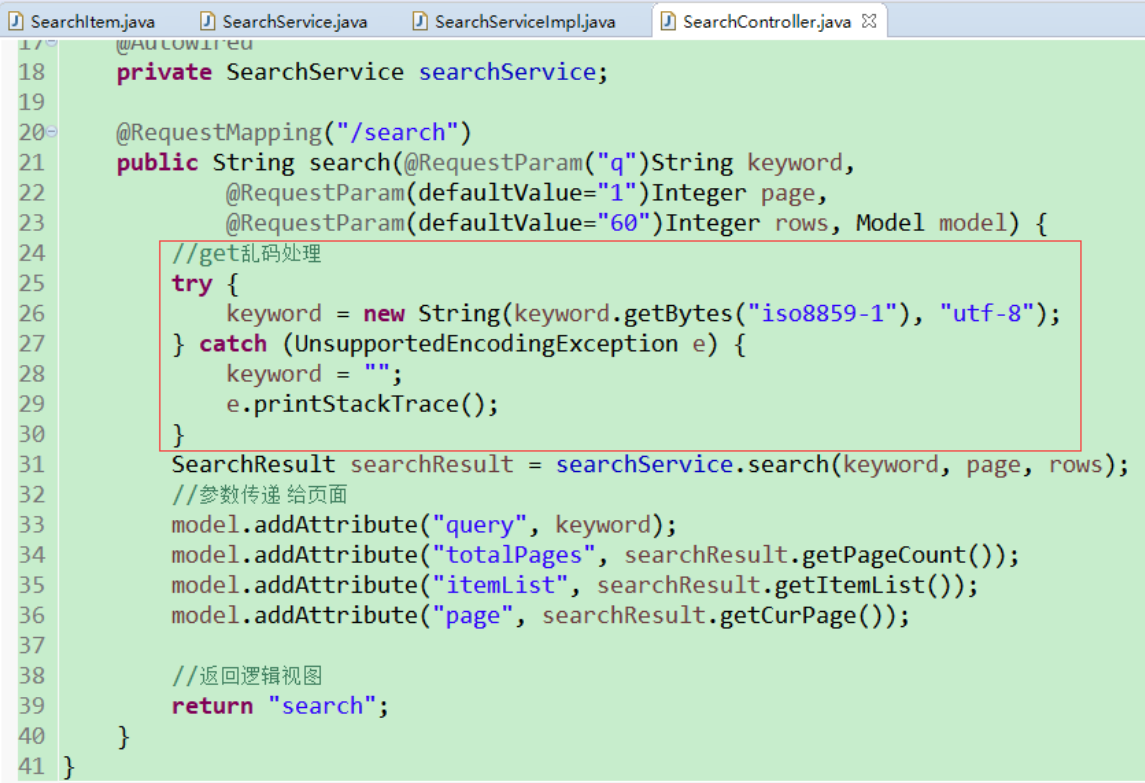
常见问题1:异常处理,可能是传入的数据为乱码导致出现空指针异常
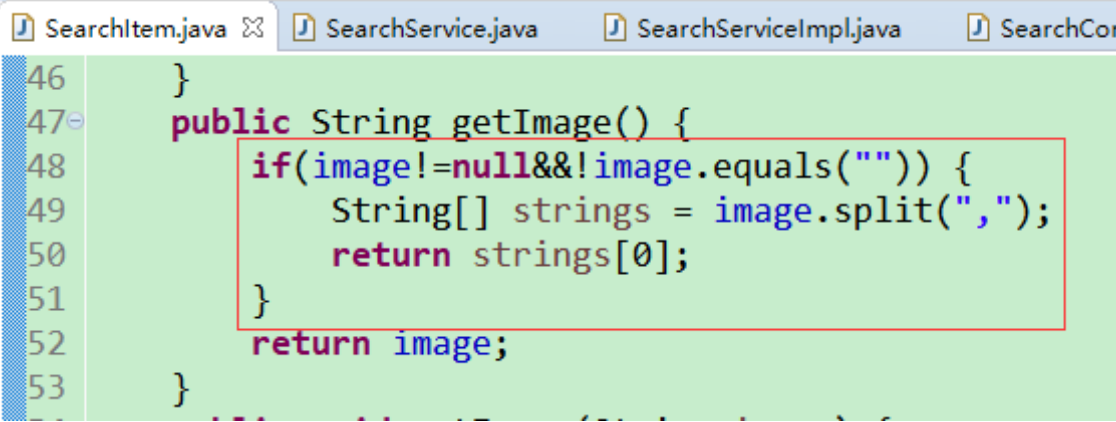
常见问题2:解决图片显示不出来的问题:一个商品可能对应有多个图片信息,在数据库中存储的形式是以“,”进行分割,此处在taotao-portal对查找出来的图片信息进行截取处理并默认返回第一个数据(切勿动taotao-search层,否则不具有通用性)
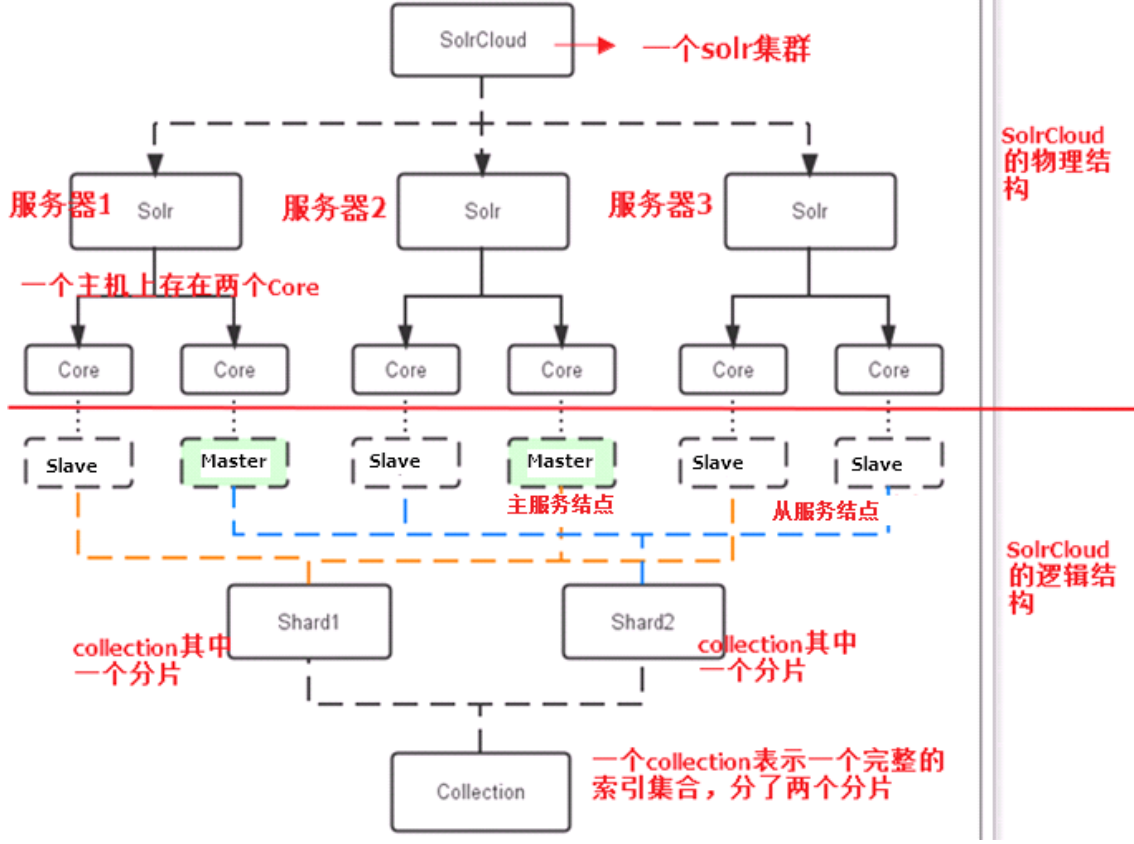
【4】solr集群环境搭建
🔖solr集群架构
SolrCloud(需要用到solr+zookeeper)
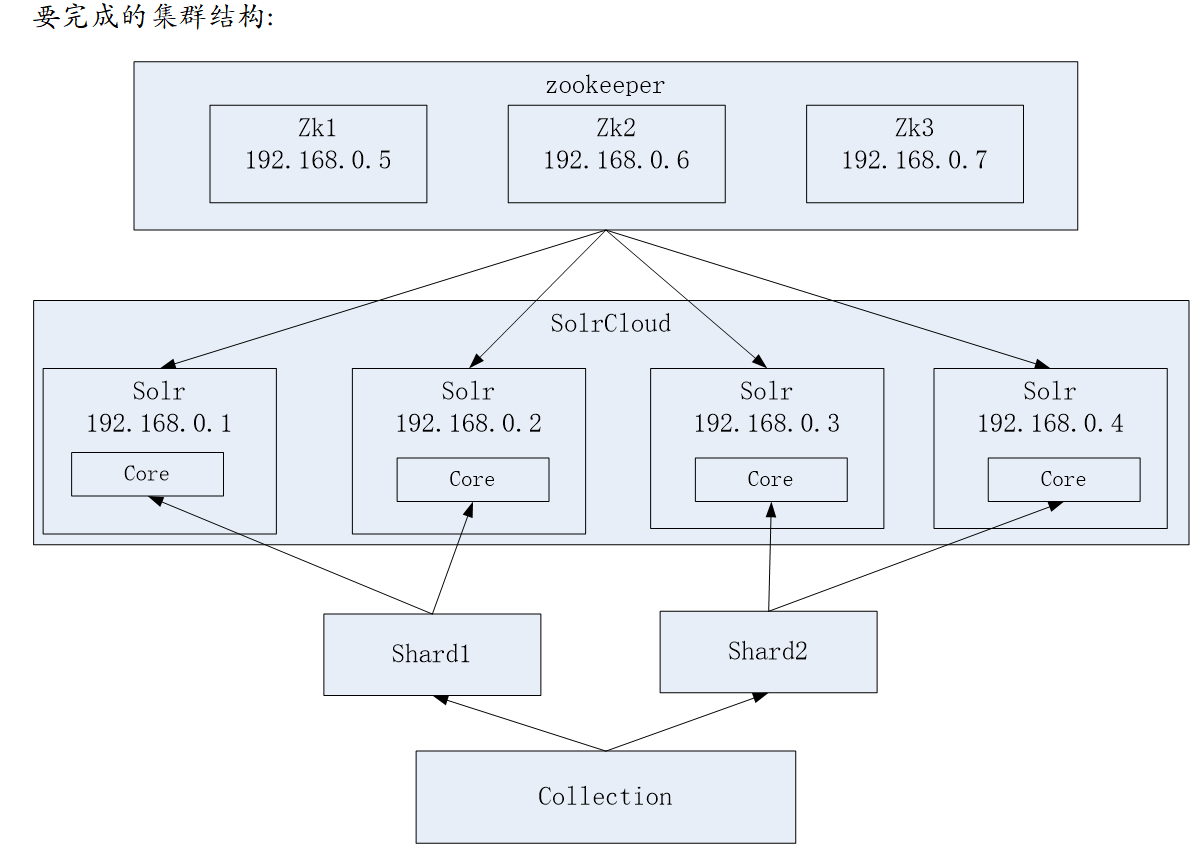
Zookeeper
- 集群管理
主从的管理、负载均衡、高可用的管理。集群的入口。Zookeeper必须是集群才能保证高可用。Zookeeper有选举和投票的机制。集群中至少应该有三个节点。
- 配置文件的集中管理
搭建solr集群时,需要把Solr的配置文件上传zookeeper,让zookeeper统一管理。每个节点都到zookeeper上取配置文件。
- 分布式锁
集群需要的服务器
Zookeeper:3台、Solr:4台
如果没有足够的服务器,可以实现伪分布式,在一台服务器上实现zookeeper三个实例(Zookeeper需要安装jdk)、tomcat(solr)需要四个实例
伪分布式实现:在单机版solr服务器上搭建集群:192.168.187.129
⚡集群搭建步骤
(1)Zookeeper集群搭建
步骤1:把zookeeper的安装包上传到服务器并解压
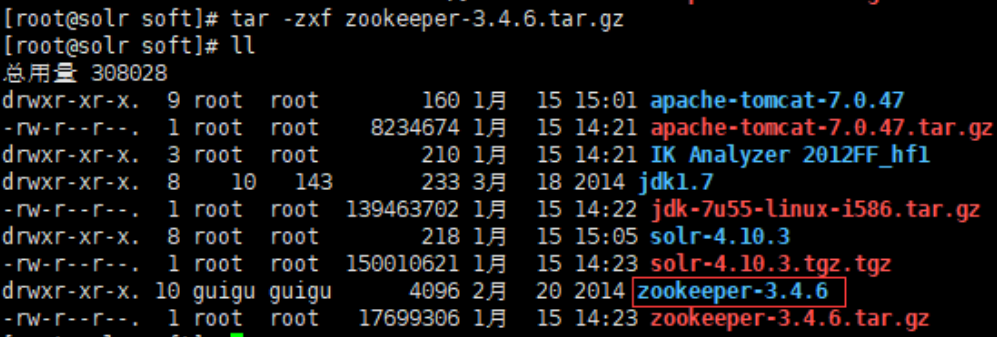
步骤2:把zookeeper向/usr/local/solr-cloud目录下复制三份
在/usr/local/下创建solr-cloud目录存放分布式solr集群搭建的内容,将解压后的zookeeper分别复制到对应的文件夹

步骤3:zookeeper配置
1)在zookeeper01目录下创建一个data文件夹,在data目录下创建一个myid的文件,Myid的内容为1(zookeeper02对应“2”,zookeeper03对应“3”)
2)Zookeeper02、03以此类推(参考步骤1)
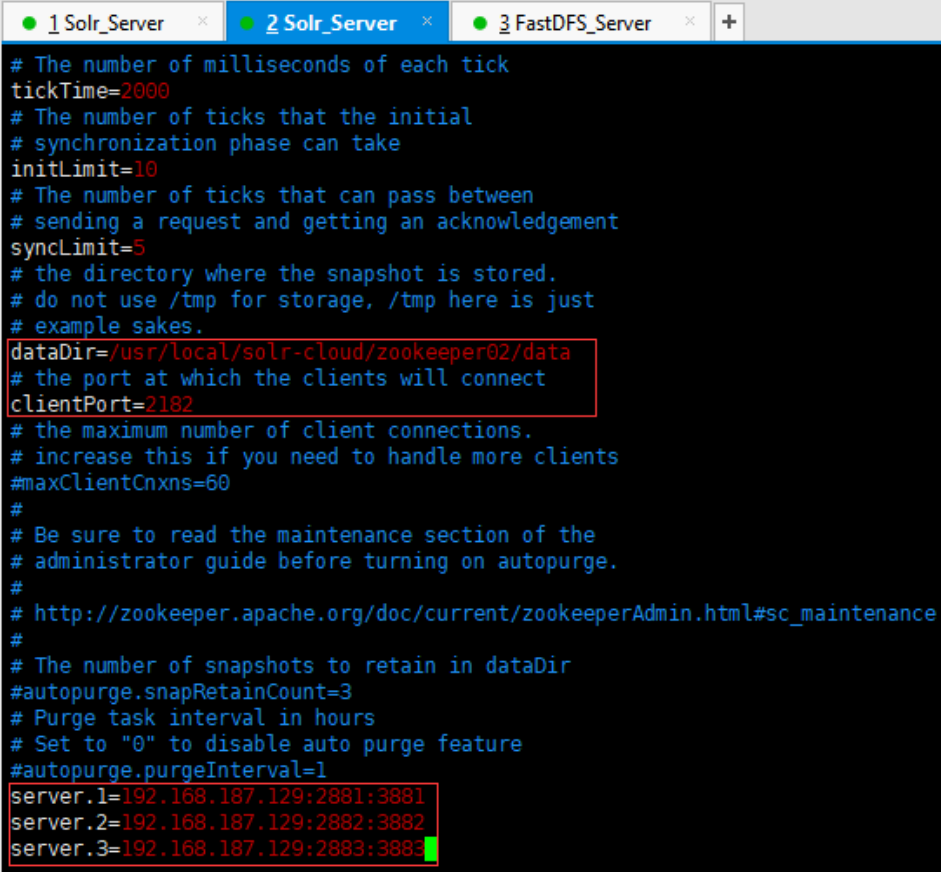
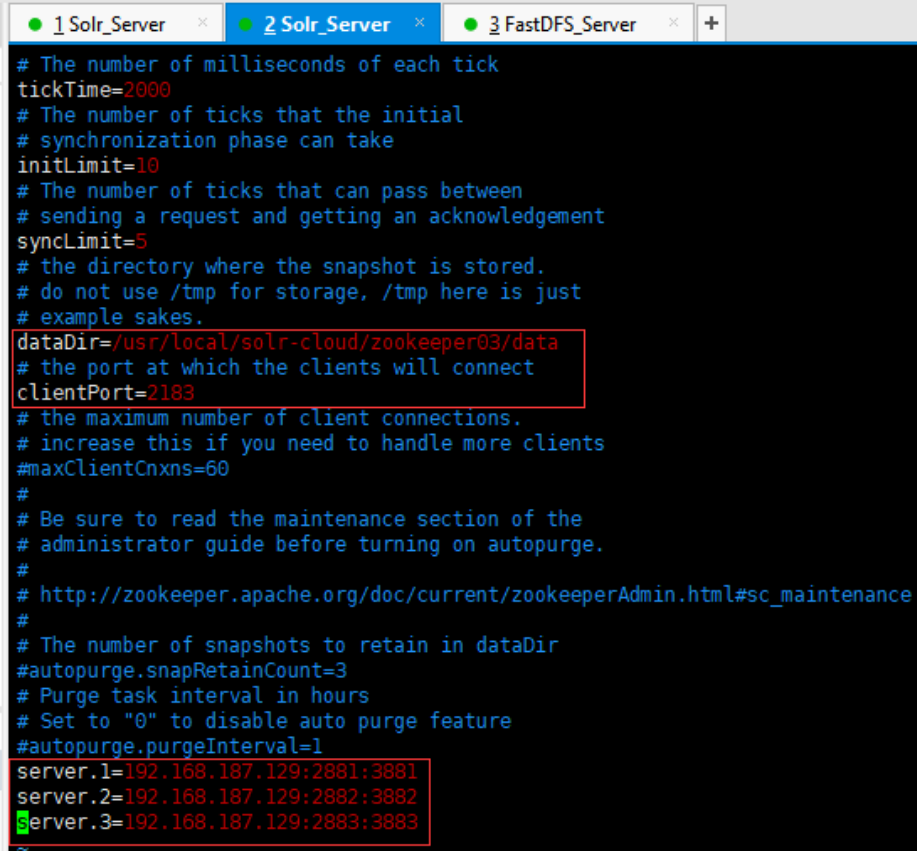
3)进入conf文件,把zoo_sample.cfg文件改名为zoo.cfg,并修改zoo.cfg文件
# 1.把dataDir=属性指定为刚创建的data文件夹
dataDir:修改
/usr/local/solr-cloud/zookeeper01/data
/usr/local/solr-cloud/zookeeper02/data
/usr/local/solr-cloud/zookeeper03/data
# 2.把clientPort指定为不冲突的端口号(01:2181、02:2182、03:2183)
ClientPort:修改(客户端连接端口)
zookeeper01:2181
zookeeper02:2182
zookeeper03:2183

# 3.在zoo.cfg中添加如下内容
# 参考配置服务器ip:投票端口、选举端口
server.1=192.168.25.154:2881:3881
server.2=192.168.25.154:2882:3882
server.3=192.168.25.154:2883:3883

# 实际配置以自身服务器ip为准,每个zookeeper节点都要配置
server.1=192.168.187.129:2881:3881
server.2=192.168.187.129:2882:3882
server.3=192.168.187.129:2883:3883
基于3)配置,最终参考内容分别如下所示
- Zookeeper01/zoo.cfg:

- Zookeeper02/zoo.cfg:
- Zookeeper03/zoo.cfg:
步骤4:启动zookeeper测试
Zookeeper的目录下有一个bin目录。使用zkServer.sh启动zookeeper服务。
启动:
./zkServer.sh start关闭:
./zkServer.sh stop查看服务状态:
./zkServer.sh status
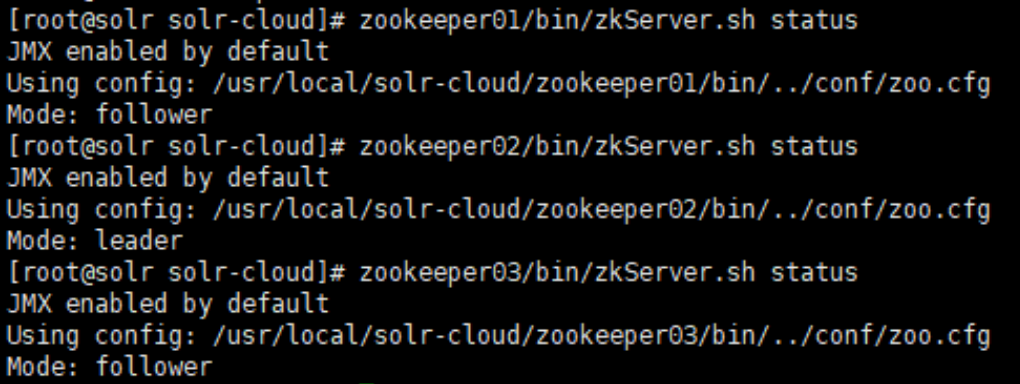
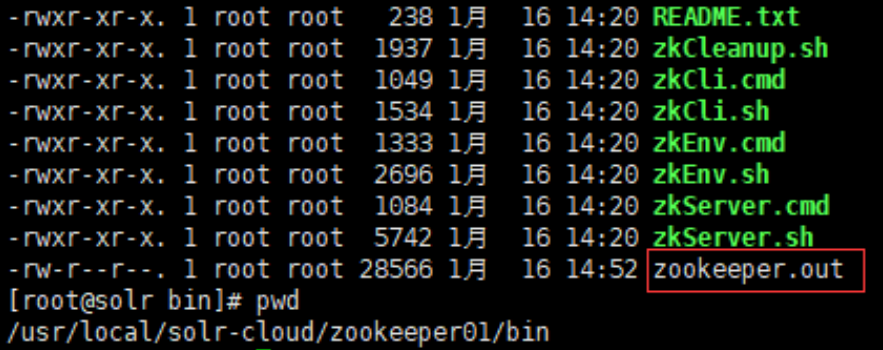
说明:如果是在zookeeper0x中启动,再其对应的bin目录下会生成相应的日志文件,如果是在外级目录去启动zookeeper则其日志文件会生成在对应的当前目录下,显示为zookeeper.out,如果是多个zookeeper则记录在相同的日志文件中
(2)搭建solr集群
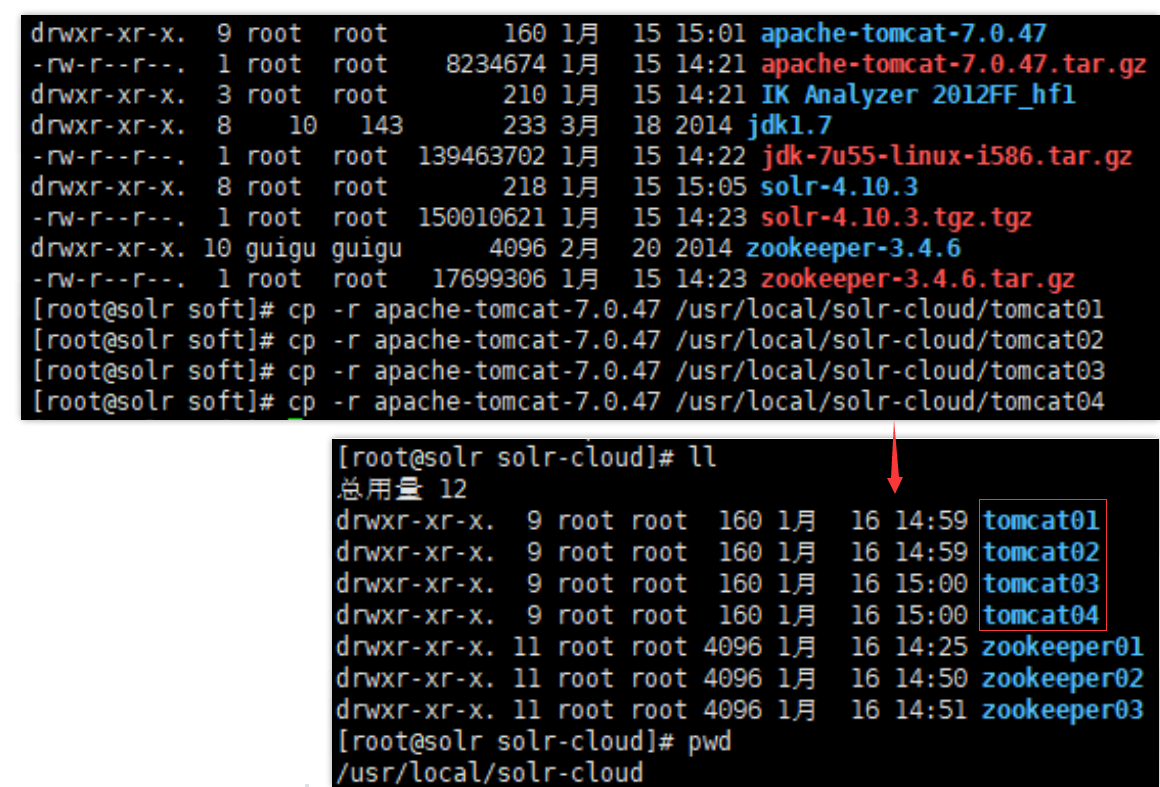
步骤1:安装四个tomcat,修改其端口号不能冲突,可选择8080~8083
在/root/soft目录下将解压后的tomcat分别复制到solr集群搭建的位置,分别进行命名
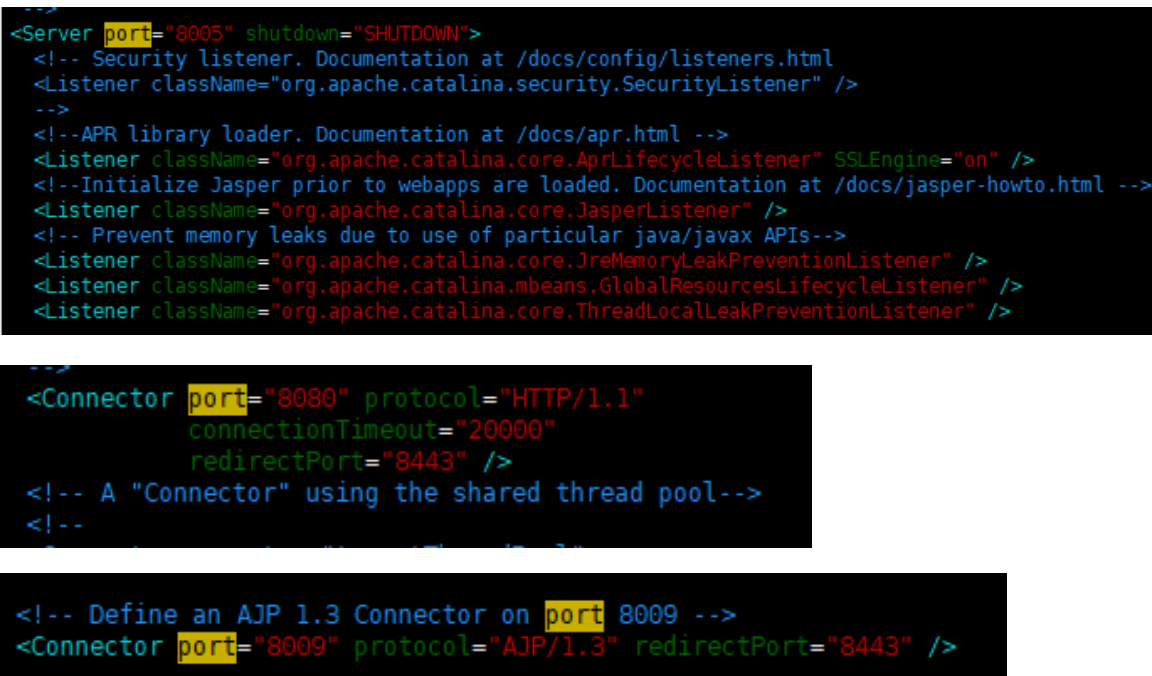
tomcat01可以不变,依次改变tomcat02(端口号+1)、tomcat03(端口号+2)、tomcat04(端口号+3)下conf/server.xml,修改3个位置的端口号信息,此处简单显示说明:
步骤2:在tomcat下部署solr(将单机版的solr工程复制到tomcat下即可)
先关闭单机版的solr服务器,随后将相关的工程复制到tomcat目录下

步骤3:为每一个solr实例创建一个solrhome并关联(修改web.xml文件)
- 为每一个solr实例创建一个solrhome
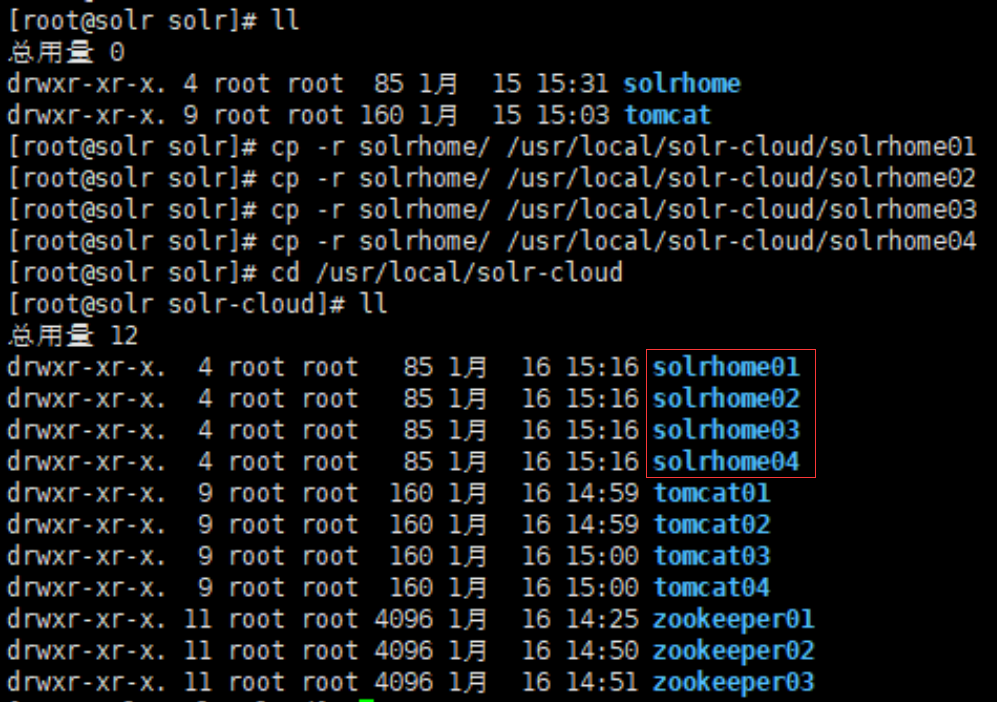
- 关联实例对应的solrhome(修改web.xml)

步骤4:修改每个solrhome下的solr.xml文件。修改host、hostPort两个属性,分别是对应的ip及端口号
由于是伪分布,此处搭建的主机ip均一致为“192.168.187.129”,如果是不同的服务器上部署则修改为相应的ip,端口号则为相应的访问的端口号,依次为8080、8081、8082、8083
vim /usr/local/solr-cloud/solrhome01/solr.xml
vim /usr/local/solr-cloud/solrhome02/solr.xml
vim /usr/local/solr-cloud/solrhome03/solr.xml
vim /usr/local/solr-cloud/solrhome04/solr.xml
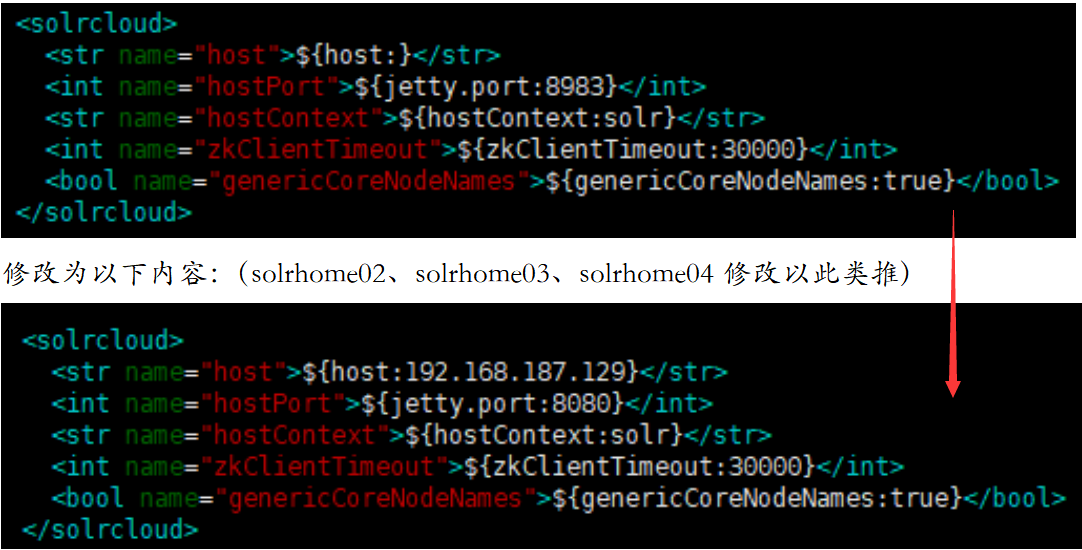
步骤5:把配置文件上传到zookeeper
需要先启动zookeeper集群(分别启动每个zookeeper节点),使用/root/solr-4.10.3/example/scripts/cloud-scripts/zkcli.sh命令上传配置文件
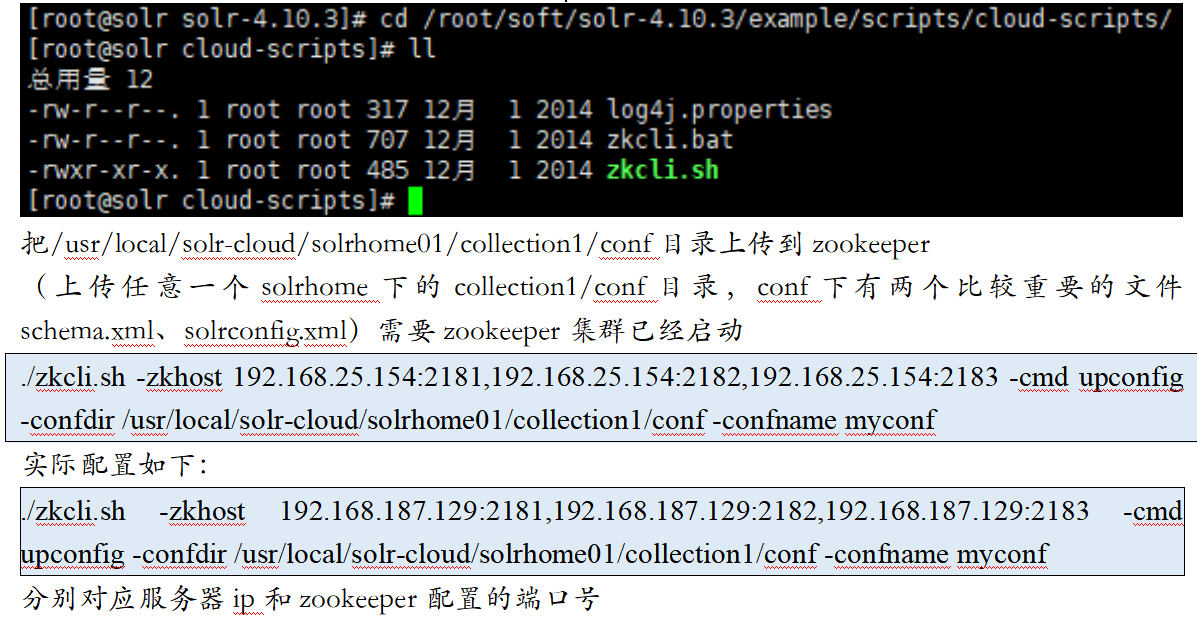
输入指令,点击回车,等待传输完成
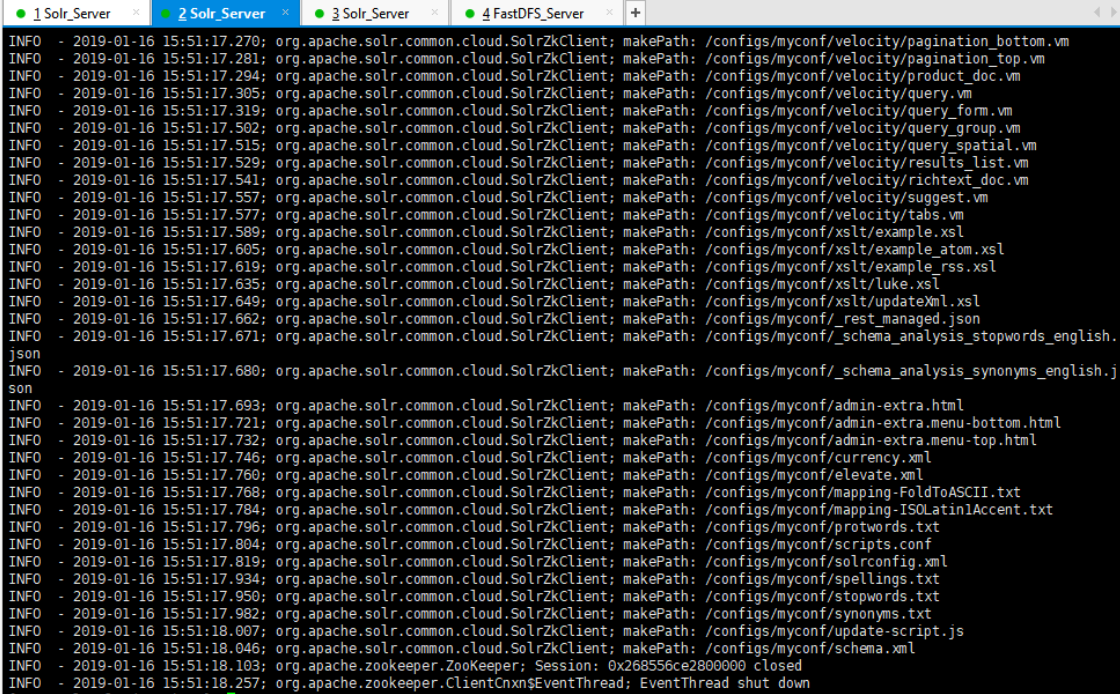
- 查看是否上传成功
使用zookeeper/bin的zkCli.sh命令查看集群中的信息,进入到任意zookeeper,bin目录下有zkCli.sh指令(每个节点的信息都是保持一致的)

步骤6:告诉solr实例zookeeper的位置,需要修改tomcat的catalina.sh
在每个节点中均添加参数,例如:vim /usr/local/solr-cloud/tomcat01/bin/catalina.sh
JAVA_OPTS="-DzkHost=192.168.25.154:2181,192.168.25.154:2182,192.168.25.154:2183"
需要注意参数添加的位置,此处需要在JAVA_OPTS使用前进行定义,否则可能导致出错

步骤7:启动每个solr实例
在/usr/local/solr-cloud下创建start-all.sh脚本,并通过chmod +x start-all.sh赋予脚本执行权限,随后执行./start-all.sh启动tomcat服务

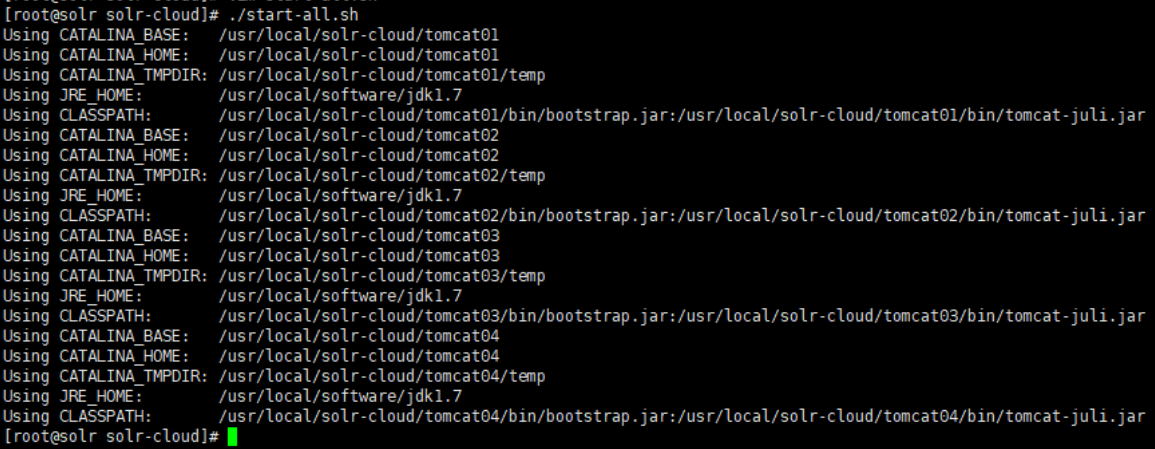
类似地,也可通过编写shutdown-all.sh,完成tomcat服务的依次关闭,定义方式参考上述

通过tail -f tomcat01/logs/catalina.out指令查看每个tomcat的启动、运行日志
可能存在的问题:启动出错,查看日志信息,一一进行排除,除却日志信息错误,还报一个严重的错误,zookeeper配置连接ip错误,即在配置时不小心将ip地址输入错误,需要进行修正后重新进行测试
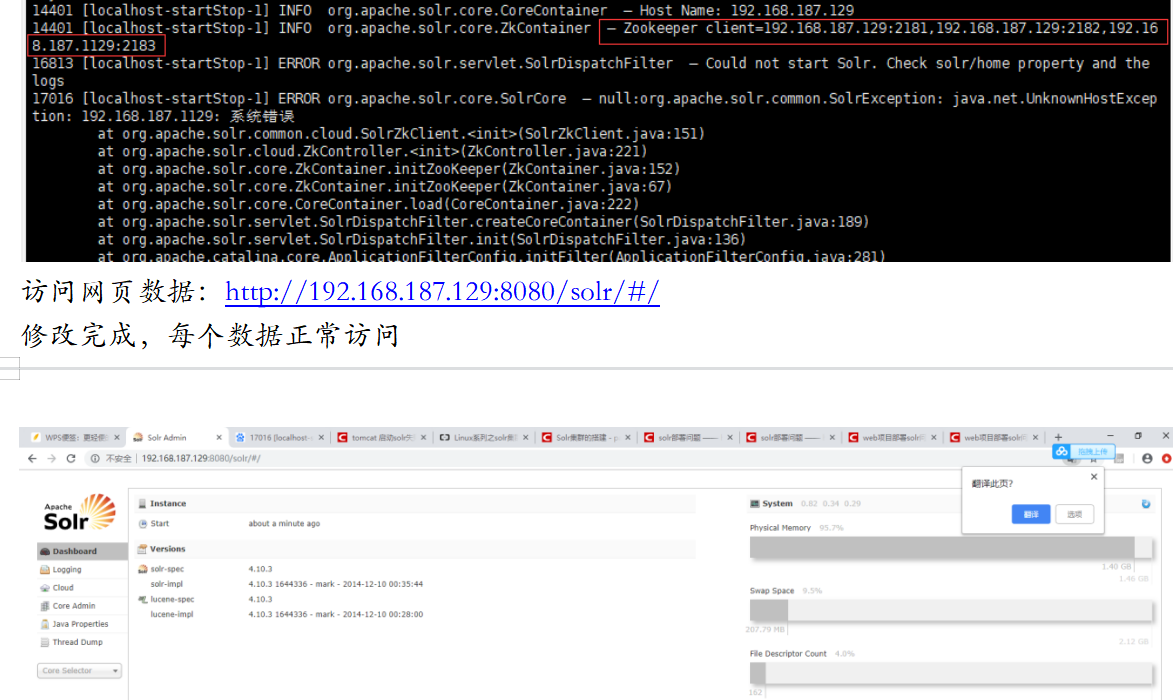
步骤8:集群分片

将集群分为两片,每片两个副本。
http://192.168.187.129:8080/solr/admin/collections?action=CREATE&name=collection2&numShards=2&replicationFactor=2
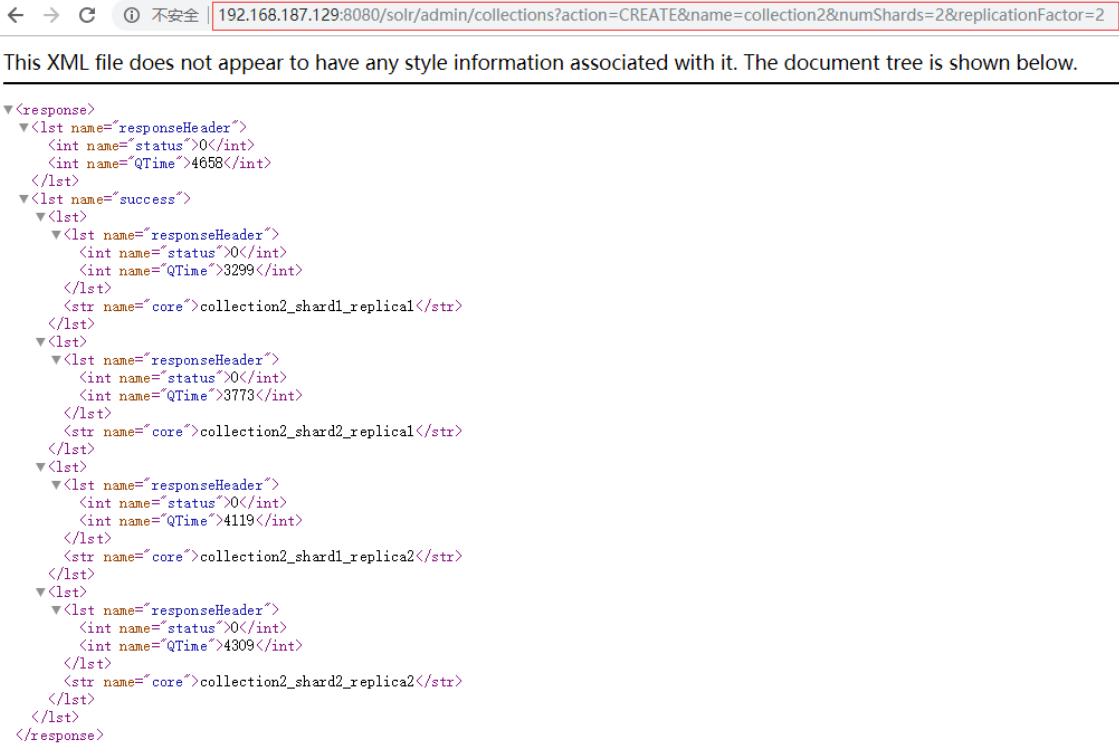
查看分片后的数据视图:

步骤9:删除collection1
http://192.168.187.129:8080/solr/admin/collections?action=DELETE&name=collection1
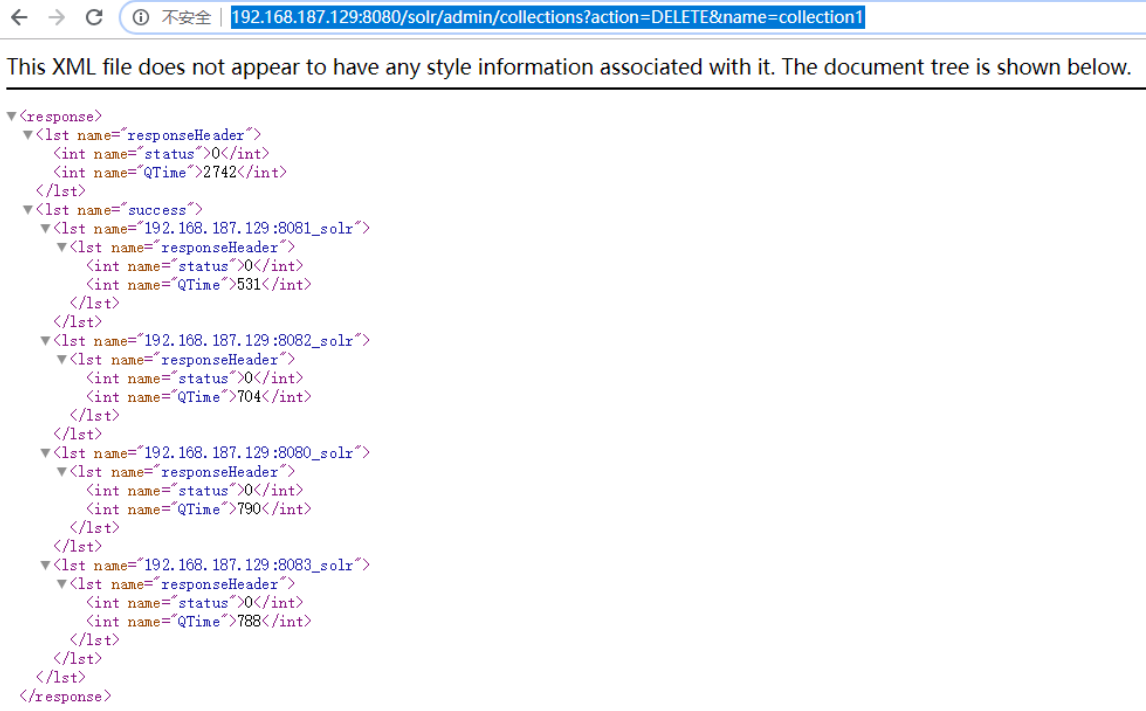
删除后刷新访问:192.168.187.129:8080/solr/#/~cloud

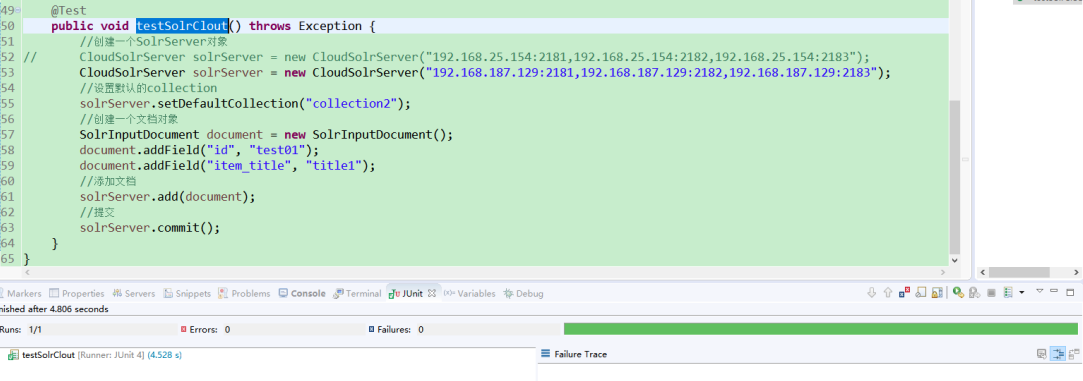
(3)使用solrJ连接集群
@Test
	public void testSolrClout() throws Exception {
		//创建一个SolrServer对象
		CloudSolrServer solrServer = new CloudSolrServer("192.168.25.154:2181,192.168.25.154:2182,192.168.25.154:2183");
		//设置默认的collection
		solrServer.setDefaultCollection("collection2");
		//创建一个文档对象
		SolrInputDocument document = new SolrInputDocument();
		document.addField("id", "test01");
		document.addField("item_title", "title1");
		//添加文档
		solrServer.add(document);
		//提交
		solrServer.commit();
	}
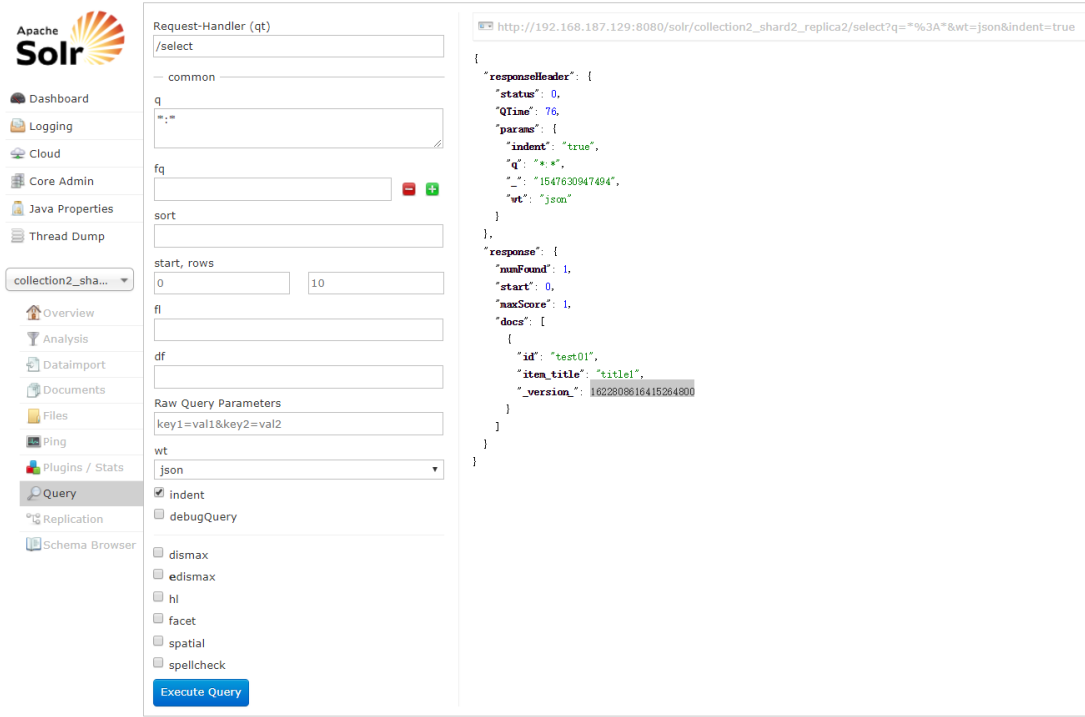
- 访问测试
(4)项目切换集群
单机版切换到集群只需要原有基础上将单机版更换成集群版即可,即在spring容器中配置一个集群版的SolrServer对象

清理掉测试数据,随后启动taotao-search,访问http://localhost:8083/search/importall导入数据测试(集群版访问较单机版慢),再访问solr查看数据是否正常导入,并启动taotao-rest、taotao-portal测试搜索服务是否正常使用
以此类推,修改商品信息后,也需要把商品信息同步到索引库。需要search工程发布服务,在后台系统如果商品信息发生修改后,可以在后台系统的Controller中调用发布的服务。把商品id传递给服务,服务进行索引库的内容同步。
