Springboot-3.web开发
Springboot-web开发
SpringMVC的快速应用
1.基于restful http接口的CRUD
Result(接口响应格式定义)
public class Result<T> {
    private Integer code;
    private String message;
    private T data;

    public Integer getCode() {
        return code;
    }

    public void setCode(Integer code) {
        this.code = code;
    }

    public String getMessage() {
        return message;
    }

    public void setMessage(String message) {
        this.message = message;
    }

    public T getData() {
        return data;
    }

    public void setData(T data) {
        this.data = data;
    }

    public Result(Integer code, String message, T data) {
        this.code = code;
        this.message = message;
        this.data = data;
    }

    public Result(Integer code, String message) {
        this.code = code;
        this.message = message;
    }


    public Result() {
    }

    @Override
    public String toString() {
        return "Result{" +
                "code=" + code +
                ", message='" + message + '\'' +
                ", data=" + data +
                '}';
    }
}
User
@Data
public class User {
    private Integer id;
    private String username;
    private String address;
    private Date birthday;

    @Override
    public String toString() {
        return "User{" +
                "id=" + id +
                ", username='" + username + '\'' +
                ", address='" + address + '\'' +
                '}';
    }

    public User(Integer id, String username, String address) {
        this.id = id;
        this.username = username;
        this.address = address;
    }

    public User(String username, String address) {
        this.username = username;
        this.address = address;
    }

    public User(Integer id, String username, String address, Date birthday) {
        this.id = id;
        this.username = username;
        this.address = address;
        this.birthday = birthday;
    }

    public User() {
    }
}
UserService(模拟数据库操作)
@Component
public class UserService {
    private static Map<Integer, User> users = new HashMap<>();

    static {
        users.put(1, new User(1, "zhangsan", "北京", new Date()));
        users.put(2, new User(2, "lisi", "上海"));
        users.put(3, new User(3, "wangwu", "深圳"));
        users.put(4, new User(4, "xushu", "非洲"));
        users.put(5, new User(5, "zhuge", "塔寨村"));
    }

    /**
     * 根据id查询用户
     */
    public User getUserById(Integer id) {
        return users.get(id);
    }


    /**
     * 查询所有用户
     */
    public List<User> getAllUser() {
        return new ArrayList(users.values());
    }

    /**
     * 更新
     */
    public void update(User user) {
        users.replace(user.getId(), user);
    }


    /**
     * 新增
     */
    public void add(User user) {
        Integer newId = users.size() + 1;
        user.setId(newId);
        users.put(newId, user);
    }

    /**
     * 删除
     */
    public void delete(Integer id) {
        users.keySet().removeIf(key -> key == id);
    }

}
userController(接口定义)
@RestController
@RequestMapping("/user")
public class UserController {
@Autowired
UserService userService;
// Rest /user/1
@GetMapping("/{id}")
public Result getUser(@PathVariable Integer id) {
User user = userService.getUserById(id);
return new Result<>(200, "查询成功", user);
}
// 新增 /user/add
@PostMapping("/add")
public Result addUser(User user) {
userService.add(user);
return new Result<>(200, "添加成功");
}
// 修改 /user1
@PutMapping("/{id}")
public Result editUser(User user) {
userService.update(user);
return new Result<>(200, "修改成功");
}
// 修改 /user1
@DeleteMapping("/{id}")
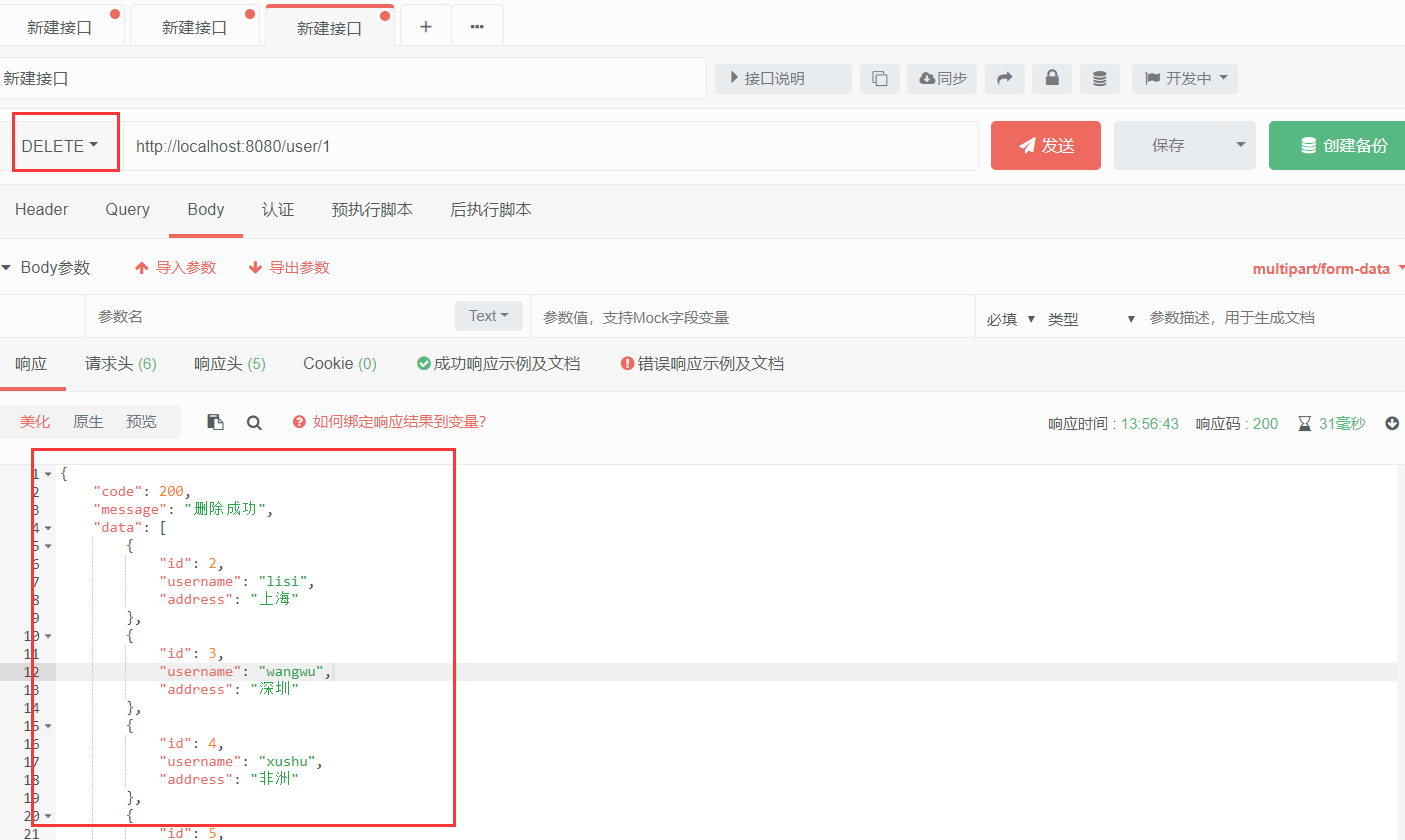
public Result editUser(@PathVariable Integer id) {
userService.delete(id);
return new Result<>(200, "删除成功");
}
}
项目启动访问:http://localhost:8080/user/1,检查响应结果
2.接口调用
调用rest http接口
RestTemplate是Spring提供的用于访问Rest服务的,RestTemplate提供了多种便捷访问远程Http服务的方法,传统情况下在java代码里访问restful服务,一般使用Apache的HttpClient或者第三方工具类hutools的请求工具类。spring提供了一种简单便捷的模板类来进行操作,这就是RestTemplate。
适用于微服务架构下 服务之间的远程调用 微服务架构(spring cloud feign)
WebClient 都可以调用远程服务,区别:webclient 依赖webflux , webclient 请求远程服务是无阻塞的,响应的。 RestTemplate 它是阻塞的,需要等待请求响应后才能执行下一句代码
通过测试类测试接口调用
@SpringBootTest
class SpringbootHelloworldApplicationTests {
    @Test
    void callByRestTemplate() {
        TestRestTemplate restTemplate = new TestRestTemplate();
        // 基于restTemplate 调用删除
        ResponseEntity<Result> resultResponseEntity = restTemplate.exchange("http://localhost:8080/user/{id}", HttpMethod.DELETE, null, Result.class, 1);
        System.out.println(resultResponseEntity.toString());
    }
}
通过postman调用
通过MockMvc测试
HelloController
@Controller
@RequestMapping("/hello")
public class HelloController {
    @RequestMapping("/getName")
    @ResponseBody
    public String getName(@RequestParam String name){
        return "Hello-" + name;
    }
}
MockMvc是由spring-test包提供,实现了对Http请求的模拟,能够直接使用网络的形式,转换到Controller的调用,使得测试速度快、不依赖网络环境。同时提供了一套验证的工具,结果的验证十分方便
编写测试类。实例化MockMvc有两种形式,一种是使用StandaloneMockMvcBuilder,另外一种是使用DefaultMockMvcBuilder。测试类及初始化MockMvc初始化:
@SpringBootTest
@AutoConfigureMockMvc
class MockMvcExampleTests {
@Test
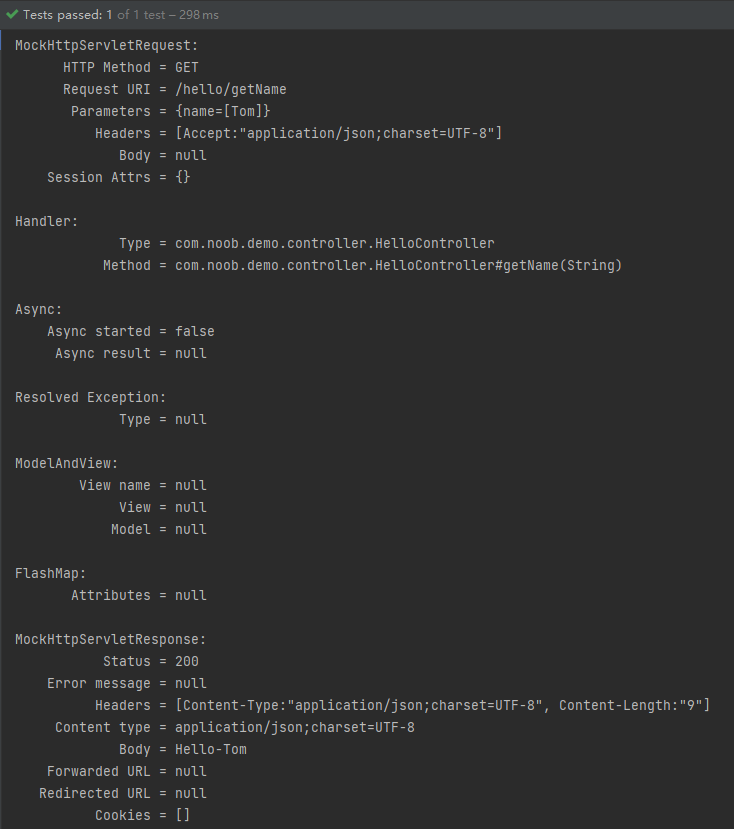
public void testHello(@Autowired MockMvc mockMvc) throws Exception {
/*
* 1、mockMvc.perform执行一个请求
* 2、MockMvcRequestBuilders.get("XXX")构造一个请求
* 3、ResultActions.param添加请求传值
* 4、ResultActions.accept(MediaType.TEXT_HTML_VALUE))设置返回类型
* 5、ResultActions.andExpect添加执行完成后的断言
* 6、ResultActions.andDo添加一个结果处理器,表示要对结果做点什么事情
* 比如此处使用MockMvcResultHandlers.print()输出整个响应结果信息
* 7、ResultActions.andReturn表示执行完成后返回相应的结果
*/
mockMvc.perform(MockMvcRequestBuilders
.get("/hello/getName")
// 设置返回值类型为utf-8,否则默认为ISO-8859-1
.accept(MediaType.APPLICATION_JSON_UTF8_VALUE)
.param("name", "Tom"))
.andExpect(MockMvcResultMatchers.status().isOk())
.andExpect(MockMvcResultMatchers.content().string("Hello-Tom"))
.andDo(MockMvcResultHandlers.print());
}
}
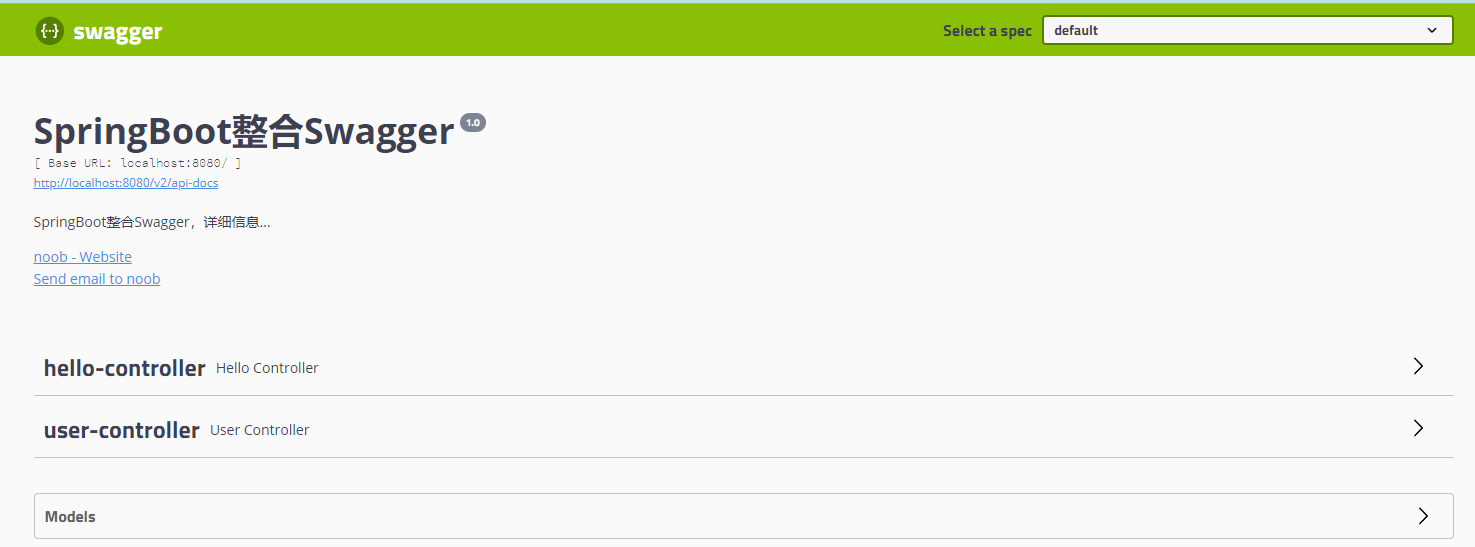
通过swagger调用
SpringBoot 整合swagger2.x ,自动生成接口文档
pom.xml依赖引入
<dependency>
    <groupId>io.springfox</groupId>
    <artifactId>springfox-swagger2</artifactId>
    <version>2.9.2</version>
</dependency>
<dependency>
    <groupId>io.springfox</groupId>
    <artifactId>springfox-swagger-ui</artifactId>
    <version>2.9.2</version>
</dependency>
配置swagger配置
@Configuration
@EnableSwagger2
public class SwaggerConfig {
    @Bean
    public Docket createRestApi() {
        return new Docket(DocumentationType.SWAGGER_2)
                .pathMapping("/")
                .select()
                .apis(RequestHandlerSelectors.basePackage("com.noob.demo.controller"))
                .paths(PathSelectors.any())
                .build().apiInfo(new ApiInfoBuilder()
                        .title("SpringBoot整合Swagger")
                        .description("SpringBoot整合Swagger,详细信息......")
                        .version("1.0")
                        .contact(new Contact("noob", "blog.holic-x.com", "holic-x@foxmail.com"))
                        .build());
    }
}
项目启动配置出错,可能是由于springboot版本与swagger版本不兼容导致(springboot 升级到 2.6.0之后,swagger版本和springboot出现了不兼容情况),此处配置springboot-2.7.6、swagger-2.9.2
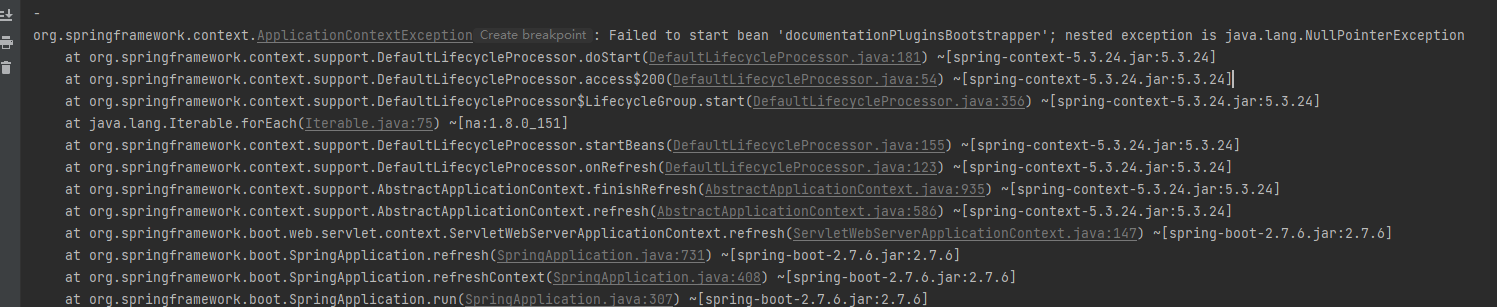
解决方案:
【1】方案1:在项目配置类SwaggerConfig或者Springboot启动类中添加@EnableWebMvc注解
【2】方案2:在 application.properties 配置文件添加配置: properties spring.mvc.pathmatch.matching-strategy=ant_path_matcher
【3】方案3:降低配置确保兼容性,例如降低springboot版本为2.5.6
项目启动成功但是出现访问404,则需要自定义WebMvcConfig实现WebMvcConfig过滤静态资源文件
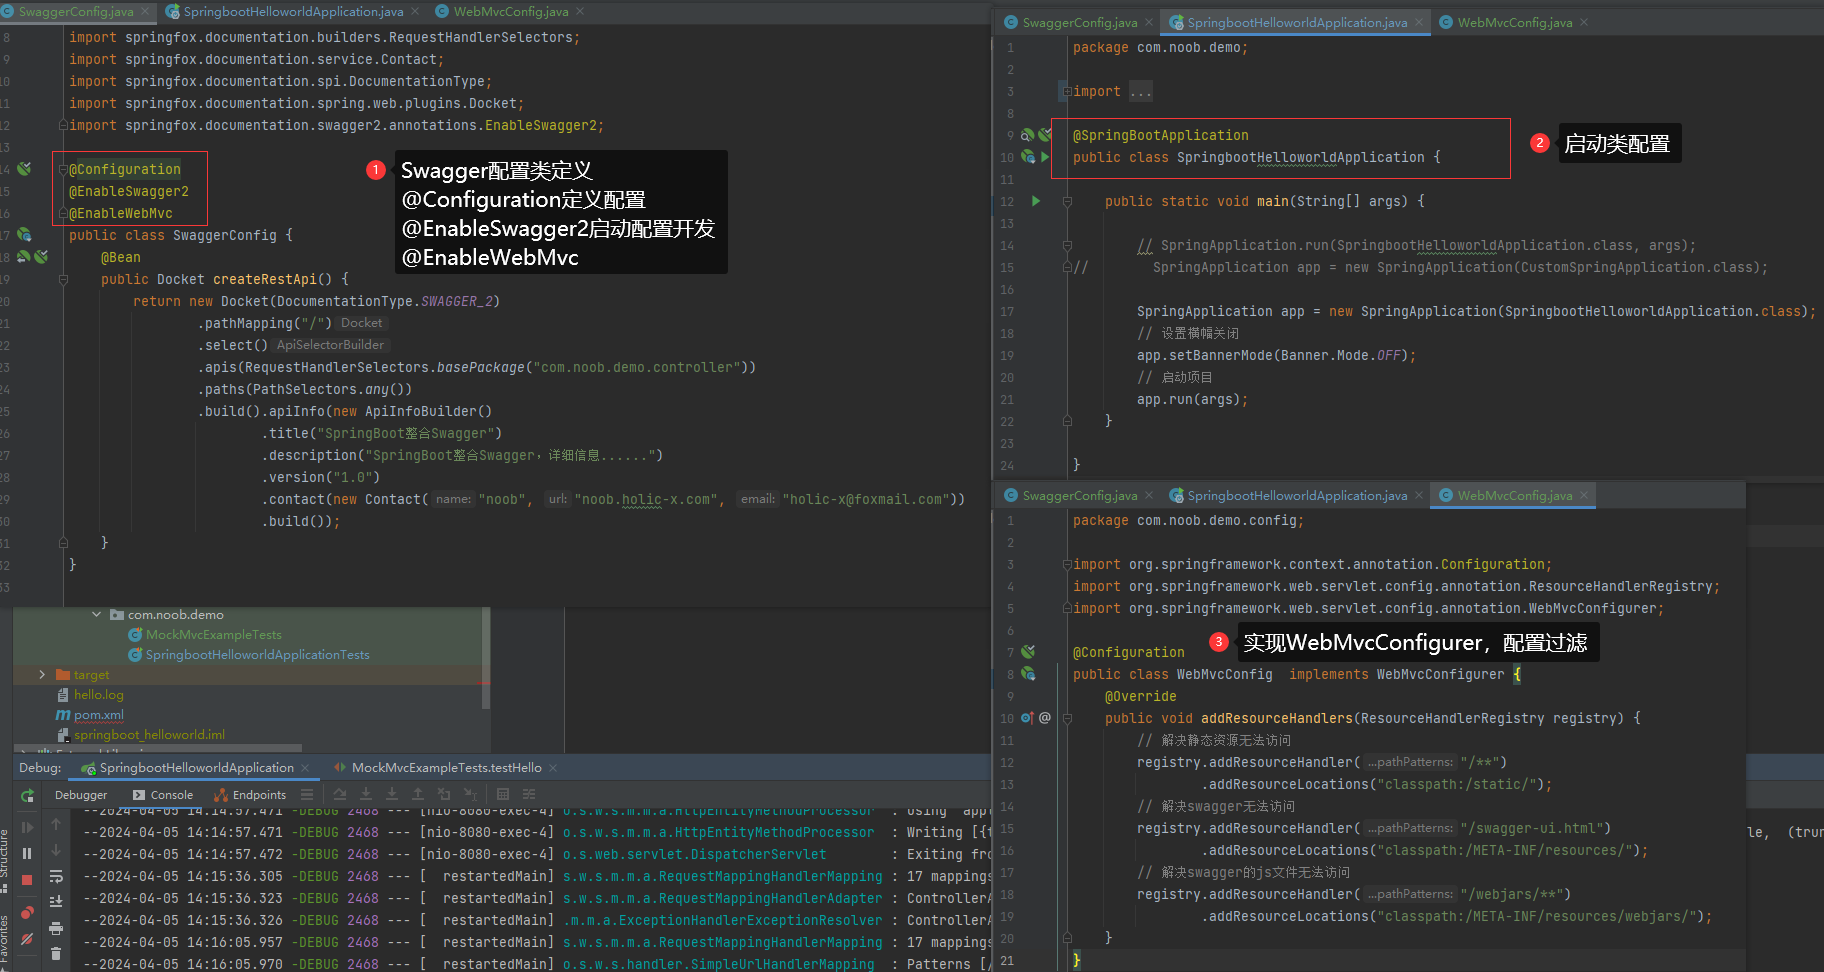
再次启动,尝试访问http://localhost:8080/swagger-ui.html
SpringMVC自动配置原理分析
SpringMVC自动配置定制化
1.WebMvcConfigurer扩展
@Configuration
public class MyWebMvcConfigurer implements WebMvcConfigurer {
    /**
     * 添加视图控制器
     * 立即访问
     * <mvc:view-controller path="/" view-name="index" />
     * @param registry
     */
    @Override
    public void addViewControllers(ViewControllerRegistry registry) {
        registry.addViewController("/tuling").setViewName("hello");
    }

    /**
     * 添加拦截器
     * @param registry
     */
    @Override
    public void addInterceptors(InterceptorRegistry registry) {
        registry.addInterceptor(new TimeInterceptor())     //添加拦截器
            .addPathPatterns("/**")    // 拦截映射规则
            .excludePathPatterns("/pages/**");  // 设置排除的映射规则
    }

    /**
     * 全局CORS配置
     * @param registry

    @Override
    public void addCorsMappings(CorsRegistry registry) {
        registry.addMapping("/user/*")   // 映射服务器中那些http接口运行跨域访问
        .allowedOrigins("http://localhost:8081")     // 配置哪些来源有权限跨域
        .allowedMethods("GET","POST","DELETE","PUT");   // 配置运行跨域访问的请求方法
    }*/

}
实现WebMvcConfigurer接口可以扩展MVC实现, 又既保留SpringBoot的自动配置
(1)在WebMvcAutoConfiguration也有一个实现了WebMvcConfigurer的配置类
(2)WebMvcAutoConfigurationAdapter 它也是利用这种方式去进行扩展, 通过查看这个类发现它实现了其他不常用的方法,进行自动配置,只需定制(拦截器、视图控制器、CORS 在开发中需要额外定制的定制的功能)
@Configuration(proxyBeanMethods = false)
@Import(EnableWebMvcConfiguration.class)
@EnableConfigurationProperties({ WebMvcProperties.class, ResourceProperties.class })
@Order(0)
public static class WebMvcAutoConfigurationAdapter implements WebMvcConfigurer {}
2.Json开发
Spring Boot提供了与三个JSON映射库的集成:
- Gson
- Jackson 性能最好
- JSON-B
Jackson 是使用的默认json库
jsckson的使用
- @JsonIgnore:进行排除json序列化,将它标注在属性上将不会进行json序列化
- @JsonFormat(pattern = "yyyy-MM-dd hh:mm:ss",locale = "zh"):进行日期格式化
- @JsonInclude(JsonInclude.Include.NON_NULL) :当属性值为null时则不进行json序列化
- @JsonProperty("uname"):设置别名
SpringBoot 还提供了@JsonComponent 来根据自己的业务需求进行json的序列化和反序列化
@JsonComponent
public class UserJsonCustom {
    public static class Serializer extends JsonObjectSerializer<User> {
        @Override
        protected void serializeObject(User user, JsonGenerator jgen, SerializerProvider provider) throws IOException {
            jgen.writeObjectField("id",user.getId());   //{"id","xxx"}
            jgen.writeObjectField("uname","xxxxx");
            /*jgen.writeFieldName("");  单独写key
            jgen.writeObject();   单独写value
            */
            // 1. 一次查不出完整的数据返回给客户端, 需要根据需求去做一些个性化调整
            // 2. 根据不同的权限给他返回不同的序列化数据
        }
    }

    public static class Deserializer extends JsonObjectDeserializer<User> {
        @Override
        protected User deserializeObject(JsonParser jsonParser, DeserializationContext context, ObjectCodec codec, JsonNode tree) throws IOException {
            User user=new User();
            user.setId(tree.findValue("id").asInt());

            return user;
        }
    }
}
3.国际化
添加国际化资源文件resource
配置messageResource设置国际化资源文件
在Springboot中提供了MessageSourceAutoConfiguration,不需要去配置messageResource,但是它并生效:开启debug=true
4.统一异常处理
SpringBoot 有统一异常处理自动配置类:ErrorMvcAutoConfiguration统一异常处理自动配置类
重要组件:DefaultErrorAttributes、BasicErrorController、DefaultErrorViewResolver(解析错误视图页面)
BasicErrorController:处理/error请求的一个控制器
