[Web基础]-CSS
[Web基础]-CSS
1.基本概念
CSS 指层叠样式表 (Cascading Style Sheets)是一门用于设置和布局网页的计算机语言,把样式添加到 HTML 4.0 中,是为了解决内容与表现分离的问题
层叠:指样式表允许以多种方式规定样式信息。可以规定在单个元素或者页面头元素中,也可以在另一个CSS文件中,规定的方式会有次序的差别。
样式:是指丰富的样式外观。例如设置边框:允许任何设置边框,允许设置边框与框内元素的距离,允许设置边框与边框的距离等。
2.CSS语法
【1】基础语法
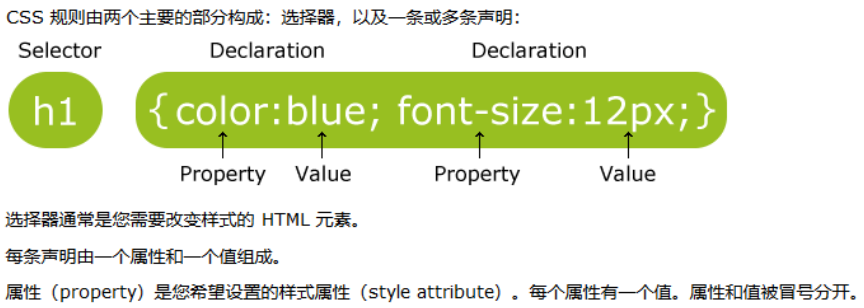
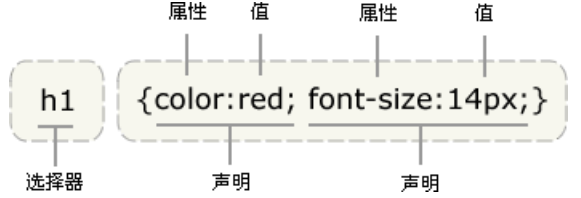
CSS 规则由两个主要的部分构成:选择器,以及一条或多条声明。
selector {declaration1; declaration2; ... declarationN }
selector {property: value}
定义颜色的不同方式:
p{ color: red;}
p { color: #ff0000; } --十六进制颜色值
p { color: #f00; }   --CSS的缩写形式
p { color: rgb(255,0,0); }   --rgb式
p { color: rgb(100%,0%,0%); }   --rgb式
多重声明:如果要定义不止一个声明,则需要用分号将每个声明分开
p {text-align:center; color:red;}
为了增强样式定义的可读性,常常每定义一个属性便换行:
p {
  text-align: center;
  color: black;
  font-family: arial;
}
大多数样式表包含不止一条规则,而大多数规则包含不止一个声明。多重声明和空格的使用使得样式表更容易被编辑,是否包含空格不会影响 CSS 在浏览器的工作效果,同样,与 XHTML 不同,CSS 对大小写不敏感。不过存在一个例外:如果涉及到与 HTML 文档一起工作的话,class 和 id 名称对大小写是敏感的
body {
  color: #000;
  background: #fff;
  margin: 0;
  padding: 0;
  font-family: Georgia, Palatino, serif;
}
参考案例
<!DOCTYPE html>
<html>
	<head>
		<meta charset="UTF-8">
		<title>1.css基础语法的使用</title>
	</head>
	<style type="text/css">
		/*style标签内的注释不能使用<!--  -->*/
		h1 { font-family: "楷体"; font-size: 2em; color: #6495ED;}
		p { font-family: "仿宋"; font-size: 3em; color: cornflowerblue;}
	</style>
	<body>
		<p>有相应样式的p标签</p>
		<br />
		<h1>有相应样式的h1标签</h1>
	</body>
</html>
⚡基本选择器
(1)CSS 派生选择器
基本概念
通过依据元素在其位置的上下文关系来定义样式,可以使标记更加简洁
在 CSS1 中,通过这种方式来应用规则的选择器被称为上下文选择器 (contextual selectors),这是由于它们依赖于上下文关系来应用或者避免某项规则。在 CSS2 中,它们称为派生选择器,但是无论你如何称呼它们,它们的作用都是相同的。派生选择器允许你根据文档的上下文关系来确定某个标签的样式。通过合理地使用派生选择器,可以使 HTML 代码变得更加整洁。
语法规则
# 1.指定所有li标签,调整背景颜色
li{
    background-color: aqua;
}
<ol type="1">
	<li>有指定的li标签样式</li>
</ol>

# 2.指定li strong标签,调整背景颜色和字体大小
li strong {
  color: bisque; font-size: 30px;
}
<ol type="1">
	<li><strong>有指定的li strong标签样式</strong></li>
</ol>
参考案例
<!DOCTYPE html>
<html>
	<head>
		<meta charset="UTF-8">
		<title>2.css派生选择器</title>
	</head>
	<!--
		基于某个标签的派生选择器
		只有是在指定的标签内才能够生效
	-->
	<style type="text/css">
		li {color: #6495ED; font-size: 20px;}
		li strong {color: bisque; font-size: 30px;}
		li big {color: chocolate; font-size: 3em;}
	</style>
	<body>
		<p>测试</p>
		<p><strong>没有指定样式的strong标签</strong></p>
		<p><big>没有指定样式的big标签</big></p>
		<ol type="1">
			<li>有指定的li标签样式</li>
			<li><strong>有指定的li strong标签样式</strong></li>
			<li><big>有指定的li big标签样式</big></li>
		</ol>
	</body>
</html>
(2)CSS id选择器
基本概念
id 选择器:可以为标有特定 id 的 HTML 元素指定特定的样式,以 "#" 来定义。
⚡注意:id 属性只能在每个 HTML 文档中出现一次
id 选择器和派生选择器:在现代布局中,id 选择器常常用于建立派生选择器。
一个选择器,多种用法:即使被标注为指定id的元素只能在文档中出现一次,但这个 id 选择器作为派生选择器也可以被使用很多次
语法规则
# id选择器,其中custom可为对应id的元素设定指定样式
#custom{
    background-color: aqua;
}
<div id="custom">xxx</div>

# 基于派生选择器的id选择器(参考:设定id为custom的p标签元素属性)
#custom p{
	background-color: aqua;
}
<p id="custom">xxx</p>
参考案例
<!DOCTYPE html>
<html>
	<head>
		<meta charset="UTF-8">
		<title>3.css的id选择器</title>
	</head>
	<!--
		id选择器的实现
		定义方式:#name{ 属性:value;属性:value;......}
		但id选择器一般不会单独使用,而是会结合派生选择器进行使用
		但在调用的时候需要注意格式,否则无效
		定义方式如下:
		方式1:#name 标签名称{ 属性:value;属性:value;......}
		相应的调用方式举例:
			<div id="xx">
			 	<p>hello带有css样式</p>
			</div>
		方式2:标签名称#name{ 属性:value;属性:value;......}
		相应的调用方式举例:
			<h3 id="name">带有css样式</h3>
		-->

	<style type="text/css">
		#test1{ color: #6495ED; font-size: 20px;}
		#test2{ color: #8B008B; font-size: 30px;}
		#id1 p{ color: blue; font-size: 40px;}
		p#id2{ color: cadetblue; font-size: 50px;}
	</style>
	<body>
		<p id="test1">带有test1样式的p标签</p>
		<h1 id="test2">带有test2样式的h1标签</h1>
		<!--需要注意的是不同的定义方式对应着不同的调用方式,不可混淆-->
		<div id="id1">
			<p>基于派生选择器的id选择器的调用示例1</p>
		</div>
		<p id="id2">基于派生选择器的id选择器的调用示例2</p>

		<!--以下为错误示例-->
		<p id=id1>错误的基于派生选择器的id选择器的调用示例1</p>
		<p><p id="id1">错误的基于派生选择器的id选择器的调用示例2</p></p>
	</body>
</html>
(3)CSS 类选择器
基本概念
在 CSS 中,类选择器以一个点号显示,和 id 一样,class 也可被用作派生选择器
语法规则
# 1.类选择器
.test1{
	color: #6495ED; font-size: 20px;
}
<h1 class="test1">调用了test1样式的h1标签</h1>

# 2.基于派生选择器的类选择器
p.test2{
  color: blue; font-size: 30px;
}
<p class="test2">调用了基于派生选择器的类选择器的p标签</p>

# 3.类选择器的叠加
.name1{ color: cadetblue;}
.name2{ font-size: 3em;}
.name2.name1{ background-color: burlywood;}
<h1 class="name1 name2">调用了迭加的类选择器的h1标签</h1>
参考案例
<!DOCTYPE html>
<html>
	<head>
		<meta charset="UTF-8">
		<title>4.css类选择器</title>
	</head>
	<!--
		类选择器“.”,同样的,类选择器亦不会单独使用,常常结合派生选择器使用
		1.类选择器的定义
			.name{ 属性:value;属性:value;...}
		    对应的调用方式举例
			<p class="name">content</p>
		2.基于派生选择器的类选择器的定义
			标签名称.name{属性:value;属性:value;......}
		    对应的调用方式举例
		    <标签名称 class="name">content</标签名称>
		3.类选择器可以进行迭加
			.name1{属性:value;...}
			.name2{属性:value;...}
			.name2.name1{新属性:value;...}
	-->

	<style type="text/css">
		.test1{ color: #6495ED; font-size: 20px;}
		p.test2{ color: blue; font-size: 30px;}
		/*迭加的类选择器*/
		.name1{ color: cadetblue;}
		.name2{ font-size: 3em;}
		.name2.name1{ background-color: burlywood;}
	</style>
	<body>
		<p>没有任何样式的p标签</p>
		<h1 class="test1">调用了test1样式的h1标签</h1>
		<p class="test1">调用了类选择器test1的p标签</p>
		<p class="test2">调用了基于派生选择器的类选择器的p标签</p>
		<h1 class="name1">调用了类选择器name1的h1标签</h1>
		<h1 class="name2">调用了类选择器name2的h1标签</h1>
		<h1 class="name1 name2">调用了迭加的类选择器的h1标签</h1>
		<h1 class="name2 name1">调用了迭加的类选择器的h1标签</h1>
	</body>
</html>
🔖属性选择器
   <ul class="l1">
        <li  >List item 1</li>
        <li  >List item 2</li>
        <li  >List item 3</li>
    </ul>
    <ul class="l2">
        <li  id="four">List item 1</li>
        <li  id="five">List item 2</li>
        <li  id="six">List item 3</li>
    </ul>

    <p class="">
        p item
    </p>
语法规则
[属性名]{ }
标签名[属性名]{ }
标签名[属性名='属性值']{ }
🔖CSS 伪类选择器
基本概念
伪类选择器,用于选择处于特定状态的元素,例如,一些元素中的第一个元素,或者某个元素被鼠标指针悬停。
语法规则
标签名:伪类名{ }
参考案例:锚伪类
在支持 CSS 的浏览器中,链接的不同状态都可以以不同的方式显示
a:link {color:#FF0000;} 	/* 未访问的链接 */
a:visited {color:#00FF00;} 	/* 已访问的链接 */
a:hover {color:#FF00FF;} 	/* 鼠标悬停链接 */
a:active {color:#0000FF;} 	/* 已选中的链接 */
/* 伪类顺序 link ,visited,hover,active,否则有可能失效 */
代码示例:
HTML 代码 :
<div>
    <a class="red" href="#">A</a> <br/>
    <a class="blue" href="#">B</a>
</div>

CSS 代码 :
/* 选择a标签,class值为red ,设置访问后为红色链接*/
a.red:visited {
    color: red;
}
🔖CSS 组合选择器
页面元素:
<div>
    <ul class="l1">
        <li>List item 1</li>
        <li>List item 2</li>
        <li>List item 3</li>
        <ul class="l2">
            <li id="four">List item 1</li>
            <li id="five">List item 2</li>
            <li id="six">List item 3</li>
        </ul>
    </ul>
</div>
(1)后代选择器
.l1 li{
    background-color: aqua;
}
(2)子级选择器
.l1 > li{
    background-color: aqua;
}
(3)同级选择器
.l1 ~ li{
    background-color: aqua;
}
(4)相邻选择器
.l1 + li{
    background-color: aqua;
}
<2>元素CSS设定
CSS 背景
基本概念
CSS 允许应用纯色作为背景,也允许使用背景图像创建相当复杂的效果,CSS 在这方面的能力远远在 HTML 之上
| 属性 | 描述 |
|---|---|
| background | 简写属性,将背景属性设置在一个声明中 |
| background-attachment | 背景图像是否固定或者随着页面的其余部分滚动 |
| background-color | 设置元素背景颜色 |
| background-image | 设置元素背景图像 |
| background-position | 设置背景图像的起始位置 |
| background-repeat | 设置背景图像是否重复、重复规则 |
参考案例1:背景颜色设定
<!DOCTYPE html>
<html>
	<head>
		<meta charset="UTF-8">
		<title>5.css背景颜色的设置</title>
	</head>

	<style type="text/css">
		body{ background-color: cyan;}
		h1{ background-color: #20B2AA;}
		p { background-color: blueviolet;}
	</style>
	<body>
		<h1>设置了背景颜色的h1标签</h1>
		<h2>没有另外设置背景颜色的h2标签</h2>
		<p>设置了背景颜色的p标签</p>
	</body>
</html>
参考案例2:背景图像
<!DOCTYPE html>
<html>
	<head>
		<meta charset="UTF-8">
		<title>6.css背景图片的设置</title>
	</head>
	<style type="text/css">
		body{
			background-image: url(../img/4.jpg); /*设置背景图片*/
			background-repeat: no-repeat;/*设置背景图片不填充*/
		}
		/*为指定的标签设置额外的背景图片*/
		p.img{ background-image: url(../img/5.jpg);}
	</style>
	<body>
		<p>没有指定背景的p标签</p>
		<p class="img">带有指定背景的p标签</p>
	</body>
</html>
参考案例3:背景关联
<!DOCTYPE html>
<html>
	<head>
		<meta charset="UTF-8">
		<title>7.css背景关联</title>
	</head>
	<style type="text/css">
		body{
			background-image: url(../img/5.jpg);/*设置背景图片*/
			background-repeat: no-repeat;/*设置背景图片不填充*/
			background-attachment: fixed;/*设置背景图片固定,不随文字滚动*/
		}
	</style>
	<body>
		<p>测试图片是否会随文字滚动1</p>
		<p>测试图片是否会随文字滚动2</p>
		<p>测试图片是否会随文字滚动3</p>
		<p>测试图片是否会随文字滚动4</p>
		<p>测试图片是否会随文字滚动5</p>
		<p>测试图片是否会随文字滚动6</p>
		<p>测试图片是否会随文字滚动7</p>
		<p>测试图片是否会随文字滚动8</p>
		<p>测试图片是否会随文字滚动9</p>
		<p>测试图片是否会随文字滚动10</p>
		<p>测试图片是否会随文字滚动11</p>
		<p>测试图片是否会随文字滚动12</p>
		<p>测试图片是否会随文字滚动13</p>
		<p>测试图片是否会随文字滚动14</p>
		<p>测试图片是否会随文字滚动15</p>
		<p>测试图片是否会随文字滚动16</p>
		<p>测试图片是否会随文字滚动17</p>
		<p>测试图片是否会随文字滚动18</p>
		<p>测试图片是否会随文字滚动19</p>
		<p>测试图片是否会随文字滚动20</p>
		<p>测试图片是否会随文字滚动21</p>
		<p>测试图片是否会随文字滚动22</p>
		<p>测试图片是否会随文字滚动23</p>
		<p>测试图片是否会随文字滚动24</p>
		<p>测试图片是否会随文字滚动25</p>
         <!--......自行添加......-->
	</body>
</html>
CSS 文本
基本概念
CSS 文本属性可定义文本的外观。通过文本属性,可以改变文本的颜色、字符间距,对齐文本,装饰文本,对文本进行缩进等等
| 属性 | 描述 |
|---|---|
| color | 设置文本颜色 |
| direction | 设置文本方向 |
| line-height | 设置行高 |
| letter-spacing | 设置字符间距 |
| text-align | 对齐元素中的文本 |
| text-decoration | 向文本添加修饰 |
| text-indent | 缩进元素中文本的首行 |
| text-shadow | 设置文本阴影 |
| text-trandform | 控制元素中的字母 |
| unicode-bidi | 设置文本方向 |
| white-space | 设置元素中空白的处理方式 |
| word-spacing | 设置字间距 |
参考案例
<!DOCTYPE html>
<html>
	<head>
		<meta charset="UTF-8">
		<title>8.css设置文本样式</title>
	</head>
	<style type="text/css">
			body{
				color: brown; /*设置文本颜色*/
				direction: rtl;/*设置文本方向*/
			}
			p.style{
				letter-spacing: 30px;/*设置字符间距*/
				text-align: center;/*设置文本对齐方式*/
				text-indent: 2em;/*设置首行缩进*/
			}
			h1.test{
				text-transform: lowercase;/*设置字母大小写*/
				word-spacing: 3em;/*设置字间距*/
			}
		</style>
	<body>
		<p class="style">hello i am p test</p>
		<h1 class="test">Hello i am h1 Test </h1>
		<h2>hello i am h2 test</h2>
	</body>
</html>
CSS 字体
基本概念
CSS 字体属性定义文本的字体系列、大小、加粗、风格(如斜体)和变形(如小型大写字母)
| 属性 | 描述 |
|---|---|
| font | 简写属性(将所有针对字体的属性设置在一个声明中) |
| font-family | 设置字体系列 |
| font-size | 设置字体尺寸 |
| font-size-adjust | 当首选自体不可用,对替换字体进行智能缩放(CSS2.1中已删除该属性) |
| font-stretch | 对字体进行水平拉伸(CSS2.1中已删除该属性) |
| font-style | 设置字体风格 |
| font-variant | 以小型小写字体或者正常字体显示文本 |
| font-weight | 设置字体的粗细 |
参考案例
<!DOCTYPE html>
<html>
	<head>
		<meta charset="UTF-8">
		<title>9.css字体样式</title>
	</head>
	<style type="text/css">
		p{
			/*有关字体样式的属性“font-xxx”*/
			font-family: "楷体";/*设置字体样式*/
			font-size: 3em;/*设置字体大小*/
			font-style: italic;/*设置字体风格*/
			font-weight: 200;/*设置字体的粗细*/
		}
	</style>
	<body>
		<h1>我是没有设置字体样式的h1标签</h1>
		<p>我是有字体样式的p标签</p>
	</body>
</html>
CSS 链接
基本概念
能够设置链接样式的 CSS 属性有很多种(例如 color, font-family, background 等等)。链接的特殊性在于能够根据它们所处的状态来设置它们的样式。
链接的四种状态:
a:link - 普通的、未被访问的链接
a:visited - 用户已访问的链接
a:hover - 鼠标指针位于链接的上方
a:active - 链接被点击的时刻
参考案例
<!DOCTYPE html>
<html>
	<head>
		<meta charset="UTF-8">
		<title>10.css链接</title>
	</head>
	<!--
		链接的四种状态:
		a:link - 普通的、未被访问的链接
		a:visited - 用户已访问的链接
		a:hover - 鼠标指针位于链接的上方
		a:active - 链接被点击的时刻
		可以设置字体颜色或者是背景颜色
	-->
	<style type="text/css">
		/*设置字体变化颜色*/
		a:link{ color: darkgray;}/*普通的、未被访问的链接*/
		a:visited{ color: deepskyblue;}/*用户已访问的链接*/
		a:hover{ color: orangered;}/*鼠标指针位于链接的上方*/
		a:active{ color: lightseagreen;}/*链接被点击的时刻*/
	</style>
	<style type="text/css">
		/*设置背景变化颜色*/
		a:link{ color: black; background-color: darkgray;}/*普通的、未被访问的链接*/
		a:visited{ color: black; background-color: deepskyblue;}/*用户已访问的链接*/
		a:hover{ color: black; background-color: orangered;}/*鼠标指针位于链接的上方*/
		a:active{ color: black; background-color: lightseagreen;}/*链接被点击的时刻*/
	</style>
	<body>
		<p>css链接测试</p>
		<a href="http://www.baidu.com">百度</a>
		<a href="http://www.taobao.com">淘宝</a>
		<a href="http://www.qq.com">腾讯</a>
	</body>
</html>
CSS 列表
基本概念
CSS 列表属性作用:
设置不同的列表项标记为有序列表
设置不同的列表项标记为无序列表
设置列表项标记为图像
| 属性 | 描述 |
|---|---|
| list-style | 简写属性(将所有用于列表的属性设置在一个声明中) |
| list-style-image | 将图像设置为列表项标志 |
| list-style-position | 设置列表中列表项标志的位置 |
| list-style-type | 设置列表中列表项标志的类型 |
参考案例
<!DOCTYPE html>
<html>
	<head>
		<meta charset="UTF-8">
		<title>11.css列表</title>
	</head>
	<style type="text/css">
		ul.style1{ list-style-image: url(../img/password.gif);}/*指定图片作为符号*/
		ul.style2{ list-style-type: square; color: #D2691E;}/*设置符号类型与颜色*/
	</style>
	<body>
		<ul class="style1">
			<li>牛奶</li>
			<li>咖啡</li>
			<li>茶</li>
		</ul>
		<ul class="style2">
			<li>苹果</li>
			<li>香蕉</li>
			<li>橙子</li>
		</ul>
	</body>
</html>
CSS 表格
基本概念
| 属性 | 描述 |
|---|---|
| border-collapse | 设置是否将表格边框合并为单一的边框 |
| border-spacing | 设置分隔单元格边框的举例 |
| caption-side | 设置表格标题的位置 |
| empty-cells | 设置是否显示表格中的空单元格 |
| table-layout | 设置显示单元、行、列的算法 |
参考案例
<!DOCTYPE html>
<html>
	<head>
		<meta charset="UTF-8">
		<title>12.css表格示例</title>
	</head>
	<style type="text/css">
		#customers{
			font-family: "楷体";/*设置字体样式*/
			width: 100%;/*设置表格宽度占据百分比*/
			border-collapse: inherit;/*设置是否把表格边框合并为单一的边框*/
		}
		/*设置基于id选择器的派生选择器,为所有的单元格设置统一的属性*/
		#customers td,#customers th{
			font-size: 1em;/*设置字体大小*/
			border: 1px solid #98bf21;/*设置边框solid表示装饰*/
			padding: 3px 7px 2px 7px; /*设置边距(上右下左--顺时针)*/
		}
		/*对表头独立设置*/
		#customers th{
			font-size: 1.2em;/*设置字体大小*/
			text-align: left;/*设置文本对齐方式*/
			background-color: #A7C941;/*设置背景颜色*/
			color: #ffffff;/*设置字体颜色*/
		}
		/*对指定的第3、5、7行进行设置*/
		#customers tr.style td{
			background-color: #EAF2D3;
			color: #000000;
		}

	</style>
	<body>
		<table id="customers" >
			<tr>
				<th>Company</th>
				<th>Contact</th>
				<th>Country</th>
			</tr>

			<tr>
				<td>Apple</td>
				<td>Steven Jobs</td>
				<td>USA</td>
			</tr>

			<tr class="style">
				<td>Baidu</td>
				<td>Li YanHong</td>
				<td>China</td>
			</tr>

			<tr>
				<td>Google</td>
				<td>Larry Page</td>
				<td>USA</td>
			</tr>

			<tr class="style">
				<td>Lenovo</td>
				<td>Liu Chuanzhi</td>
				<td>China</td>
			</tr>

			<tr>
				<td>Microsoft</td>
				<td>Bill Gates</td>
				<td>USA</td>
			</tr>

			<tr class="style">
				<td>Nokia</td>
				<td>Stephen Elop</td>
				<td>Finland</td>
			</tr>
		</table>
	</body>
</html>
CSS 边框属性
基本概念
| 属性 | 描述 |
|---|---|
| outline | 在一个声明中设置所有轮廓属性 |
| outline-color | 设置轮廓颜色 |
| outline-style | 设置轮廓样式 |
| outline-width | 设置轮廓宽度 outline-width:thin;outline-width:3px; |
参考案例
<!DOCTYPE html>
<html>
	<head>
		<meta charset="UTF-8">
		<title>13.边框属性</title>
	</head>
	<style type="text/css">
		p{
			border: red solid thin;/*设置边框装饰*/
			outline: #00ff00 dotted thick;/*设置轮廓属性*/
		}
	</style>
	<body>
		<p>
			hello 你看我好看吗?? 我有一个发光的外表
		</p>
	</body>
</html>
<3>盒子模型
万物皆"盒子"。盒子模型是通过设置元素框与元素内容和外部元素的边距,而进行布局的方式。
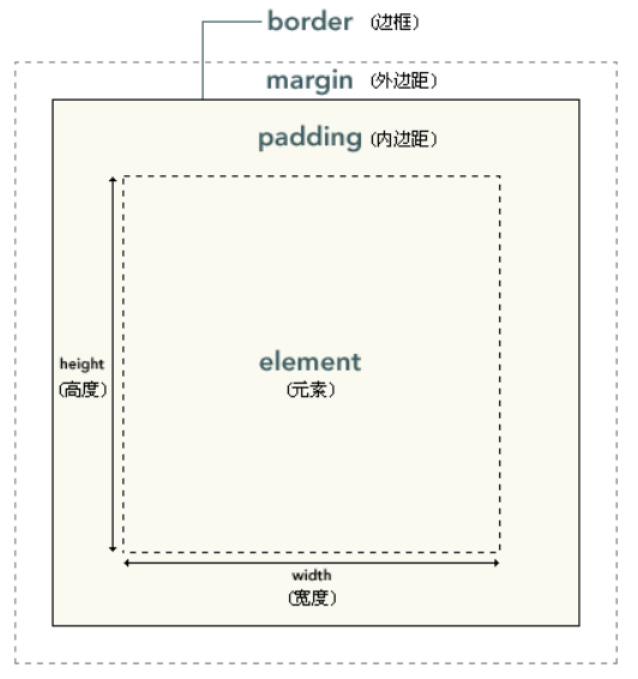
- element : 元素
- padding : 内边距(填充)
- border : 边框
- margin : 外边距(空白或空白边)
基本布局
内边距、边框和外边距都是可选的,默认值是零。但是,许多元素将由用户代理样式表设置外边距和内边距。在 CSS 中,width 和 height 指的是内容区域的宽度和高度。
 <style>
        div{
            border: 2px solid blue;
        }

        .big{
            width: 200px;
            height: 200px;
          	/* padding: 30px; 内边距(增加内边距会增加元素框的总尺寸) */
        }

        .small{
            width: 100px;
            height: 100px;
            margin: 30px;/*  外边距 */
        }
    </style>


<div class="big">
    <div class="small">
    </div>
</div>
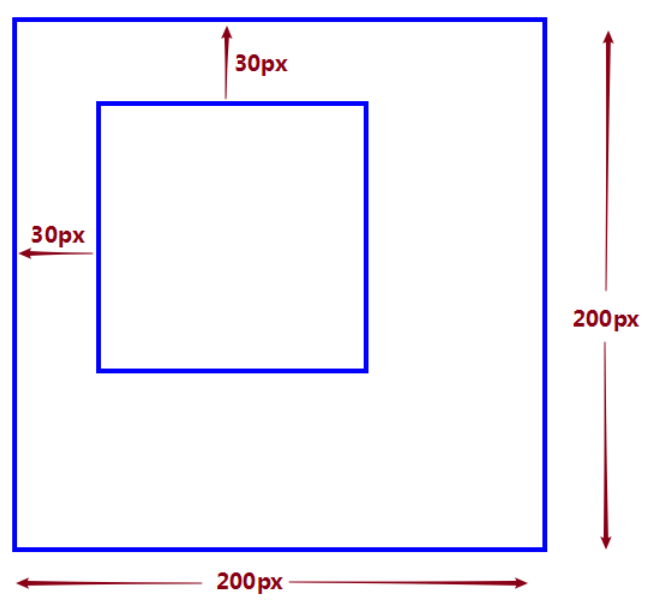
外边距
单独设置边框的外边距,设置上、右、下、左方向:
margin-top
margin-right
margin-bottom
margin-left
定义规则
- 一个值时
margin:10px;/* 所有4个外边距都是10px */
- 两个值时
margin:10px 5px; /* 上外边距和下外边距是 10px 右外边距和左外边距是 5px */
margin:10px auto; /* auto 浏览器自动计算外边距,具有居中效果 */
- 三个值时
margin:10px 5px 15px;/* 上外边距是10px 右外边距和左外边距是 5px 下外边距是 15px*/
- 四个值时
margin:10px 5px 15px 20px;/*上外边距是 10px;右外边距是5px;下外边距是 15px;左外边距是 20px*/
内边距
与外边距类似,单独设置边框的内边距,设置上、右、下、左方向:
padding-top
padding-right
padding-bottom
padding-left
3.案例
【1】登录注册
<!DOCTYPE html>
<html>
	<head>
		<meta charset="UTF-8">
		<title>网站名称</title>
	</head>
	<style type="text/css">
		/*设置背景图片样式*/
		body{
			background-image: url(../img/bg.jpg);
			background-repeat: no-repeat;
		}
		/*设置表格中插入的图片样式*/
		#customer h1{
			color: gray;
			font-family: "新宋体";
			font-size: 1.3em;
			font-weight: bolder;
		}
		#customer td.img{
			height: 250;
		}
		#customer table.backimg{
			background-image: url(../img/bg1.png);
			width: 725px;
			height: 60%;
		}
		#customer table.text td{
			font-family: "楷体";
			font-size: 20px;
			text-align: center;
			padding: 3px 7px 2px 50px; /*设置边距(上右下左--顺时针) ;*/
		}
	</style>
	<body>
		<table id="customer">
			<tr>
				<td><img src="../img/2.png" height="50" width="250"/></td>
				<td><img src="../img/3.png" height="50" width="250"/></td>
			</tr>
			<tr height="600">
				<td></td>
				<td>
					<table class="backimg">
						<tr>
							<td align="center"><img src="../img/java.png" width="275" height="275"/></td>
							<td>
								<table class="text">

									<tr>
										<td><h1>= 用户登录 USER LOGIN</h1></td>
									</tr>

									<tr>
										<td>
											<p><img src="../img/user.gif" width="25" height="25"/>用户名:<input type="text" name="username"/></p>
										</td>
									</tr>

									<tr>
										<td>
											<p><img src="../img/password.gif" width="25" height="25"/>密--码:<input type="password" name="pwd"/></p>
										</td>
									</tr>

									<tr>
										<td rowspan="2">
											<a href=""><img src="../img/login.jpg"/></a>
											<a href=""><img src="../img/reset.jpg"/></a>
										</td>
									</tr>
									<tr>
									</tr>
								</table>
							</td>
						</tr>
					</table>
				</td>
				<td></td>
			</tr>
		</table>
	</body>
</html>
【2】个人简历
<!DOCTYPE html>
<html>
	<head>
		<meta charset="UTF-8">
		<title>个人简历</title>
	</head>
	<style type="text/css">
		#customer{
			background-color: rgb(242,242,242);
		}

		#customer table.table1css th{
			font-family: "新宋体";
			font-size: 25px;
			text-align: center;
			border:1px solid #808080;
			background-color: rgb(47,117,181);
			color: #ffffff;
		}
		#customer table.table1css td{
			font-family: "楷体";
			font-size: 20px;
			text-align: left;
			color: rgb(31,78,161);
			border: 1px solid #808080;
		}

		#customer table.table2css th{
			font-family: "新宋体";
			font-size: 25px;
			text-align: center;
			color: rgb(31,78,120);
			width: 610px;
		}
		#customer table.table2css td{
			font-family: "楷体";
			font-size: 15px;
			text-align: left;
			color: rgb(31,78,161);
			border: 1px solid midnightblue;
		}

		#customer table.table3css th{
			font-family: "新宋体";
			font-size: 25px;
			text-align: center;
			color: rgb(31,78,120);
			width: 610px;
		}
		#customer table.table3css td{
			font-family: "楷体";
			font-size: 15px;
			text-align: center;
			color: rgb(31,78,161);
			border: 1px solid midnightblue;
		}

	</style>

	<body id="customer">
		<table >
			<tr>
				<td>
					<img src="../icon/user.png" />
				</td>
				<td>
					<table class="table1css" cellspacing="0" cellpadding="0">
						<tr>
							<th colspan="4">基本信息</th>
						</tr>
						<tr>
							<td>性别:</td>
							<td>位置</td>
							<td>年龄:</td>
							<td>18</td>
						</tr>
						<tr>
							<td>籍贯:</td>
							<td>xx</td>
							<td>婚姻:</td>
							<td>xx</td>
						</tr>
						<tr>
							<td>学历:</td>
							<td>本科</td>
							<td>专业:</td>
							<td>计算机科学与技术</td>
						</tr>
						<tr>
							<th colspan="4">联系方式</th>
						</tr>
						<tr>
							<td>手机:</td>
							<td>xxx</td>
							<td>微信:</td>
							<td>xxx</td>
						</tr>
						<tr>
							<td>QQ:</td>
							<td>8008208820</td>
							<td>邮箱:</td>
							<td>8008208820@qq.com</td>
						</tr>
					</table>
				</td>
			</tr>
		</table>

		<table class="table2css" >
			<tr>
				<th>
					<img src="../icon/img1.png" />工作经历
				</th>
			</tr>
			<tr>
				<td>
					2014.01-2014.03               XXXXX广告公司             设计实习生<br />
					●  协助组员完成创意工作,设计初稿的参考 <br />
					●  为项目提供文字与图片材料,并后期编辑图片 <br />
					●  协助广告设计构思新的设计思路、元素;<br />
					●  广告摄影的前期的风格调研,摄影师调研与拍摄日程安排辅助工作 <br />
					<br />
					2013.08-2014.01               XXXXX设计工作室              设计助理<br />
					●  学习优秀设计师相关先进设计理念 <br />
					●  参与鼎天提花面料公司的VI系统设计,包括重新对公司定位,设计标志,拍摄时尚大片,拟订文案,设计宣传手册和企业内部刊物等方面。<br />
					●  参与头脑风暴讨论,协助上司完成各项工作等。<br />
				</td>
			</tr>
		</table>

		<table class="table2css" >
			<tr>
				<th>
					<img src="../icon/img2.png" />教育经历
				</th>
			</tr>
			<tr>
				<td>
					●   2015.09-2019.09   xxx大学   计算机科学与技术本科<br />
					●   2012.09-2015.09   xxx中学   理工科类<br />
				</td>
			</tr>
		</table>

		<table class="table3css" >
			<tr>
				<th>
					<img src="../icon/img1.png" />兴趣爱好
				</th>
			</tr>
			<tr>
				<td>
					游戏 | 旅游 | 乒乓球 | 书籍 | 慢跑<br />
				</td>
			</tr>
		</table>

		<table class="table3css">
			<tr>
				<th>
					<img src="../icon/img1.png" />个人技能
				</th>
			</tr>
			<tr>
				<td>
					<table>
						<tr>
							<td>办公技能</td>
							<td><img src="../icon/bar1.png"  /></td>
							<td>设计技能</td>
							<td><img src="../icon/bar3.png"  /></td>
							<td>工作技能</td>
							<td><img src="../icon/bar1.png"  /></td>
						</tr>
						<tr>
							<td>工作热情</td>
							<td><img src="../icon/bar2.png"  /></td>
							<td>团队合作</td>
							<td><img src="../icon/bar4.png"  /></td>
							<td>沟通能力</td>
							<td><img src="../icon/bar3.png"  /></td>
						</tr>
					</table>
				</td>
			</tr>
		</table>
	</body>
</html>